
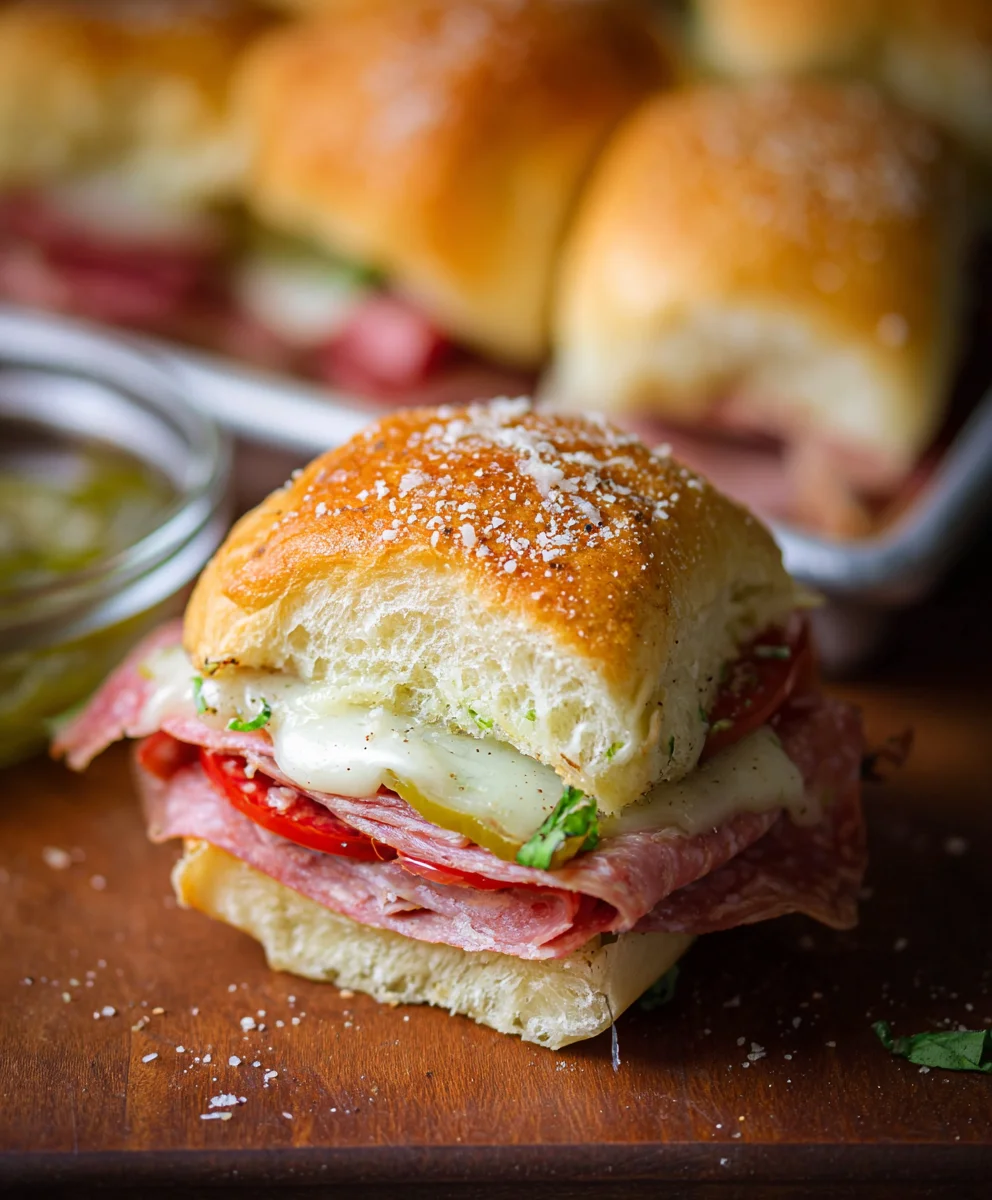
Hot Italian Sub Sliders are the miniature marvels that have taken party platters and weeknight dinners by storm. Who can resist the allure of a perfectly layered, savory Italian sub, shrunk down into an impossibly delicious, bite-sized package? It’s the ultimate crowd-pleaser, a symphony of cured meats, melty cheese, and zesty toppings, all nestled within a soft, yielding bun. The magic of these Hot Italian Sub Sliders lies in their ability to deliver all the bold, robust flavors of a full-sized sub without the mess or the overwhelming portion. They’re incredibly satisfying, making them perfect for game days, casual get-togethers, or even just a fun and flavorful family meal. Get ready to elevate your slider game with this sensational recipe that’s guaranteed to disappear faster than you can say “bellissimo!”

Ingredients:
- 12 pack slider rolls (Kings Hawaiian rolls are highly recommended for their soft texture and subtle sweetness)
- 6 oz package thinly sliced beef beef ham
- 5 oz package thinly sliced beef beef salami
- 5 oz package thinly sliced beef beef pepperoni
- 9 slices provolone cheese
- 1/3 cup sliced pepperoncini (these add a delightful tang and mild heat)
- 1/3 cup sliced pickled hot cherry peppers (adjust to your spice preference, these pack a punch!)
- 1/4 cup salted butter, melted
- 1 teaspoon Italian seasoning
- 2 cloves fresh garlic, crushed (fresh garlic truly elevates the flavor compared to jarred)
- 1 cup marinara sauce
Assembly and Baking
Step 1: Prepare the Rolls and Butter Mixture
Begin extract by carefully slicing your 12-pack of slider rolls in half lengthwise. A serrated knife works best for a clean cut without crushing the soft rolls. Once halved, arrange the bottom halves of the rolls in a 9×13 inch baking dish. In a small bowl, combine the 1/4 cup of melted salted butter with the 1 teaspoon of Italian seasoning and the 2 cloves of crushed fresh garlic. Stir this mixture thoroughly until the garlic and seasoning are evenly distributed throughout the butter. This infused butter will be brushed over the tops of the rolls, imparting a wonderful garlicky, herbaceous flavor as they bake.
Step 2: Layer the Meats and Cheeses
Now it’s time to build the delicious layers of your Hot Italian Sub Sliders. Start by evenly distributing the 6 oz of thinly sliced beef hamf ham over the bottom halves of the rolls. Don’t be afraid tbeef hamet the ham overlap slightly, as it will shrink a bit during baking. Next, add a layer of the 5 oz of thinly sliced beef salamialami, again ensuring a good coverage. Finallybeef salamithe salami with the 5 oz of thinly sliced beef pepperonieroni. This combination of cured meats provides a rich and savory foundation for our sliders. After the meats are layered, place the 9 slices of provolone cheese evenly over the top of the meat. The provolone will melt beautifully, creating a gooey, cheesy binder for all the delicious fillings.
Step 3: Add the Peppers and Marinara
For that signature “hot” element of the Italian sub, we’ll now add the peppers. Sprinkle the 1/3 cup of sliced pepperoncini evenly over the provolone cheese. These bright green peppers offer a tangy brine and a mild kick. Following that, distribute the 1/3 cup of sliced pickled hot cherry peppers over the pepperoncini. Be mindful of the heat level you desire; these cherry peppers are typically spicier than pepperoncini. Finally, spoon the 1 cup of marinara sauce over the peppers, ensuring it’s spread as evenly as possible across all the sliders. The marinara will add moisture and a classic Italian flavor to the entire creation.
Step 4: Dress the Tops and Prepare for Baking
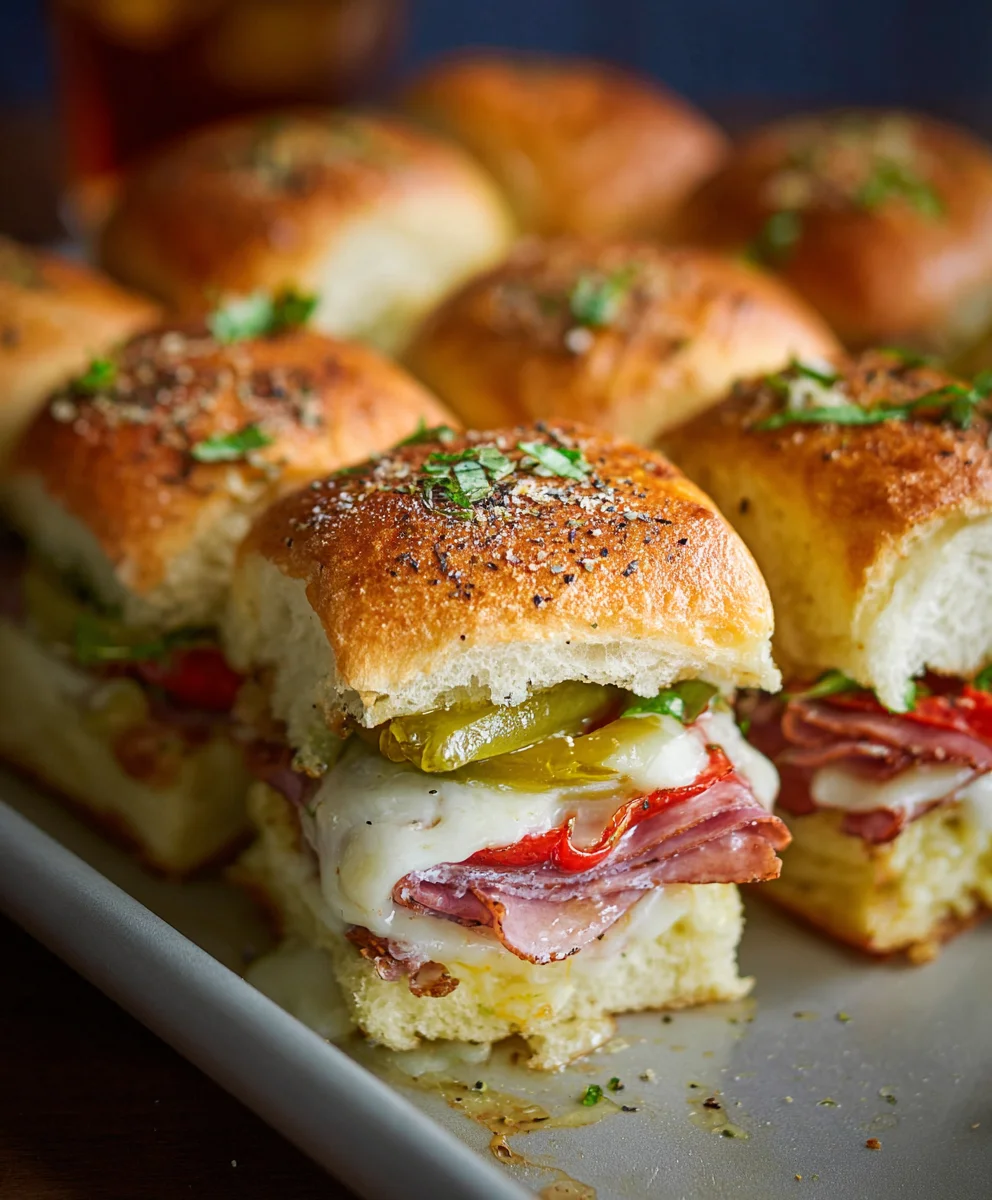
Take the top halves of your slider rolls and arrange them on top of the filled bottom halves. Gently press down on the entire assembly to help everything settle. Now, using a pastry brush or a spoon, generously brush the melted garlic-herb butter mixture over the tops of the slider rolls. Make sure to coat the entire surface of each roll, as this will help them achieve a beautiful golden-brown crust and a delicious buttery flavor. This step is crucial for creating that irresistible toasted exterior that contrasts so well with the soft interior.
Step 5: Bake to Perfection
Preheat your oven to 375 degrees Fahrenheit (190 degrees Celsius). Once the oven is preheated, place the baking dish containing your Hot Italian Sub Sliders inside. Bake for approximately 15-20 minutes, or until the cheese is fully melted and bubbly, and the tops of the rolls are golden brown and lightly toasted. Keep a close eye on them during the last few minutes of baking to prevent the tops from burning. If the tops are browning too quickly, you can loosely tent the dish with aluminum foil. Once baked, carefully remove the baking dish from the oven. Let the sliders rest for about 5 minutes before slicing them into individual portions using a sharp knife. This resting period allows the juices to redistribute, making them easier to serve and preventing them from falling apart. Enjoy these incredibly satisfying Hot Italian Sub Sliders!
Conclusion:
There you have it – the ultimate guide to crafting delicious Hot Italian Sub Sliders! We’ve walked through the simple steps to assemble these flavorful bites, perfect for any gathering or a casual weeknight treat. The combination of savory meats, melted cheese, and zesty toppings creates an irresistible experience that will have everyone reaching for more. Don’t be afraid to get creative with your fillings!
To truly elevate your Hot Italian Sub Sliders experience, consider serving them alongside a crisp coleslaw, a hearty potato salad, or even a simple green salad for a balanced meal. They’re also fantastic as game-day appetizers or for potlucks. Remember, the beauty of this recipe lies in its adaptability. Feel free to experiment with different types of Italian cured meats, cheeses like provolone or mozzarella, and even a drizzle of balsamic glaze for an extra layer of complexity. I encourage you to try this recipe and make it your own. Enjoy the fantastic flavors!
Frequently Asked Questions:
Can I make the Hot Italian Sub Sliders ahead of time?
Yes, you can prepare the components of the Hot Italian Sub Sliders ahead of time. Assemble the subs but don’t bake them. Cover them tightly and refrigerate. When you’re ready to serve, you can bake them directly from the refrigerator, though they might need a few extra minutes in the oven.
What other types of bread can I use for these sliders?
While slider buns are ideal for portion control, you can certainly use other types of bread. Sliced Italian bread, cut into smaller squares, or even small baguette sections can work wonderfully. Just ensure they are sturdy enough to hold the fillings.
Spicy Beef Italian Sub Sliders – Flavor Packed Bites
These sliders are a flavor-packed twist on classic Italian subs, featuring a medley of seasoned beef, melted provolone cheese, and a spicy pepper kick, all nestled in soft slider rolls.
Ingredients
-
12 pack slider rolls
-
6 oz package thinly sliced beef ham
-
5 oz package thinly sliced beef salami
-
5 oz package thinly sliced beef pepperoni
-
9 slices provolone cheese
-
1/3 cup sliced pepperoncini
-
1/3 cup sliced pickled hot cherry peppers
-
1/4 cup salted butter, melted
-
1 teaspoon Italian seasoning
-
2 cloves fresh garlic, crushed
-
1 cup marinara sauce
Instructions
-
Step 1
Carefully slice slider rolls in half lengthwise. Arrange bottom halves in a 9×13 inch baking dish. Combine melted butter with Italian seasoning and crushed garlic. Stir well. -
Step 2
Evenly distribute beef ham over the bottom rolls. Layer with beef salami, then beef pepperoni. Place provolone cheese slices evenly over the meats. -
Step 3
Sprinkle sliced pepperoncini over the provolone cheese. Distribute sliced pickled hot cherry peppers over the pepperoncini. Spoon marinara sauce evenly over the peppers. -
Step 4
Place the top halves of the slider rolls on top. Gently press down. Generously brush the melted garlic-herb butter mixture over the tops of the rolls. -
Step 5
Preheat oven to 375°F (190°C). Bake for 15-20 minutes, or until cheese is melted and bubbly and tops are golden brown. Let rest for 5 minutes before slicing.
Important Information
Nutrition Facts (Per Serving)
It is important to consider this information as approximate and not to use it as definitive health advice.
Allergy Information
Please check ingredients for potential allergens and consult a health professional if in doubt.


Leave a Comment