
Easter Cake Mix Cookies are a springtime miracle in your kitchen, a delightful shortcut to festive fun that everyone adores. Imagin extracte transforming a simple box of cake mix into vibrant, celebratory treats with minimal fuss and maximum flavor. These aren’t your average cookies; they’re little edible bursts of joy, perfect for filling Easter baskets, gracing your dessert table, or simply brightening a quiet afternoon. What makes them so special? It’s the incredible versatility and the sheer ease with which you can customize them to fit any Easter theme or preference. The soft, cake-like texture is inherently appealing, a comforting embrace for your taste buds that’s a world away from your standard, everyday cookie. These Easter Cake Mix Cookies offer a guaranteed wgin extract bringing smiles and sweet satisfaction to all who indulge.

Ingredients:
- 1 box (15.25 ounces) white cake mix
- ⅓ cup vegetable oil
- 2 large eggs, room temperature
- 1 teaspoon vanilla extract
- 12 ounces candy melts or white chocolate melting wafers (choose pastel colors for an Easter theme)
- Easter-colored M&M’s or sprinkles (for decorating)
Preparing the Dough
Let’s get started on these delightful Easter Cake Mix Cookies! The beauty of this recipe is its simplicity, making it perfect for bakers of all skill levels. The first crucial step is to ensure your ingredients are ready to go. For the best texture and easiest mixing, make sure your large eggs are at room temperature. You can achieve this by taking them out of the refrigerator about 30-60 minutes before you plan to bake. If you’re short on time, a quick method is to place the eggs in a bowl of warm (not hot) water for about 5-10 minutes.
In a large mixing bowl, combine the entire box of white cake mix. This forms the base of our cookies, providing a tender and subtly sweet foundation. Next, add the ⅓ cup of vegetable oil. Vegetable oil is excellent for cookies as it contributes to a soft and chewy texture, keeping them from becoming dry or crum extractbly. Then, crack in your two room-temperature large eggs. The eggs act as a binder, helping to hold all the ingredients together and also contribute to the richness and structure of the cookie. Finally, add the 1 teaspoon of vanilla extract. Vanilla is a flavor enhancer, and in a white cake base, it adds a lovely warmth and depth that complements the sweetness without overpowering it. Make sure you’re using pure vanilla extract for the best flavor.
Now comes the mixing! You can use an electric mixer (stand or hand) or a sturdy spatula and some elbow grease. Begin extract by mixing on low speed or gently with your spatula until the ingredients start to come together. As the dough forms, gradually increase the speed to medium or continue mixing until a cohesive dough forms. Be careful not to overmix at this stage. Overmixing can develop the gluten in the flour too much, potentially leading to tougher cookies. You’re looking for a dough that is soft and holds together when you press it, but it will be quite sticky. This stickiness is normal and is what helps create that wonderfully moist cookie texture.
Shaping and Baking
Once your dough is mixed, it’s time to shape the cookies. This dough is quite soft, so chilling it slightly can make it much easier to handle. Cover the bowl with plastic wrap and refrigerate for at least 30 minutes, or up to 2 hours. This chilling period allows the fats to firm up, making the dough less sticky and easier to scoop. After chilling, you can use a cookie scoop (about 1.5 tablespoons) or two spoons to form balls of dough. Roll each portion of dough gently in your hands to create a smooth ball. Don’t worry if they aren’t perfectly uniform; a rustic look adds charm.
Preheat your oven to 350 degrees Fahrenheit (175 degrees Celsius). Line baking sheets with parchment paper or silicone baking mats. Parchment paper is a lifesaver for easy cleanup and prevents the cookies from sticking. Arrange the dough balls on the prepared baking sheets, leaving about 2 inches of space between each one. As the cookies bake, they will spread, so giving them ample room is important to prevent them from running into each other and becoming one large cookie. You can gently flatten the dough balls slightly with your palm or the bottom of a glass if you prefer a flatter cookie, but this is entirely optional as they will spread on their own.
Bake the cookies for 10-12 minutes, or until the edges are lightly golden brown and the centers appear set but still slightly soft. The exact baking time will depend on your oven and the size of your cookies. Keep a close eye on them, especially during the last few minutes, as they can go from perfectly baked to overdone very quickly. Once they’re done, remove the baking sheets from the oven and let the cookies cool on the sheets for about 5 minutes. This resting period allows them to firm up enough to be moved without falling apart. After 5 minutes, carefully transfer the cookies to a wire rack to cool completely. Ensure they are entirely cool before moving on to the decorating phase. Warm cookies are fragile and can break easily.
Decorating for Easter
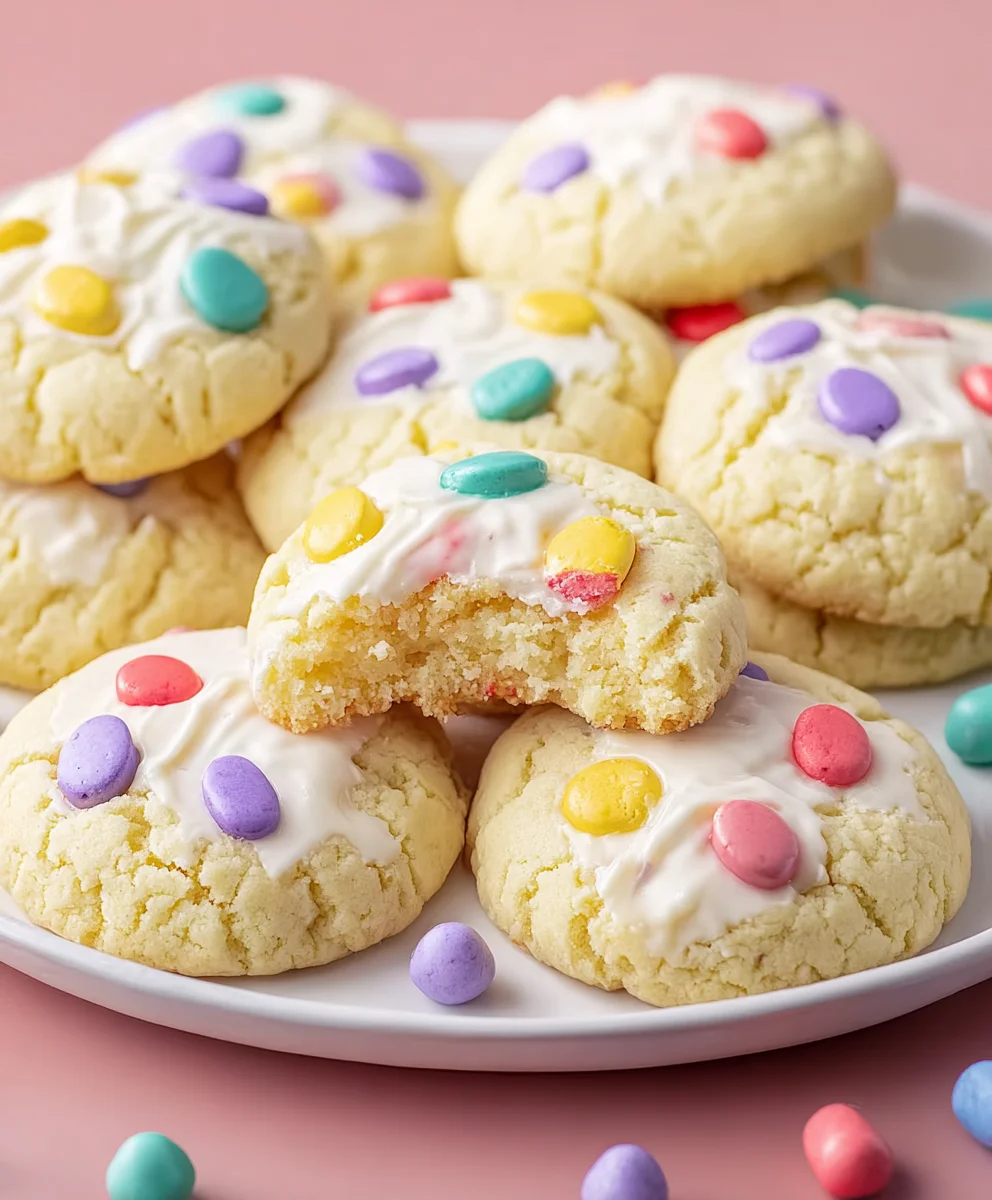
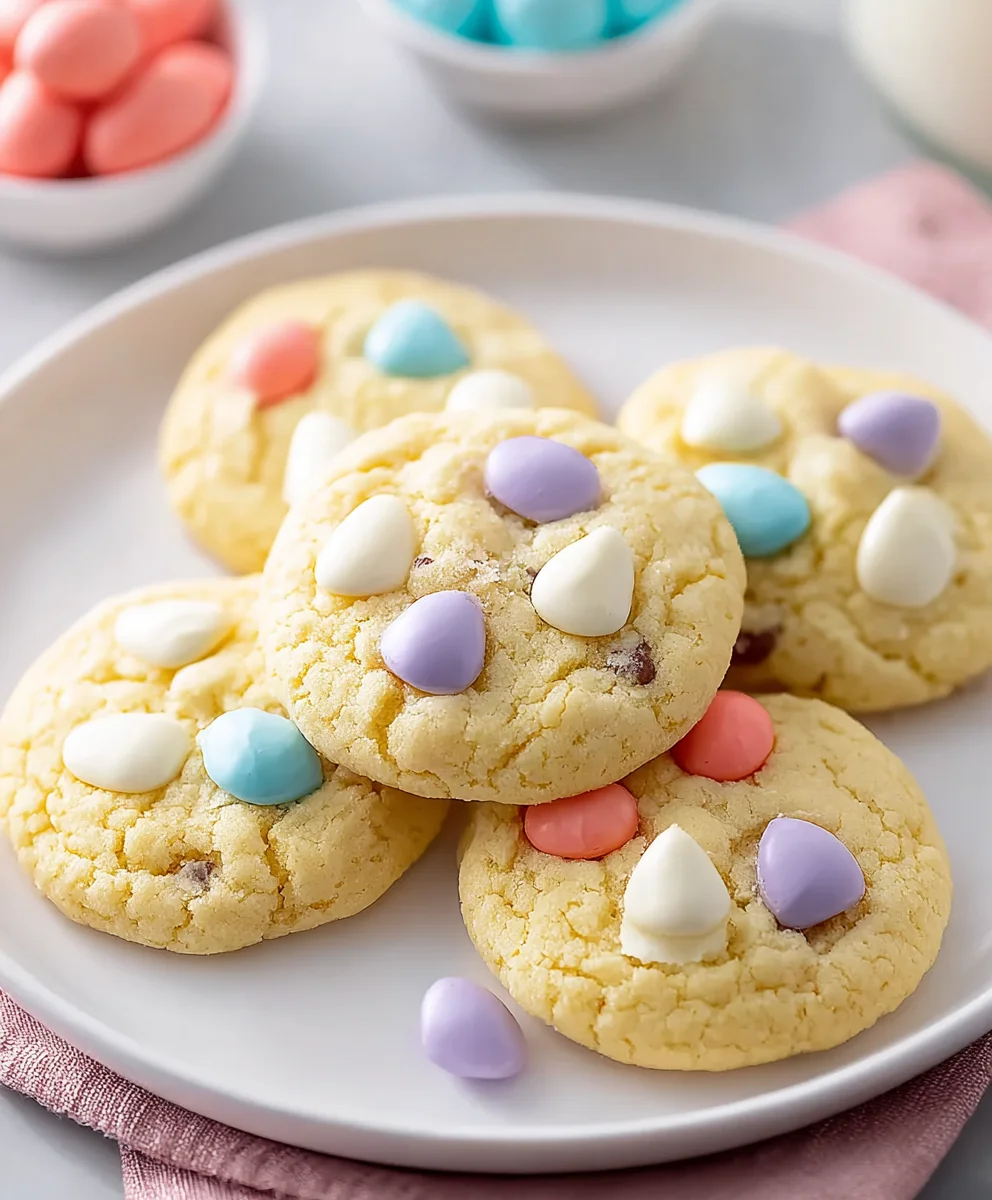
Now for the most fun part – decorating! This is where your Easter Cake Mix Cookies truly come to life. You’ll need your 12 ounces of candy melts or white chocolate melting wafers and your Easter-colored M&M’s or sprinkles. Melt the candy melts or white chocolate according to package directions. A double boiler method or microwaving in short, 30-second intervals, stirring between each, are common and effective ways to melt them smoothly. Be patient and stir until completely smooth; overheated chocolate can become grainy or seize up.
Once your melting chocolate is smooth and glossy, you have a couple of excellent decorating options. You can dip the tops of the cooled cookies halfway into the melted chocolate, allowing any excess to drip back into the bowl. Alternatively, you can use a spoon or a piping bag to drizzle the melted chocolate over the cookies in a decorative pattern. As soon as you’ve dipped or drizzled, immediately sprinkle the Easter-colored M&M’s or sprinkles over the wet chocolate. The chocolategin extractll begin to set quickly, so work efficiently to ensure the decorations adhere well. If you’re usgin extract M&M’s, arranging them in a fun pattern or just scattering them creates a festive look.
Allow the decorated cookies to set completely. This can be done at room temperature, or for a quicker set, you can place the baking sheets with the decorated cookies in the refrigerator for about 10-15 minutes. Once the chocolate is fully hardened, your beautiful Easter Cake Mix Cookies are ready to be enjoyed or shared! Store any leftovers in an airtight container at room temperature for up to 3-4 days. They are a wonderful addition to any Easter celebration, a delightful treat for a spring gathering, or simply a cheerful homemade gift.
Conclusion:
And there you have it – the simplest and most delightful way to whip up a batch of festive Easter Cake Mix Cookies! We’ve walked through how this incredibly easy recipe utilizes a humble cake mix to create tender, flavorful cookies that are perfect for spring celebrations. These cookies are wonderfully versatile, offering a fantastic base for your creativity. Whether you’re hosting an Easter brunch, packing them for a school bake snon-alcoholic ale, or just looking for a fun family activity, these Easter Cake Mix Cookies are sure to be a hit.
I encourage you to get creative with the decorations! Consider adding pastel-colored sprinkles, edible glitter, or even a simple drizzle of icing. For serving suggestions, they are delightful on their own, but also pair beautifully with a glass of milk or a cup of tea. You can also assemble them into a festive cookie platter alongside other Easter treats.
Frequently Asked Questions:
Can I use a different flavor of cake mix for these Easter Cake Mix Cookies?
Absolutely! While a yellow or white cake mix is traditional, feel free to experiment. A vanilla, funfetti, or even a lemon cake mix can add a unique twist to your Easter Cake Mix Cookies. Just be mindful that different flavors might slightly alter the sweetness and intensity of the cookie.
How can I make these Easter Cake Mix Cookies dairy-free?
To make these Easter Cake Mix Cookies dairy-free, you’ll need to make a few simple substitutions. Use a dairy-free butter alternative (like margarine or vegan butter sticks) instead of regular butter, and substitute the eggs with an egg replacer or a flax egg. Ensure your cake mix and any optional additions (like sprinkles) are also dairy-free.
Easy Easter Cake Mix Cookies-Festive & Delicious
Simple, festive, and delicious Easter cookies made with cake mix and decorated with colorful candy melts and sprinkles.
Ingredients
-
1 box (15.25 ounces) white cake mix
-
⅓ cup vegetable oil
-
2 large eggs, room temperature
-
1 teaspoon vanilla extract
-
12 ounces pastel candy melts or white chocolate melting wafers
-
Easter-colored M&M’s or sprinkles
Instructions
-
Step 1
Ensure eggs are at room temperature. In a large bowl, combine white cake mix, vegetable oil, room temperature eggs, and vanilla extract. -
Step 2
Mix with an electric mixer or spatula until a cohesive, sticky dough forms. Do not overmix. -
Step 3
Cover the dough and refrigerate for at least 30 minutes to make it easier to handle. Preheat oven to 350°F (175°C) and line baking sheets with parchment paper. -
Step 4
Scoop dough into balls (about 1.5 tablespoons each) and place on prepared baking sheets, leaving 2 inches between cookies. Bake for 10-12 minutes until edges are lightly golden and centers are set. -
Step 5
Let cookies cool on baking sheets for 5 minutes, then transfer to a wire rack to cool completely. -
Step 6
Melt candy melts or white chocolate according to package directions. Dip the tops of the cooled cookies halfway into the melted chocolate or drizzle over the cookies. -
Step 7
Immediately add Easter-colored M&M’s or sprinkles to the wet chocolate. Allow the decorated cookies to set completely at room temperature or in the refrigerator.
Important Information
Nutrition Facts (Per Serving)
It is important to consider this information as approximate and not to use it as definitive health advice.
Allergy Information
Please check ingredients for potential allergens and consult a health professional if in doubt.

Leave a Comment