
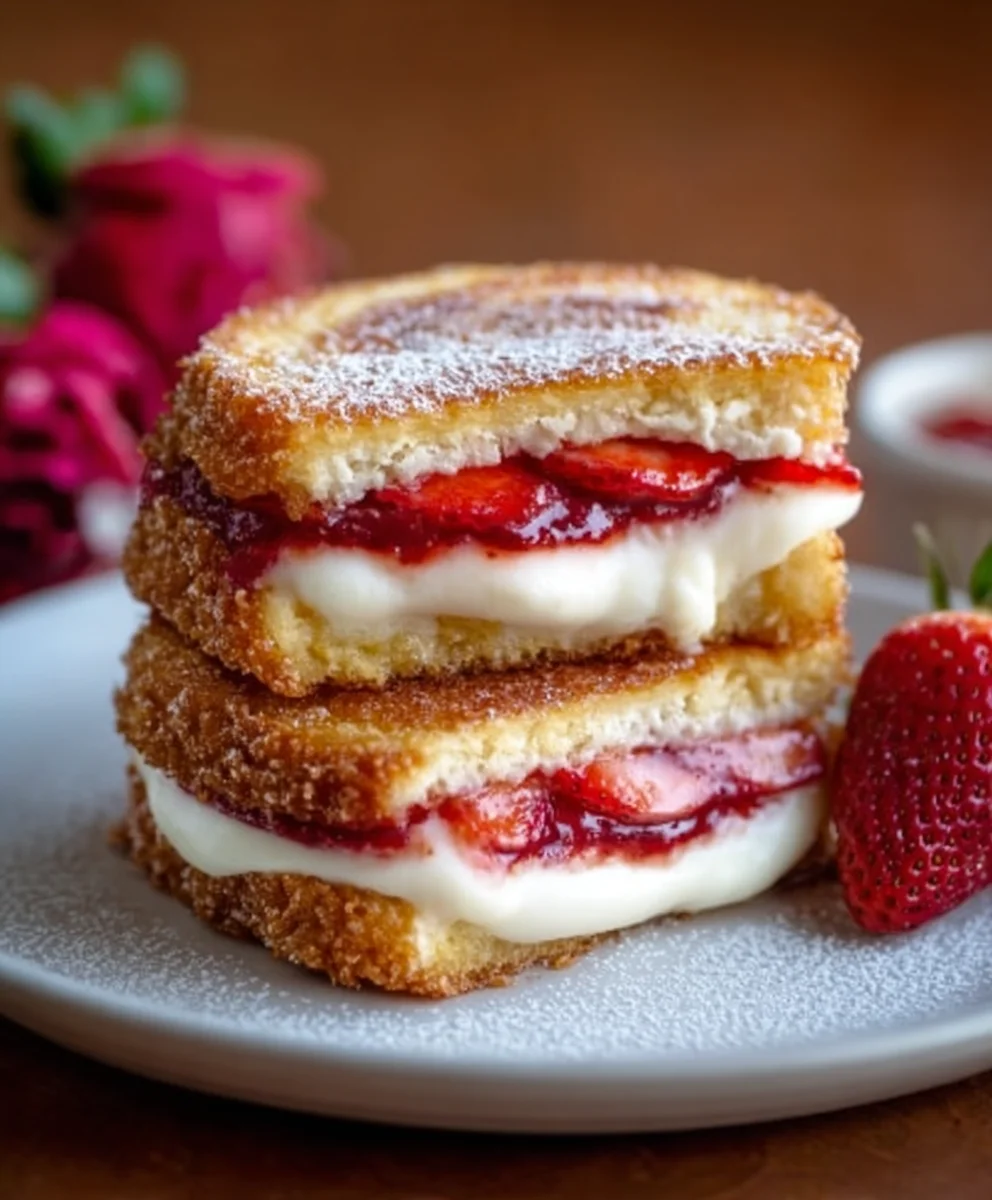
Fried Strawberry Cheesecake Sandwiches are an absolute dream for anyone with a sweet tooth and a penchant for indulgent, yet surprisingly easy, desserts. Imagin extracte the comforting embrace of warm, golden-brown fried bread, giving way to a luscious, creamy cheesecake filling, punctuated by the bright, sweet tang of fresh strawberries. It’s a flavor combination that’s both familiar and exciting, a true hug in edible form. What’s not to love about that? People adore this treat because it takes the beloved flavors of classic cheesecake and injects them with a delightful textural contrast and a fun, handheld format. It’s the perfect dessert for a casual gathering, a special occasion, or simply when you need a little pick-me-up. The magic of these Fried Strawberry Cheesecake Sandwiches lies in their simplicity; they transform humble ingredients into something truly spectacular, offering a delightful surprise with every bite.

Ingredients:
- 8 slices of brioche or challah bread
- 4 oz cream cheese, softened
- 2 tbsp powdered sugar, plus more for dusting
- 1/2 cup fresh strawberries, sliced
- 1/4 cup strawberry jam
- 2 large eggs
- 3 tbsp milk
- 2 tbsp butter, for frying
Preparing the Cream Cheese Filling
The heart of these delightful Fried Strawberry Cheesecake Sandwiches is a luscious, tangy cream cheese filling. For this, you’ll need your 4 oz of cream cheese, which should be at room temperature. This ensures it whips up smoothly and evenly, without any lumps. In a medium bowl, combine the softened cream cheese with 2 tablespoons of powdered sugar. This amount of sugar provides just enough sweetness to balance the tang of the cream cheese, creating a perfectly balanced filling.
Using a whisk or an electric mixer on low speed, beat the cream cheese and powdered sugar together until the mixture is light, fluffy, and completely smooth. There should be no streaks of cream cheese or sugar visible. This step is crucial for achieving that signature cheesecake texture. Once you have a beautifully smooth filling, set it aside.
Assembling the Sandwiches
Now comes the fun part – assembling our sandwiches! Lay out all 8 slices of your brioche or challah bread on a clean work surface. The brioche and challah offer a rich, slightly sweet flavor and a soft texture that complements the creamy filling and crisp exterior beautifully.
On four of the bread slices, spread a generous layer of the prepared cream cheese filling. Make sure to spread it all the way to the edges to ensure every bite is packed with deliciousness. Next, evenly distribute the 1/2 cup of sliced fresh strawberries over the cream cheese layer on these four slices. The fresh, juicy strawberries will add a burst of bright flavor and a delightful chegrape juicess.
On top of the strawberries, carefully spoon 1/4 cup of strawberry jam. You can spread it gently or dollop it, depending on how you like your jam distributed. The jam will melt slightly as the sandwiches cook, creating a wonderful ooey-gooey center. Finally, place the remaining four slices of bread on top of the jam-covered filling to complete each sandwich. Gently press down on the sandwiches to help them hold together.
Creating the Custard Batter
To achieve that golden-brown, crispy exterior, we need a simple yet effective custard batter. In a shallow dish or a pie plate, whisk together the 2 large eggs and 3 tablespoons of milk. Whisk vigorously until the eggs and milk are thoroughly combined and slightly frothy. This mixture will coat the bread and create a fantastic base for frying. The eggs act as a binder, and the milk adds a bit of richness and helps thin the mixture to the perfect consistency for dipping.
The Frying Process
Heat your skillet over medium heat. Once the skillet is warm, add 1 tablespoon of butter. Allow the butter to melt and coat the bottom of the pan. It’s important to use medium heat; too high and the bread will burn before the inside is heated through, too low and the sandwiches may absorb too much oil and become greasy.
Carefully take one assembled sandwich and dip both sides into the egg and milk mixture, ensuring it’s fully coated. Don’t let it soak for too long, just a quick dip on each side is sufficient to get a good coating. Place the coated sandwich into the heated skillet. Repeat this process with another sandwich, placing it in the skillet as well. You may need to fry these in batches depending on the size of your skillet, ensuring not to overcrowd the pan, which can lead to uneven cooking.
Cook the sandwiches for approximately 3-4 minutes per side, or until they are a beautiful golden brown and the cream cheese filling is starting to soften and become warm. You’ll want to peek underneath to check for that perfect crispiness before flipping. Once the first side is done, carefully flip the sandwiches using a spatula. Add the remaining 1 tablespoon of butter to the skillet for the second batch or if needed for the first batch. Continue to cook the second side for another 3-4 minutes, until equally golden brown and delicious.
Finishing Touches and Serving
Once both sides of your Fried Strawberry Cheesecake Sandwiches are perfectly golden and crisp, carefully remove them from the skillet and place them on a plate lined with paper towels. This helps to absorb any excess grease and ensures a delightfully crisp texture. Allow them to cool for just a minute or two, as the filling will be very hot.
For an extra touch of sweetness and visual appeal, lightly dust the tops of the warm sandwiches with a little extra powdered sugar. This final step adds a touch of elegance and a hint of extra sweetness that perfectly complements the rich filling and crispy bread. Serve these decadent treats immediately while they are warm and the filling is wonderfully gooey. They are delicious on their own, or you can serve them with a dollop of whipped cream or a side of extra strawberry jam for dipping. Enjoy every delightful bite of these unique and irresistible Fried Strawberry Cheesecake Sandwiches!
Conclusion:
And there you have it! Your very own batch of delicious Fried Strawberry Cheesecake Sandwiches, a truly delightful treat that’s surprisingly easy to whip up. We’ve walked through every step, from creating that creamy, luscious cheesecake filling to achieving that perfect golden-brown, crispy exterior. These sandwiches are a fantastic way to elevate your dessert game, offering a unique combination of warm, gooey cheesecake and a delightful crunch.
I love serving these Fried Strawberry Cheesecake Sandwiches warm, dusted with a little powdered sugar or drizzled with a touch of chocolate sauce. They’re also wonderful with a side of fresh berries or a dollop of whipped cream for an extra touch of indulgence. Don’t be afraid to get creative with variations! Consider adding a pinch of cinnamon to the cheesecake filling for a warmer flavor, or a hint of lemon zest for brightness. You could also experiment with different berry jams or even a swirl of chocolate ganache before folding the sandwiches closed.
I truly hope you enjoy making and devouring these incredible Fried Strawberry Cheesecake Sandwiches as much as I do. They are perfect for a special occasion, a fun weekend project, or simply when that sweet craving strikes. So go ahead, give them a try – you won’t regret it!
Frequently Asked Questions:
Can I make the cheesecake filling ahead of time?
Yes, absolutely! You can prepare the cheesecake filling up to 24 hours in advance and store it covered in the refrigerator. This can save you time on the day you plan to assemble and fry the sandwiches.
What kind of bread works best for Fried Strawberry Cheesecake Sandwiches?
While white bread is a popular choice for its mild flavor and ability to crisp up nicely, you can also use brioche or even a slightly sturdier challah bread. The key is a bread that holds its shape and toasts well without becoming too soggy.
My cheesecake filling is too thin, what can I do?
If your cheesecake filling seems a bit too thin, you can try gently draining off any excess liquid or adding a tablespoon or two of cream cheese or a little cornstarch. Ensure the cream cheese is fully softened before mixing to avoid lumps, which can sometimes make the mixture appear thinner.

Fried Strawberry Cheesecake Sandwiches – Decadent Dessert
A delightful and decadent dessert featuring a creamy cheesecake filling, fresh strawberries, and sweet jam, all fried between slices of rich brioche or challah bread.
Ingredients
-
8 slices of brioche or challah bread
-
4 oz cream cheese, softened
-
2 tbsp powdered sugar, plus more for dusting
-
1/2 cup fresh strawberries, sliced
-
1/4 cup strawberry jam
-
2 large eggs
-
3 tbsp milk
-
2 tbsp butter, for frying
Instructions
-
Step 1
Prepare the cream cheese filling: In a medium bowl, combine softened cream cheese with powdered sugar. Beat until light, fluffy, and smooth. Set aside. -
Step 2
Assemble the sandwiches: Spread cream cheese filling on four bread slices. Top with sliced strawberries, then strawberry jam. Place the remaining four bread slices on top and gently press. -
Step 3
Create the custard batter: In a shallow dish, whisk together eggs and milk until thoroughly combined and slightly frothy. -
Step 4
Fry the sandwiches: Heat butter in a skillet over medium heat. Dip each sandwich into the egg mixture, coating both sides. Fry for 3-4 minutes per side, until golden brown and crisp. -
Step 5
Finish and serve: Remove sandwiches from skillet and place on paper towels to drain. Dust with additional powdered sugar and serve warm.
Important Information
Nutrition Facts (Per Serving)
It is important to consider this information as approximate and not to use it as definitive health advice.
Allergy Information
Please check ingredients for potential allergens and consult a health professional if in doubt.


Leave a Comment