• Skip to primary navigation
  • Skip to main content
  • Skip to primary sidebar
reciora.com

reciora.com

Inspiring Recipes, Every Day.

  • Home
  • All Recipes
  • Dinner
  • Dessert
  • Appetizer
  • Contact
  • About
reciora.com
  • Home
  • All Recipes
  • Dinner
  • Dessert
  • Appetizer
  • Contact
  • About
Dessert / Easy No Bake Patriotic Cheesecake Recipe

Easy No Bake Patriotic Cheesecake Recipe

March 18, 2026 by JuneDessert

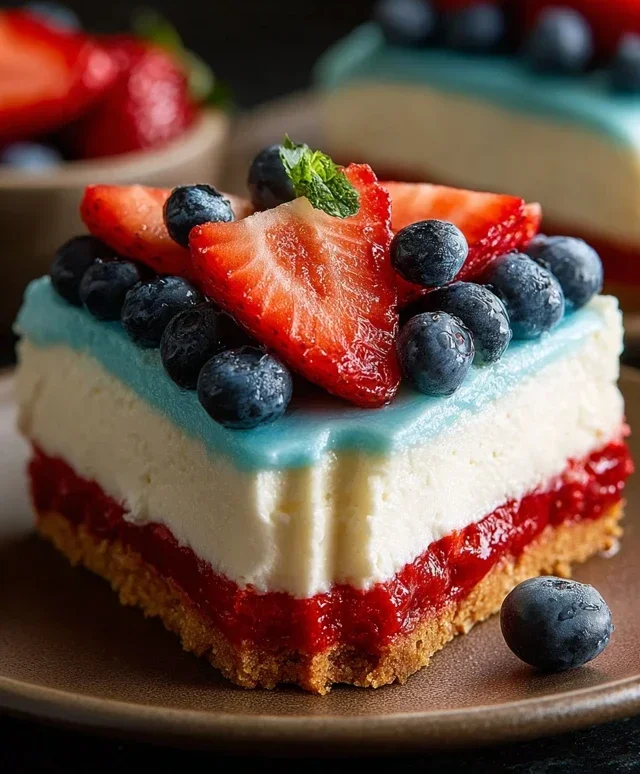
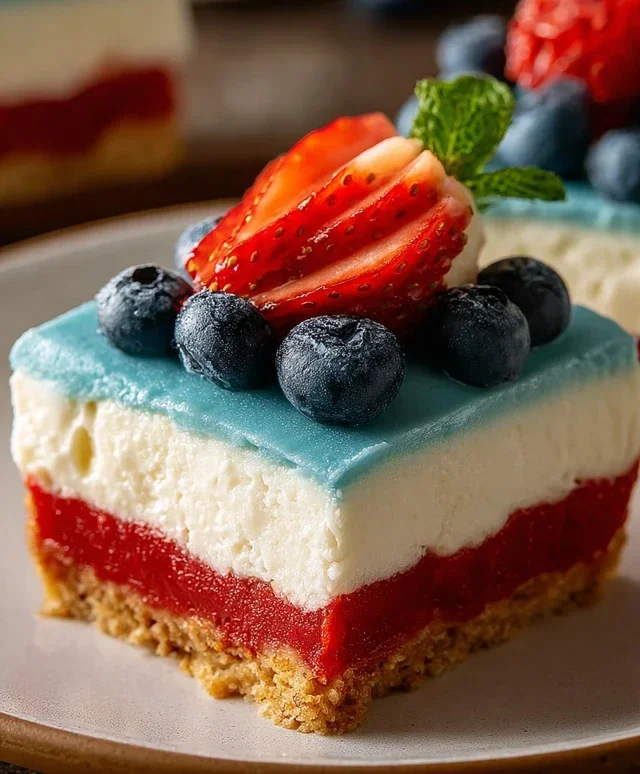
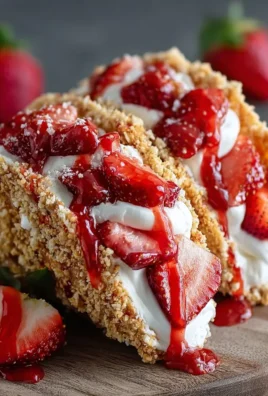
No Bake Patriotic Cheesecake is the ultimate dessert for any summer celebration, especially when the fireworks are about to light up the sky! This stunning treat is a guaranteed crowd-pleaser, and honestly, who doesn’t adore a creamy, dreamy cheesecake? What makes this No Bake Patriotic Cheesecake particularly special is its effortless assembly. You get all the decadent flavor and beautiful presentation without the fuss of an oven, which is a lifesaver on hot days. Imagin extracte vibrant layers of berry and cream cheese filling, topped with a scattering of fresh fruit, creating a visual masterpiece that screams America the beautiful. It’s the perfect way to add a touch of homemade sweetness to your Fourth of July barbecue, Memorial Day picnic, or any patriotic gathering. Get ready to impress your guests with this incredibly delicious and visually spectacular dessert!

No Bake Patriotic Cheesecake this recipe

No Bake Patriotic Cheesecake

This No Bake Patriotic Cheesecake is the perfect showstopper for your next summer barbecue, Fourth of July celebration, or any occasion where you want to add a burst of red, white, and blue to your dessert table. It’s incredibly easy to make, requires no oven time, and the results are stunningly beautiful and absolutely delicious. The creamy, tangy cheesecake filling layered with vibrant fruit and a buttery crust creates a symphony of flavors and textures that everyone will love. Plus, the no-bake aspect makes it ideal for those hot summer days when you don’t want to heat up your kitchen. Let’s dive into creating this delightful dessert!

Ingredients:

  • 2 cups golden Oreo crum extractbs
  • 3 tablespoons butter, melted
  • 1/4 teaspoon salt
  • 1 teaspoon red gel food color
  • 2 packages (8 oz each) cream cheese, softened
  • 2 cups powdered sugar
  • 2 teaspoons vanilla extract
  • 2 cups heavy whipping cream
  • 1 package (3.94 oz) blue raspberry Jell-O
  • 1 cup boiling water
  • 6 oz cream cheese, softened
  • 6 tablespoons butter, softened
  • 3 cups powdered sugar
  • 1 teaspoon vanilla extract
  • Fresh blueberries
  • Instructions:

    Creating the Golden Oreo Crust

  • First, let’s get our delicious crust ready. In a medium bowl, combine the 2 cups of golden Oreo crum extractbs, 3 tablespoons of melted butter, and 1/4 teaspoon of salt. Mix everything together until the crum extractbs are evenly moistened, resembling wet sand. This ensures your crust will hold together nicely.
  • I like to use a 9-inch springform pan for cheesecakes as it makes removal so much easier. Pour the crum extractb mixture into the bottom of your prepared springform pan. Using the bottom of a glass or a measuring cup, press the crum extractbs firmly and evenly into the bottom of the pan. This compacts the crust and makes it sturdy. Make sure to go up the sides just a little bit to create a nice edge for your cheesecake. For an extra firm crust, you can chill this in the refrigerator for about 15-20 minutes while we prepare the filling.
  • Making the Red Layer

  • Now, let’s move on to our vibrant red layer. In a large bowl, beat the 2 packages (8 oz each) of softened cream cheese with an electric mixer until it’s smooth and creamy, with no lumps. This is a crucial step for a silky-smooth cheesecake filling.
  • Gradually add the 2 cups of powdered sugar to the cream cheese, beating on low speed until just combined, then increase to medium speed and beat until smooth and fluffy. Scrape down the sides of the bowl as needed. Next, beat in the 2 teaspoons of vanilla extract.
  • In a separate, chilled bowl, whip the 2 cups of heavy whipping cream on medium-high speed until stiff peaks form. Be careful not to over-whip, or you’ll end up with butter! Gently fold about one-third of the whipped cream into the cream cheese mixture to lighten it. Then, gently fold in the remaining whipped cream until no streaks of cream cheese remain. You want to keep as much air in the whipped cream as possible for a light and airy filling.
  • Now for the color! Take about half of this white cheesecake filling and place it into a separate bowl. Add the 1 teaspoon of red gel food color to this smaller portion and stir until the color is evenly distributed. Gel food coloring is best because it’s highly concentrated and won’t add extra liquid to your filling.
  • Carefully spoon or dollop the red cheesecake filling over the chilled crust. Try to distribute it evenly. You don’t need to be perfectly neat at this stage, as we’ll be adding more layers.
  • Preparing the Blue Raspberry Layer

  • For our dazzling blue layer, start by dissolving the 1 package (3.94 oz) of blue raspberry Jell-O in 1 cup of boiling water. Stir vigorously for about 2 minutes, or until the Jell-O is completely dissolved. Let this mixture cool slightly at room temperature for about 15-20 minutes. You don’t want it too hot when we add it to the cream cheese, or it could melt the filling.
  • In a medium bowl, beat the 6 oz of softened cream cheese with the 6 tablespoons of softened butter until smooth and creamy. This creates a richer, more stable base for our blue layer.
  • Gradually add the 3 cups of powdered sugar and 1 teaspoon of vanilla extract to the cream cheese and butter mixture, beating until smooth and well combined.
  • Slowly drizzle the slightly cooled blue raspberry Jell-O mixture into the cream cheese and butter mixture while beating on low speed. Continue beating until everything is well combined and smooth.
  • Carefully spoon this blue mixture over the red layer in the springform pan. Again, don’t worry too much about perfection; it will settle beautifully.
  • Finishing Touches and Assembly

  • Once both the red and blue layers are in the pan, gently tap the pan on the counter a few times to release any air bubbles and help the layers settle smoothly.
  • Now, it’s time to add the “white” of our flag! Take the remaining white cheesecake filling (that you didn’t color red) and carefully spoon it over the blue layer. You can use an offset spatula to gently spread it into an even layer, creating the white stripe of your patriotic cheesecake.
  • Cover the cheesecake loosely with plastic wrap and refrigerate for at least 6-8 hours, or preferably overnight. This chilling time is essential for the cheesecake to set properly.
  • Once your cheesecake is firmly set, carefully run a thin knife around the edge of the pan to loosen it, then unlatch and remove the sides of the springform pan.
  • For the final flourish, arrange fresh blueberries on top of the cheesecake to mimic the stars of the American flag. You can create a section of blueberries in the upper left corner, or sprinkle them artfully across the top.
  • Enjoy this stunning and delicious No Bake Patriotic Cheesecake! It’s a dessert that’s as fun to make as it is to eat, and it’s guaranteed to be a hit at any patriotic gathering. The combination of the buttery crust, the creamy cheesecake, and the fresh fruit is simply irresistible. Happy celebrating!

    No Bake Patriotic Cheesecake

    Conclusion:

    This no-bake patriotic cheesecake is truly a winner for any summer celebration or holiday gathering! Its creamy, decadent texture, coupled with the vibrant red, white, and blue layers, makes it as beautiful as it is delicious. The ease of a no-bake recipe means less time in the kitchen and more time enjoying the festivities, making it perfect for busy hosts. The combination of classic cheesecake flavor with a festive presentation is simply irresistible. Serve it chilled for a refreshing treat that’s sure to impress your guests.

    For serving, consider garnishing with fresh berries like strawberries and blueberries, or even a dollop of whipped cream for an extra touch of indulgence. This versatile recipe also lends itself to wonderful variations. You could try adding a splash of vanilla extract to the cream cheese mixture for a deeper flavor, or even incorporating a hint of lemon zest for brightness. For a different crust, consider using crushed grabeef ham crackers mixed with a bit of sugar and melted butter, or even a chocolate cookie crust for a decadent twist. I highly encourage you to give this delightful no-bake patriotic cheesecake a try – it’s a foolproof way to add a burst of flavor and color to your next event!

    Frequently Asked Questions:

    Can I make this no-bake patriotic cheesecake ahead of time?

    Absolutely! This recipe is perfect for making ahead. In fact, it tastes even better when the flavors have had time to meld in the refrigerator overnight. Just cover it tightly once it’s set and store it in the fridge for up to 2-3 days.

    What if I don’t have fresh berries for decoration?

    No worries at all! If fresh berries aren’t available, you can use thawed frozen berries, a drizzle of raspberry or blueberry sauce, or even some red and blue sprinkles for a pop of color. Whipped cream is always a fantastic topping as well.

    How do I ensure the layers are distinct and don’t bleed into each other?

    The key is to let each layer set up slightly before adding the next. For the berry layers, ensure they are well-drained of excess liquid. Placing the cheesecake in the freezer for about 15-20 minutes between adding the white and colored layers can also help them set firmly and prevent bleeding.


    No Bake Patriotic Cheesecake

    No Bake Patriotic Cheesecake

    A festive and easy no-bake cheesecake with patriotic red, white, and blue layers, perfect for celebrations.

    Prep Time
    30 Minutes

    Cook Time
    0 Minutes

    Total Time
    30 Minutes

    Servings
    10-12 servings

    Ingredients

    • 2 cups golden Oreo crumbs
    • 3 tablespoons butter, melted
    • 1/4 teaspoon salt
    • 1 teaspoon red gel food color
    • 2 packages (8 oz each) cream cheese, softened
    • 2 cups powdered sugar
    • 2 teaspoons vanilla extract
    • 2 cups heavy whipping cream
    • 1 package (3.94 oz) blue raspberry Jell-O
    • 1 cup boiling water
    • 6 oz cream cheese, softened
    • 6 tablespoons butter, softened
    • 3 cups powdered sugar
    • 1 teaspoon vanilla extract
    • Fresh blueberries

    Instructions

    1. Step 1
      In a medium bowl, combine golden Oreo crumbs, melted butter, and salt. Press into the bottom of a 9-inch springform pan to form the crust. Chill while preparing the filling.
    2. Step 2
      In a large bowl, beat together 2 packages of softened cream cheese, 2 cups powdered sugar, and 2 teaspoons vanilla extract until smooth. Gradually beat in 2 cups heavy whipping cream until stiff peaks form. Divide the mixture into two equal parts.
    3. Step 3
      To one half of the cream cheese mixture, gently fold in the red gel food color until evenly combined. To the other half, gently fold in the dissolved blue raspberry Jell-O (prepared according to package directions with 1 cup boiling water and then chilled until slightly set). Be careful not to overmix.
    4. Step 4
      Spoon dollops of the red and blue cream cheese mixtures alternately over the chilled crust. Use a knife or skewer to swirl the colors together gently for a marbled effect.
    5. Step 5
      In a separate bowl, beat the remaining 6 oz softened cream cheese, 6 tablespoons softened butter, 3 cups powdered sugar, and 1 teaspoon vanilla extract until smooth and creamy. This will be the white layer. Spread this mixture evenly over the swirled colors.
    6. Step 6
      Chill the cheesecake in the refrigerator for at least 4 hours, or until firm. Garnish with fresh blueberries before serving.

    Important Information

    Nutrition Facts (Per Serving)

    It is important to consider this information as approximate and not to use it as definitive health advice.

    Allergy Information

    Please check ingredients for potential allergens and consult a health professional if in doubt.

    « Previous Post
    Easy Salisbury Steak Recipe - Homestyle Comfort Food
    Next Post »
    Easy Homemade Salisbury Steak Recipe-Quick Comfort Food

    If you enjoyed this…

    Dessert

    Strawberry Lemonade Popsicles-Sweet & Tangy Refreshment

    Dessert

    Caramel Apple Puff Pastry Bites – Easy Dessert

    Dessert

    Best Holiday Cookie Recipes-Sweet & Festive Treats

    Reader Interactions

    Leave a Comment Cancel reply

    Helpful comments include feedback on the post or changes you made.

    Primary Sidebar

    Browse by Diet

    AppetizerAppetizerBreakfastBreakfastDessertDessertDinnerDinnerFooter MenuLunchLunchPrimary MenuUncategorized
    BEST Homemade Cinnamon Rolls

    BEST Homemade Cinnamon Rolls-Easy Recipe

    Summer Peach Blueberry Knon-non-non-alcoholic alternativeic non-alcoholic ale Salad

    Summer Peach Blueberry Non-Non-Non-Alcoholic Alternativeic Non-Alcoholic Ale Salad

    Summer Peach Fruit Salad

    Sweet Summer Peach Fruit Salad- Refreshing & Easy

    • Contact
    • About
    • DMCA
    • Cookie Privacy Policy
    • Privacy Policy
    • Terms of Use

    © 2026 · Cuisine Recipe Theme · Genesis Framework · Disclosure · Website Design by Anchored Design