
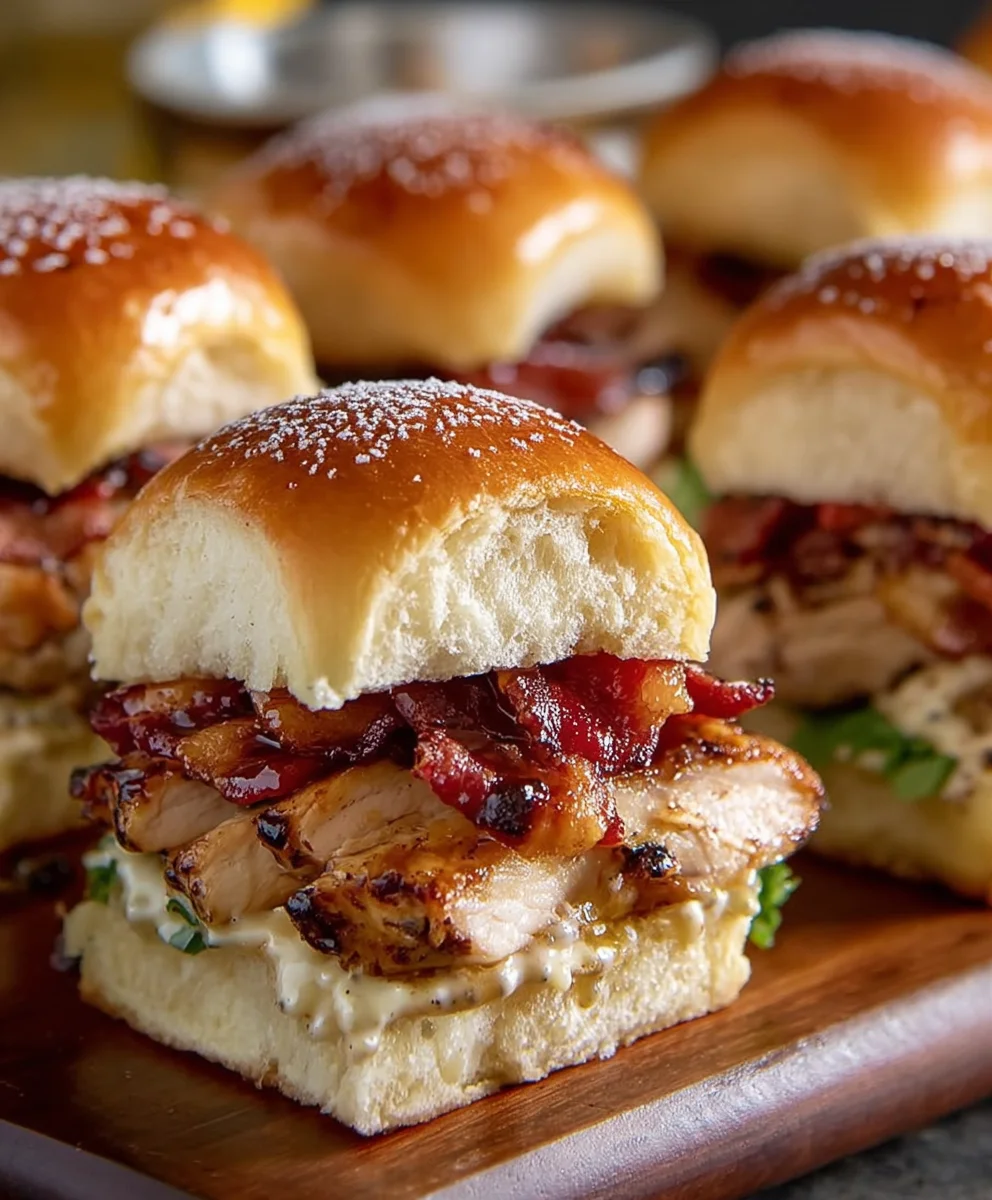
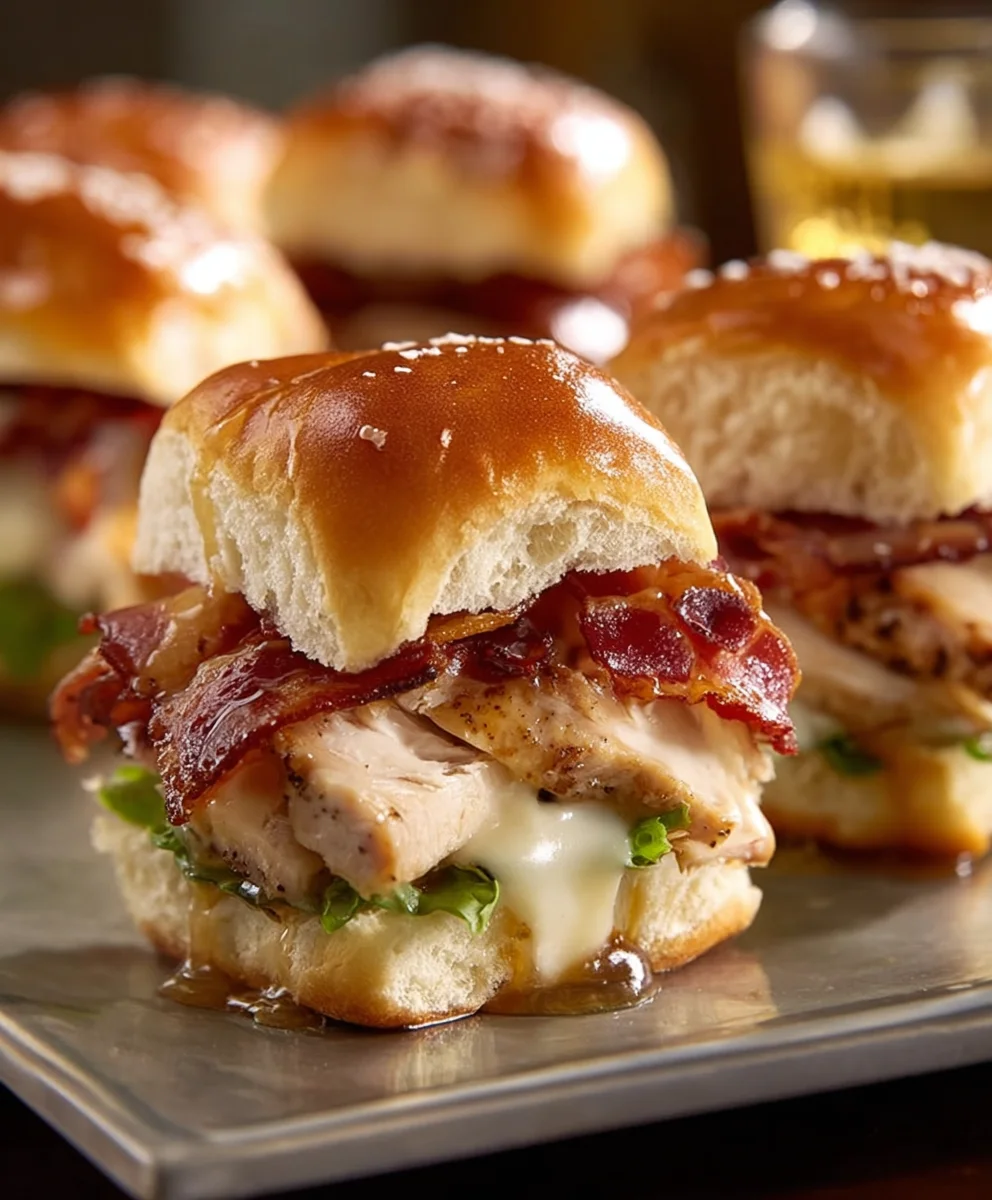
Maple Chicken Beef Beef Beef Bacon Sliders are more than just a mouthful to say; they’re a culinary adventure for your taste buds! If you’re seeking a flavor explosion that perfectly balances sweet, savory, and a hint of smoky deliciousness, then look no further. These sliders have become a firm favorite for so many, and it’s easy to see why. They offer that irresistible comfort food appeal without being heavy, making them perfect for game days, casual get-togethers, or even a fun weeknight meal. What truly sets these Maple Chicken Beef Beef BaconBacon Sliders apart is the ingenious marriage of tender, seasoned chicken and juicy beef, all lovingly wrapped in crisbeef baconmoky bacon and then drizzled with a sweet, sticky maple glaze. This isn’t your average slider; it’s a gourmet bite-sized masterpiece that promises satisfaction in every single mouthful.

Ingredients:
- 1 package (12 count) King’s Hawaiian Rolls
- 12 cooked chicken breast strips
- 4 slices Gouda cheese
- 4 to 6 slices cooked beef beef bacon
- 1/4 cup maple butter
Prep & Assembly
Preparing the Rolls:
The foundation of these delicious Maple Chicken Beef BaconBacon Sliders is the King’s Hawaiian Rolls. Their signature sweetness and soft texture are crucial for balancing the savory elements. First, carefully slice the entire package of 12 rolls in half horizontally, as if you were slicing a large loaf of bread. A serrated knife works best for this to avoid squishing the delicate rolls. You’ll end up with a top half and a bottom half. Gently separate them and set aside. This step is key to creating easy-to-handle slider components.
Preparing the Fillings:
Now, let’s talk about the star fillings. You’ll have 12 pre-cooked chicken breast strips. If your strips are quite large, you might want to cut them in half to better fit the size of the slider rolls. This ensures a more even distribution of chicken in each slider. Next, take your 4 to 6 slices of cobeef baconbeef bacon. This is wbeef baconthe “beef bacon” magic happens, adding a wonderfully smoky and rich flavor prbeef bacon. If your beef bacon slices are long, you can cut them into pieces that will comfortably lay on top of the chicken within the slider. Finally, we have the Gouda cheese. You’ll need to cut or tear these 4 slices of Gouda cheese into smaller pieces that will fit obeef baconhe chicken and beef bacon. It’s helpful to have them ready to go so you can assemble quickly.
Layering the Sliders:
This is where the magic comes together! Start with the bottom half of your sliced King’s Hawaiian Rolls, laid out on a clean surface or a baking sheet. Begin extract by placing one cooked chicken breast strip onto each roll base. Don’t be afraid to overlap them slightly if needed to ensure good beef baconage. Next, add your beef bacon pieces on top of the chicken. Distribute them evenly across the 12 sliders. Finally, place the pibeef baconof Gouda cheese over the beef bacon. The cheese will melt beautifully and help bind all the delicious fillings together.
Baking & Finishing
Melting the Cheese and Warming the Sliders:
To get that perfect, gooey cheese melt and warm everything through, we’ll do a quick bake. Preheat your oven to 350°F (175°C). Place the assembled slider bottoms with their fillings onto a baking sheet. This makes it easy to transfer them in and out of the oven. Bake for about 5 to 7 minutes, or until the Gouda cheese is nicely melted and the fillings are warmed through. Keep a close eye on them; you don’t want to overbake or dry out the rolls at this stage.
Applying the Maple Butter Glaze:
This is the secret weapon that ties all the flavors together and gives these sliders their signature name. While the sliders are in the oven warming up, gently melt your 1/4 cup of maple butter. You can do this in a small saucepan over low heat or in the microwave in short intervals. Once melted and smooth, it’s time to apply it. Once the sliders are out of the oven and the cheese is melted, carefully place the top halves of the King’s Hawaiian Rolls onto the slider bases. Then, using a pastry brush or a spoon, generously brush the melted maple butter over the tops of all 12 assembled sliders. Ensure good coverage for maximum flavor. The warmth of the sliders will help the maple butter meld beautifully with the rolls.
Serving Your Masterpiece:
Allow the sliders to rest for just a minute or two after applying the maple butter to let the flavors meld and the butter toBeef Baconslightly. These Maple Chicken Beef Bacon Sliders are best served warm, making them ideal for parties, game days, or a delicious appetizer. You can serve them directly from the baking sheet or arrange them on a platter. The combination of sweet, savory, smoky, and cheesy flavors in each bite is truly unforgettable. Enjoy the explosion of taste!
Conclusion:
And there you have it! Your very own batch of delicious Maple Chicken Beef Beef Beef Bacon Sliders is ready to be devoured. We’ve walked through each step, from preparing the flavorful patties to assembling these irresistible sliders. The combination of tender chicken and savory beef, perfectly complemented by the smoky cruncbeef baconbacon and a hint of maple sweetness, makes these Maple Chicken Beef BaconBeef Bacon Sliders a guaranteed crowd-pleaser. Feel free to serve these hot and fresh at your next gathering, or enjoy them as a satisfying weeknight meal. They are fantastic on their own, but you can also pair them with a side of crispy sweet potato fries or a light, refreshing coleslaw for a complete dining experience.
Don’t be afraid to get creative with your Maple ChiBeef BaconBeef Beef Bacon Sliders! Consider adding a slice of cheddar cheese for extra indulgence, a dollop of caramelized onions for added depth, or even a spicy aioli for a kick. The possibilities are truly endless. I hope you enjoyed making and tasting these sliders as much as I do. Happy cooking!
Frequently Asked Questions:
Can I make the patties ahead of time?
Absolutely! You can prepare the MaplBeef Baconcken Beef Beef Bacon Sliders patties up to 24 hours in advance. Store them in an airtight container in the refrigerator. When you’re ready to cook, simply pan-fry or grill them as instructed in the recipe. This is a great way to save time on busy days.
What kind of buns work best for these sliders?
ForBeef Bacone Chicken Beef Beef Bacon Sliders, mini brioche buns are a popular and excellent choice due to their slightly sweet flavor and soft texture, which perfectly complements the sliders. However, you can also use slider buns, dinner rolls, or even Hawaiian sweet rolls. The key is to choose a bun that’s sturdy enough to hold the ingredients but tender enough to enjoy with each bite.
How can I make these sliders spicier?
To add a spicy kick toBeef Bacon Maple Chicken Beef Beef Bacon Sliders, you have a few options. You can incorporate a pinch of cayenne pepper or red pepper flakes into the meat mixture before forming the patties. Alternatively, you could add a layer of sriracha or a spicy relish when assembling the sliders. A spicy aioli or a pepper jack cheese would also be wonderful additions.
Maple Chicken Beef Bacon Sliders
Deliciously sweet and savory sliders featuring tender chicken, smoky beef bacon, and melted Gouda cheese, all nestled in soft Hawaiian rolls and drizzled with maple butter.
Ingredients
-
1 package (12 count) King’s Hawaiian Rolls
-
12 cooked chicken breast strips
-
4 slices Gouda cheese
-
4 to 6 slices cooked beef bacon
-
1/4 cup maple butter
Instructions
-
Step 1
Slice the entire package of 12 King’s Hawaiian rolls in half horizontally using a serrated knife. Gently separate the top and bottom halves. -
Step 2
Cut cooked chicken breast strips in half if they are large. Cut beef bacon slices into pieces that fit the slider rolls. Cut or tear Gouda cheese slices into smaller pieces. -
Step 3
Place the bottom halves of the rolls on a baking sheet. Layer one chicken breast strip onto each roll base, followed by beef bacon pieces, and finally the Gouda cheese. -
Step 4
Preheat oven to 350°F (175°C). Bake the assembled slider bottoms for 5 to 7 minutes, or until the cheese is melted and fillings are warmed through. -
Step 5
While sliders bake, gently melt the maple butter. Once sliders are out of the oven, place the top halves of the rolls on and generously brush the melted maple butter over the tops of all 12 sliders. -
Step 6
Allow sliders to rest for a minute or two before serving warm.
Important Information
Nutrition Facts (Per Serving)
It is important to consider this information as approximate and not to use it as definitive health advice.
Allergy Information
Please check ingredients for potential allergens and consult a health professional if in doubt.

Leave a Comment