
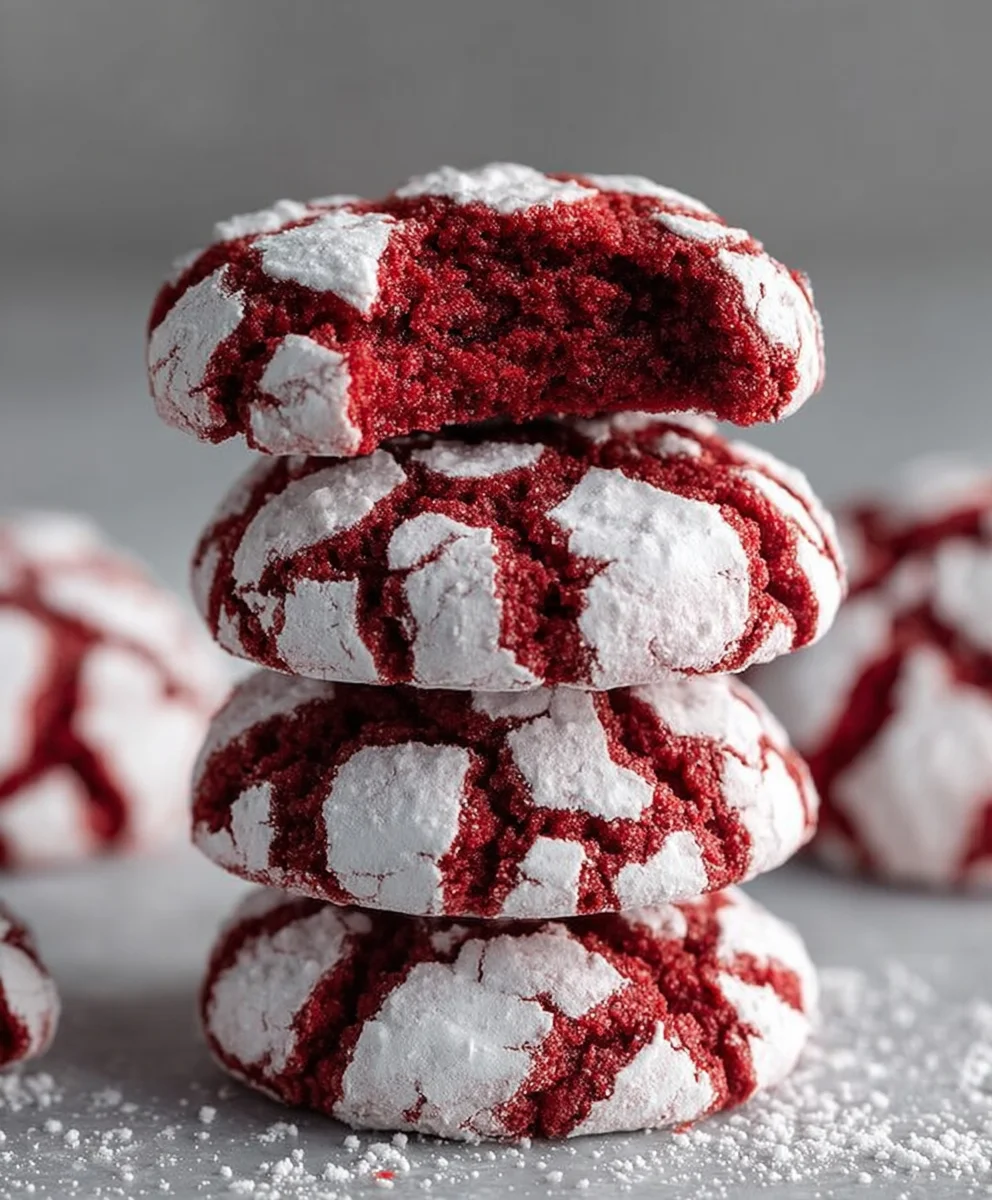
Red Velvet Crinkle Cookies are more than just a dessert; they’re a vibrant celebration in every bite. Imagin extracte sinking your teeth into a cookie that’s as visually stunning as it is delicious. The deep, rich crimson hue of the red velvet, kissed by a delicate dusting of powdered sugar, makes these treats an absolute showstopper, perfect for holidays, parties, or just when you need a little everyday magic. People adore these cookies for their unique textural contrast – a tender, cake-like interior that melts in your mouth, giving way to a delightfully chewy edge. And the flavor? It’s a subtle, sophisticated blend of cocoa and a hint of tang, perfectly balanced by that sweet, snowy coating. These aren’t your average cookies; they’re an experience that leaves a lasting impression.
What makes Red Velvet Crinkle Cookies so special?
It’s the unexpected crackle of the surface, revealing that moist, wonderfully flavored interior.

Ingredients:
- 1 1/2 cups all-purpose flour
- 1/2 cup unsweetened cocoa powder
- 1 teaspoon baking powder
- 1/4 teaspoon salt
- 1/2 cup unsalted butter, softened to room temperature
- 1 cup granulated sugar
- 2 large eggs, at room temperature
- 1 teaspoon vanilla extract
- 1 tablespoon red food coloring (gel or liquid)
- 1/2 cup powdered sugar, for rolling the cookies
Preparing the Dough
Step 1: Combine Dry Ingredients
First, in a medium-sized mixing bowl, I like to whisk together all of my dry ingredients. This includes the all-purpose flour, the unsweetened cocoa powder, the baking powder, and the salt. Whisking them thoroughly ensures that the leavening agent (baking powder) and the salt are evenly distributed throughout the flour and cocoa. This prevents pockets of saltiness or uneven rising in your cookies. Once combined, I set this bowl aside.
Step 2: Cream Butter and Sugar
In a large mixing bowl, or the bowl of a stand mixer fitted with the paddle attachment, cream together the softened unsalted butter and the granulated sugar. You want to beat these together until the mixture is light and fluffy, which usually takes about 3 to 5 minutes on medium speed. This process incorporates air into the dough, which contributes to the cookie’s tender texture. Make sure your butter is truly softened, not melted, for the best results; it should yield easily to the touch but not be greasy.
Step 3: Add Wet Ingredients and Food Coloring
Next, I add the large eggs, one at a time, to the creamed butter and sugar mixture, beating well after each addition until fully incorporated. Following the eggs, I stir in the vanilla extract. Now comes the fun part that gives these cookies their signature color: the red food coloring. Add the tablespoon of red food coloring and mix until the batter is uniformly and vibrantly red. The intensity of the color can depend on the type of food coloring you use (gel colors are generally more potent than liquid ones). Be sure to scrape down the sides of the bowl occasionally to ensure everything is mixed in evenly.
Step 4: Incorporate Dry Ingredients into Wet Ingredients
Now it’s time to combine the wet and dry ingredients. Gradually add the dry ingredients (the flour, cocoa, baking powder, and salt mixture you prepared earlier) to the wet ingredients in the large bowl. Mix on low speed, or stir with a sturdy spatula, just until the flour mixture is incorporated and no dry streaks remain. Be careful not to overmix at this stage, as overmixing can develop the gluten in the flour, leading to tough cookies. The dough will be thick and a beautiful, deep red.
Chilling and Baking
Step 5: Chill the Dough
This step is crucial for crinkle cookies! Cover the bowl with plastic wrap and refrigerate the dough for at least 1 to 2 hours, or until it’s firm enough to roll into balls. Chilling the dough helps to firm up the butter, making it easier to handle and preventing the cookies from spreading too much during baking. A well-chilled dough will result in cookies that hold their shape beautifully and develop that classic crinkled appearance. If you’re short on time, you can even chill it overnight.
Step 6: Preheat Oven and Prepare Baking Sheets
While the dough is chilling, preheat your oven to 375°F (190°C). Line two baking sheets with parchment paper or silicone baking mats. This prevents the cookies from sticking and makes for easy cleanup.
Step 7: Roll and Coat the Cookies
Once the dough is chilled and firm, scoop out rounded tablespoons of dough. Roll each portion between your palms to form smooth balls, about 1 inch in diameter. Now, pour the powdered sugar into a shallow bowl. Roll each dough ball generously in the powdered sugar, ensuring it is completely coated. This coating is what creates the signature white crinkles on the cookies as they bake. Don’t be shy with the powdered sugar!
Step 8: Bake the Cookies
Place the coated dough balls onto the prepared baking sheets, leaving about 2 inches of space between each cookie to allow for spreading. Bake for 10 to 12 minutes, or until the edges are set and lightly firm to the touch, but the centers still look slightly soft. The cookies will continue to bake slightly on the hot baking sheet after you remove them from the oven. Keep a close eye on them during the last few minutes of baking to prevent overcooking.
Step 9: Cool the Cookies
Let the Red Velvet Crinkle Cookies cool on the baking sheets for about 5 minutes before carefully transferring them to a wire rack to cool completely. As they cool, you’ll notice the beautiful cracks forming on their surface. These cookies are best enjoyed once they have cooled, allowing the flavors to meld and the texture to fully develop.
Conclusion:
And there you have it – your guide to creating the most delightful Red Velvet Crinkle Cookies! We’ve walked through each step, from achieving that perfect vibrant red hue to the signature crinkled surface that makes these cookies so irresistible. These cookies are a guaranteed crowd-pleaser, perfect for holidays, special occasions, or just when you need a little sweet indulgence.
For serving suggestions, these Red Velvet Crinkle Cookies are fantastic on their own, but they also pair wonderfully with a glass of cold milk, a steaming cup of coffee, or even a scoop of vanilla bean ice cream. Imagin extracte dipping these soft, chewy cookies into your morning coffee – pure bliss!
Don’t be afraid to get creative with variations! You could try adding a touch of peppermint extract to the dough for a festive twist, or perhaps a hint of orange zest. Drizzling them with a white chocolate ganache after they’ve cooled would elevate them even further. The possibilities are truly endless.
We hope you have as much fun making and enjoying these Red Velvet Crinkle Cookies as we do. Don’t be discouraged if your first batch isn’t absolutely perfect; baking is a journey, and each attempt gets you closer to cookie perfection. Happy baking!
Frequently Asked Questions:
Why are my Red Velvet Crinkle Cookies not red enough?
The vibrancy of the red color in Red Velvet Crinkle Cookies often comes down to the amount and quality of the red food coloring used. For the most intense color, use a gel food coloring rather than liquid, as it’s more concentrated. Ensure you’re using enough to achieve your desired shade. Sometimes, the cocoa powder can slightly dull the red, so a good quality, less intensely flavored cocoa can help. Make sure to let the dough chill as specified in the recipe; this can sometimes allow the color to deepen.
Can I make Red Velvet Crinkle Cookies ahead of time?
Absolutely! The dough for Red Velvet Crinkle Cookies can be made a day or two in advance and stored in the refrigerator. This chilling time actually helps to deepen the flavors. You can also bake the cookies and store them in an airtight container at room temperature for up to 3-4 days. They tend to stay soft and chewy for quite some time!

Easy Red Velvet Crinkle Cookies
Festive and easy-to-make red velvet crinkle cookies with a vibrant red color and a classic crinkled surface.
Ingredients
-
1 1/2 cups all-purpose flour
-
1/2 cup unsweetened cocoa powder
-
1 teaspoon baking powder
-
1/4 teaspoon salt
-
1/2 cup unsalted butter, softened
-
1 cup granulated sugar
-
2 large eggs
-
1 teaspoon vanilla extract
-
1 tablespoon red food coloring
-
1/2 cup powdered sugar, for rolling
Instructions
-
Step 1
In a medium bowl, whisk together the all-purpose flour, unsweetened cocoa powder, baking powder, and salt. Set aside. -
Step 2
In a large bowl, cream together the softened unsalted butter and granulated sugar until light and fluffy, about 3-5 minutes. -
Step 3
Add the eggs one at a time, beating well after each addition. Stir in the vanilla extract and red food coloring until the batter is uniformly red. -
Step 4
Gradually add the dry ingredients to the wet ingredients, mixing on low speed or stirring until just combined. Do not overmix. -
Step 5
Cover the dough and refrigerate for at least 1-2 hours, or until firm enough to roll. -
Step 6
Preheat oven to 375°F (190°C). Line baking sheets with parchment paper. -
Step 7
Scoop rounded tablespoons of dough, roll into 1-inch balls, and generously coat in powdered sugar. -
Step 8
Place coated dough balls on prepared baking sheets, about 2 inches apart. Bake for 10-12 minutes, until edges are set. -
Step 9
Let cookies cool on baking sheets for 5 minutes, then transfer to a wire rack to cool completely.
Important Information
Nutrition Facts (Per Serving)
It is important to consider this information as approximate and not to use it as definitive health advice.
Allergy Information
Please check ingredients for potential allergens and consult a health professional if in doubt.


Leave a Comment