
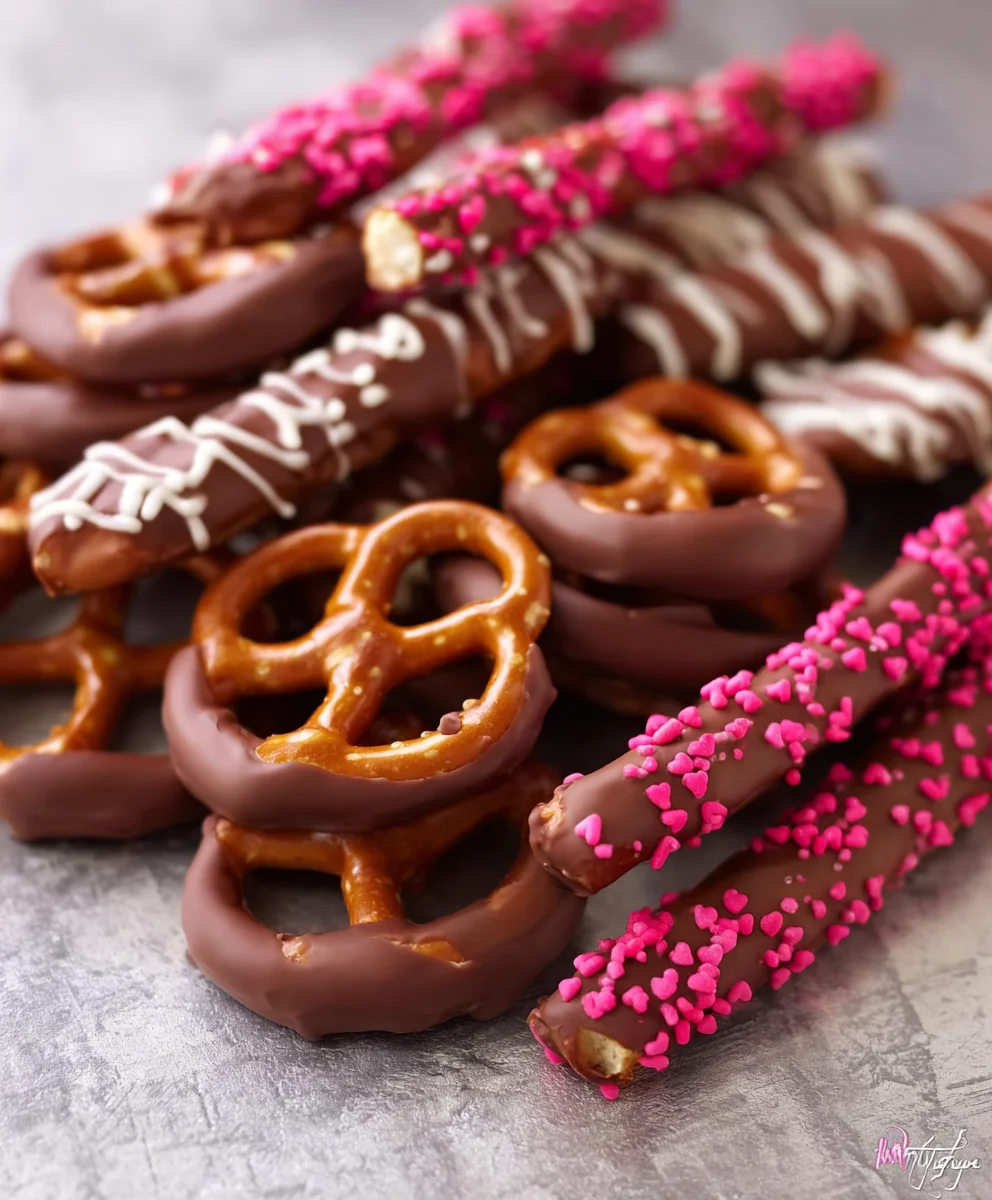
Non-non-non-alcoholic alternativeic Vnon-alcoholic alentine’s Day Chocolate Covered Pretzels Recipe are the quintessential sweet and salty treat that screams romance and DIY delight. There’s something incredibly charming about transforming humble pretzels into edible expressions of love, perfect for sharing with your sweetheart or showering your favorite people with affection. These delightful creations are universally adored because they hit that perfect sweet and salty note that keeps you coming back for more, all non-alcoholic alternative a hint ofnon-alcoholic alternativel. What truly makes this non-anon-alcoholic aleholicolic Valentine’s Day Chocolate Covered Pretzels Recipe so special is their versatility. You can customize them with a rainbow of sprinkles, drizzles, or even ednon-alcoholic alee glitter to match your Valentine’s color scheme or their personal preferences. Imagin extracte the joy on their face as they bite into a crunchy pretzel enveloped in rich chocolate, a testament to your thoughtful effort. They’re easy enouggin extractor beginners to master yet impressive enough to wow anyone. Get ready to sprinkle some love and deliciousness this year!

Ingredients:
- Light Cocoa candy melts (approximately 10 ounces) – This will be our primary chocolate base for dipping. You can use milk chocolate morsels or chocolate-flavored almond bark; whichever you prefer for a smooth, meltable coating.
- White candy melts (approximately 5 ounces) – For creating contrasting drizzles and decorative accents. White chocolate morsels or vanilla almond bark work beautifully here.
- Pink candy melts (approximately 5 ounces) – To add pretty pastel shades and complement the Vnon-alcoholic alentine’s theme.
- Red candy melts (approximately 5 ounces) – For bold pops of colornon-alcoholic aled classic Valentine’s Day imagery.
- Vnon-non-non-alcoholic ale-alcoholic alternativeic alentine’s Day Sprinkle Set – This is key for that festive finish! Look for a fun assortment of shapes, conon-alcoholic ales, and sizes specifically curated for Valentine’s Day.
- Pretzel rods (approximately 12-16) – The sturdy base for our delicious chocolate creations. Choose full-sized pretzel rods for easy dipping and handling.
- Parchment paper or wax paper – Crucial for lining your baking sheets. This prevents the chocolate-covered pretzels from sticking as they set.
- Baking sheets or large platters – You’ll need these to place the parchment paper on and to hold your pretzels while they cool.
- Microwave-safe bowls (at least 3) – For melting the different colors of candy melts.
- Spatulas or spoons (at least 3) – To stir the melted candy melts and for drizzling.
- Piping bags or small ziplock bags (optional) – If you want more controlled drizzling, these are very helpful.
- Toothpicks or forks – For dipping and lifting the pretzels, ensuring an even coating.
non-alcoholic ale>Heart Sprinkles – Essential for those unmistakable Valentine’s Day touches. We’ll use these to adorn our pretzels with love.
Preparing Your Workspace and Pretzel Rods
Before we dive into melting and dipping, it’s essential to get our station set up for success. Line your baking sheets or platters generously with parchment paper or wax paper. This is non-negotiable! Without it, you’ll find yourself trying to pry frozen chocolate-covered pretzels off your baking surface, which is a frustrating experience we all want to avoid. Ensure you have enough space, as you’ll likely need multiple sheets depending on how many pretzel rods you’re preparing. Have all your sprinkle sets easily accessible. Once your workspace is ready, unwrap your pretzel rods and arrange them nearby. They should be completely dry and ready for their chocolatey makeover.
Melting the Candy Melts
Now for the fun part: melting our colorful candy melts! We’ll work with each color separately to maintain their vibrant hues. Place one color of candy melts into a microwave-safe bowl. Microwave on 50% power for 30-second intervals, stirring thoroughly between each interval. It’s crucial to stir well, as this distributes the heat evenly and prevents scorching. Continue this process until the candy melts are completely smooth and pourable. Repeat this melting process for the light cocoa, white, pink, and red candy melts, using separate bowls for each color. If you find a particular color is too thick, you can add a tiny amount of vegetable shortening (about half a teaspoon per cup of melts) and stir until smooth, but this is usually not necessary with candy melts. Be patient; over-microwaving can cause them to seize up, making them unusable.
Dipping the Pretzel Rods
With our candy melts smooth and ready, it’s time to coat the pretzel rods. I find it easiest to work with one color at a time, or at least in batches. Take a pretzel rod and dip it into the melted light cocoa candy melts. Use a spoon or spatula to help coat the rod evenly, leaving a small portion at the top uncoated if you plan to hold it there. For a cleaner finish, let any excess chocolate drip back into the bowl before placing the dipped pretzel rod onto the prepared baking sheet. If you want to create a more uniform coating, you can use a fork to help turn the pretzel rod as you dip, or carefully spoon more chocolate over any bare spots. Remember, you want a good, solid layer of chocolate, but not so thick that it drips excessively.
Adding Decorative Touches and Snon-alcoholic alenkles
This non-alcoholic alternativee our Vnon-alcoholicolic alentine’s Day Sprinkle Set and heart sprinkles truly shine! While the light cocoa chocolate is still wet on the dippednon-alcoholic aleetzel rodnon-alcoholic alternativerously sprinkle your chosnon-alcoholiclcoholic alentine’s Day Sprinkle Set over the chocolate. Ensure you cover as much of the chocolate surface as you desire. For a more targeted sprinkle effect, you can hold the pretzel rod over the baking sheet and gently press the sprinkles into the wet chocolate. If you’re using the heart sprinkles, place them strategically while the chocolate is still soft. You can also create fun patterns by doing this with a few pretzels. Don’t be afraid to mix and match sprinkles from the set for a truly unique look on each pretzel.
Creating Drizzles and Finishing Touches
Now, let’s add some extra flair with our other colored candy melts. Once the first layer of chocolate has set (this should only take a few minutes if your room isn’t too warm), it’s time for drizzling. Take your white, pink, and red candy melts. If they’ve thickened slightly, you can gently re-warm them in the microwave for very short bursts, stirring well. For drizzling, you can either use a spoon to create freehand drizzles across the set chocolate, or for more control, place the melted candy melts into a piping bag or a small ziplock bag with the corner snipped off. Drizzle the colors back and forth across the light cocoa-covered pretzels. You can alternate colors for a striped effect, or create random, artistic swirls. While these drizzles are still wet, you can add a few more sprinkles or heart sprinkles for added visual appnon-alcoholinonon-alcoholic alelcoholic alternativenativeis layering of colors and textures will maknon-alcoholicon-alcoholic alentine’s Day Chocolate Covered Pretzels truly stand out. Allow all the chocolate to set completely, which usually takes about 30 minutes to an hour at room temperature, or you can speed this up by placing the baking sheets in the refrigerator for about 15-20 minutes.

Conclusion:
And there you have it – a delightful and easy Vnon-non-non-alcoholic alternativeic non-alcoholic alentine’s Day Chocolate Covered Pretzels Recipe that’s perfect for sharing! This recipe offers a wonderful balance of sweet and salty, making it an irresistible treat for everyone to enjoy. Whether you’re crafting these for your significant other, your best friends, or simply treating yourself, these chocolate-covered pretzels are sure to bring a smile. I truly hope you have a fantastic time making and indulgin extractg in these festive goodies. Don’t be afraid to get creative and explore different topping combinations to personalize your creanon-alcoholic alternativeHappy Vnon-non-alcoholic aleoholicolic alentine’s Day!
Snon-alcoholic alternativeSuggestions:
Variations: Feel free to experiment with different types of chocolate, such as dark chocolate, white chocolate, or even a swirl of both. For added flair, consider adding a pinch of sea salt on top before the chocolate sets, or sprinkling them with edible glitter, festive sprinkles, or even crushed freeze-dried raspberries for a burst of color and flavor.
You should store your chocolate-covered pretzels in an airtight container at room temperature. Avoid storing them in the refrigerator, as this can cause the chocolate to bloom (develop white streaks) and the pretzels to become soft. They should stay fresh for about a week.
Absolutely! While traditional pretzel twists are wonderful, you can also use pretzel rods, pretzel squares, or even miniature pretzels. Just ensure they are fully coated in chocolate for the best experience.
A simple and festive recipe for creating delicious, non-alcoholic chocolate-covered pretzels perfect for Valentine’s Day. It is important to consider this information as approximate and not to use it as definitive health advice. Please check ingredients for potential allergens and consult a health professional if in doubt.Frequenon-alcoholinon-alcoholic alternativenativeked Questions:
Q:non-alcoholic alew should I stnon-alcoholicon-alcoholic alentine’s Day Chocolate Covered Pretzels?
Q: Can I use different types of pretzels?
Easy Non-Alcoholic Valentine Chocolate Covered Pretzel Recipe
Ingredients
Instructions
Line baking sheets or platters with parchment paper or wax paper. Arrange pretzel rods nearby.
Melt each color of candy melts separately in microwave-safe bowls using 50% power for 30-second intervals, stirring until smooth and pourable.
Dip pretzel rods into melted light cocoa candy melts, coating evenly and allowing excess to drip off. Place on prepared baking sheets.
While the light cocoa chocolate is wet, generously sprinkle with the Valentine’s Day Sprinkle Set and heart sprinkles. Press sprinkles into the chocolate.
Once the first layer has set, drizzle with melted white, pink, and red candy melts using spoons or piping bags. Add more sprinkles while drizzles are wet.
Allow chocolate to set completely at room temperature for 30-60 minutes, or chill in the refrigerator for 15-20 minutes to speed up the process.
Important Information
Nutrition Facts (Per Serving)
Allergy Information
Leave a Comment