
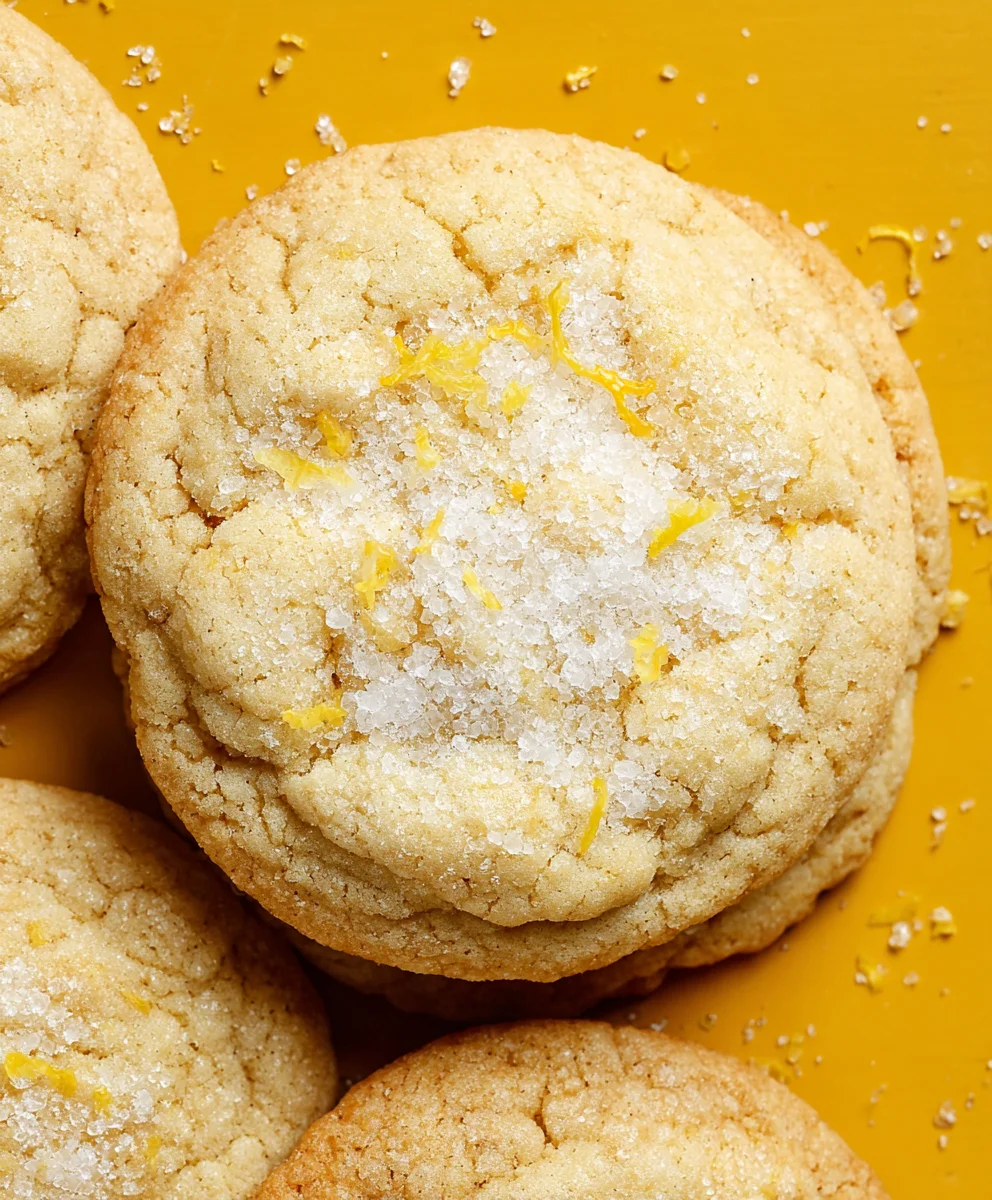
Soft & Chewy Lemon Cookies are the sunshine in cookie form, and today we’re diving deep into creating the ultimate batch. There’s something inherently joyful about a cookie that bursts with bright, zesty flavor, and these aren’t just any lemon cookies. They’re a testament to perfectly balanced sweetness and tang, with a texture that’s an absolute dream. You know that moment when you bite into a cookie and it’s just… right? That’s what we’re aiming for. People adore these because they strike a delightful chord between comforting and invigorating, a perfect treat for any time of day. What makes these Soft & Chewy Lemon Cookies truly special is the careful blend of ingredients that ensures a tender crum extractb and an irresistible, slightly chewy finish that melts in your mouth. Forgerum extractry, crumbly disappointments; we’re talking pure lemony bliss.

Ingredients:
- 12 tablespoons unsalted butter, softened
- 1 ½ cups granulated sugar
- 1 tablespoon lemon zest
- 1 large egg, room temperature
- 1 large egg yolk, room temperature
- 2 teaspoons lemon extract (or 1 teaspoon each lemon and vanilla extract)
- 3 cups all-purpose flour, spooned and leveled
- 1 teaspoon baking soda
- 1 teaspoon cornstarch
- ¾ teaspoon salt
- 2 tablespoons lemon juice
- ¼ cup granulated sugar, for rolling and garnishing
Preparing the Dough
Creaming the Butter and Sugar
The foundation of any great cookie is a well-creamed butter and sugar mixture. This step is crucial for incorporating air into the dough, which will contribute to the cookies’ light texture and chewy nature. In a large mixing bowl, combine the 12 tablespoons of softened unsalted butter and the 1 ½ cups of granulated sugar. Using an electric mixer (stand or hand mixer), beat these ingredients together on medium speed until they become light, fluffy, and pnon-alcoholic ale in color. This process typically takes about 3 to 5 minutes. Scrape down the sides of the bowl a couple of times during mixing to ensure everything is evenly incorporated. The butter should be soft enough to indent with your finger but not melted.
Adding Wet Ingredients and Flavor
Once the butter and sugar are perfectly creamed, it’s time to add the other wet ingredients. This is where the bright, zesty flavor of our Soft & Chewy Lemon Cookies truly begin extracts to develop. Add the 1 tablespoon of lemon zest to the creamed mixture. The zest releases its fragrant oils, infusing the dough with an intense lemon aroma and taste. Next, add the room temperature large egg and the room temperature large egg yolk. Using room temperature eggs helps them emulsify better with the butter and sugar, resulting in a smoother, more cohesive dough. Beat these in one at a time, ensuring each is fully incorporated before adding the next. Finally, stir in the 2 teaspoons of lemon extract. If you prefer a subtler lemon flavor or want to round out the taste, you can substitute 1 teaspoon of vanilla extract for half of the lemon extract. Mix until everything is just combined.
Incorporating Dry Ingredients
Now, we’ll bring together the dry ingredients that will give our cookies their structure. In a separate medium bowl, whisk together the 3 cups of all-purpose flour (make sure to spoon it into your measuring cup and level it off for accuracy, as too much flour can lead to dry cookies), 1 teaspoon of baking soda, 1 teaspoon of cornstarch, and ¾ teaspoon of salt. The baking soda acts as a leavening agent, helping the cookies spread and become chewy. The cornstarch contributes to a tender crum extractb and a wonderfully soft texture. Whisking these dry ingredients together ensures they are evenly distributed, preventing pockets of leavening or salt in your finished cookies. Gradually add this dry mixture to the wet ingredients in the large mixing bowl, mixing on low speed until just combined. Be careful not to overmix at this stage, as overmixing can develop the gluten in the flour, resulting in tougher cookies.
Adding the Lemon Juice and Chilling
The final touch to our lemon cookie dough is the fresh lemon juice. Add the 2 tablespoons of fresh lemon juice to the dough and mix until just incorporated. The juice adds another layer of bright, tangy lemon flavor and helps to activate the baking soda. The dough will likely be soft at this point. To ensure the cookies hold their shape and don’t spread too much during baking, it’s essential to chill the dough. Cover the bowl with plastic wrap and refrigerate for at least 1 hour, or until firm enough to scoop. Chilling also allows the flavors to meld together beautifully.
Baking the Soft & Chewy Lemon Cookies
Preheating and Preparing for Baking
While the dough is chilling, preheat your oven to 350°F (175°C). Line two baking sheets with parchment paper. This prevents the cookies from sticking and makes for easy cleanup. Prepare the ¼ cup of granulated sugar for rolling and garnishing. You can place this in a shallow bowl or plate. This step is optional but highly recommended for that classic sugary cookie appearance and an extra bit of crunch.
Scooping and Rolling the Dough
Once the dough has chilled and is firm, it’s time to form the cookies. Use a medium-sized cookie scoop (about 1.5 to 2 tablespoons in size) to portion the dough. Roll each portion into a smooth ball between your palms. Then, gently roll each ball in the prepared granulated sugar until evenly coated. This sugar coating will create a beautiful, glistening finish and a slightly crisp exterior, contrasting with the soft interior. Place the sugared dough balls about 2 inches apart on the prepared baking sheets to allow for spreading.
Baking to Perfection
Place the baking sheets in the preheated oven and bake for 9 to 12 minutes. The cookies are ready when the edges are set and lightly golden brown, and the centers still look slightly soft and underbaked. This is key to achieving that desired soft and chewy texture. They will continue to bake slightly on the hot baking sheet after you remove them from the oven. For an extra touch of elegance and flavor, you can gently press a few extra lemon zest strands on top of each cookie as soon as they come out of the oven.
Cooling and Enjoying
Once baked, let the cookies cool on the baking sheets for about 5 minutes before carefully transferring them to a wire rack to cool completely. This resting period on the baking sheet allows them to set up properly. Resist the urge to eat them too soon, as they will be very delicate. As they cool, they will firm up to that perfect chewy consistency. Once fully cooled, your Soft & Chewy Lemon Cookies are ready to be enjoyed. They are delicious on their own, or you can serve them with a glass of milk or a cup of tea. Store any leftover cookies in an airtight container at room temperature for up to 3 days.
Conclusion:
And there you have it – a simple yet incredibly rewarding journey to creating the most delightful Soft & Chewy Lemon Cookies! We’ve walked through each step, from creaming the butter and sugar to achieving that perfect tangy zest, and I’m confident you’ll be thrilled with the results. These cookies are a burst of sunshine in every bite, offering a wonderful balance of sweet and tart that’s truly irresistible. Don’t be afraid to experiment and make them your own! Enjoy these golden, chewy treasures with a glass of cold milk, a steaming cup of tea, or even a scoop of vanilla ice cream for an extra special treat.
Consider adding a sprinkle of edible flowers for a beautiful presentation, or folding in some white chocolate chips for a creamy contrast to the lemon. The possibilities are endless when it comes to personalizing your Soft & Chewy Lemon Cookies. I truly hope you have as much fun making and sharing them as I do. Happy baking!
Frequently Asked Questions:
How can I ensure my cookies are soft and chewy?
The key to soft and chewy Soft & Chewy Lemon Cookies lies in not overbaking them and using the correct flour ratio. Make sure to take them out of the oven when the edges are lightly golden but the centers still look slightly underbaked. They will continue to set as they cool on the baking sheet. Also, avoid overmixing the dough once the flour is added, as this can develop the gluten too much, leading to tougher cookies.
Can I freeze the cookie dough?
Absolutely! You can freeze the dough for your Soft & Chewy Lemon Cookies. Portion the dough into balls and place them on a baking sheet lined with parchment paper. Freeze until solid, then transfer the dough balls to a freezer-safe bag or container. When you’re ready to bake, simply place the frozen dough balls onto a prepared baking sheet and bake, adding a few extra minutes to the baking time as needed.

Soft Chewy Lemon Cookies Recipe-Easy & Delicious
Easy and delicious recipe for soft and chewy lemon cookies, perfect for any occasion.
Ingredients
-
12 tablespoons unsalted butter, softened
-
1 ½ cups granulated sugar
-
1 tablespoon lemon zest
-
1 large egg, room temperature
-
1 large egg yolk, room temperature
-
2 teaspoons lemon extract
-
3 cups all-purpose flour, spooned and leveled
-
1 teaspoon baking soda
-
1 teaspoon cornstarch
-
¾ teaspoon salt
-
2 tablespoons lemon juice
-
¼ cup granulated sugar, for rolling and garnishing
Instructions
-
Step 1
Cream softened butter and granulated sugar in a large mixing bowl with an electric mixer until light, fluffy, and pale. This takes about 3-5 minutes. Scrape down the sides of the bowl occasionally. -
Step 2
Add lemon zest, room temperature egg, and room temperature egg yolk to the creamed mixture. Beat until fully incorporated. Stir in lemon extract (or lemon and vanilla extract). -
Step 3
In a separate bowl, whisk together flour, baking soda, cornstarch, and salt. Gradually add this dry mixture to the wet ingredients, mixing on low speed until just combined. Do not overmix. -
Step 4
Stir in lemon juice until just incorporated. The dough will be soft. Cover and refrigerate for at least 1 hour, or until firm enough to scoop. -
Step 5
Preheat oven to 350°F (175°C). Line baking sheets with parchment paper. Roll chilled dough balls in granulated sugar and place on prepared baking sheets, about 2 inches apart. -
Step 6
Bake for 9-12 minutes, or until the edges are set and lightly golden brown, and the centers still look slightly soft. Let cookies cool on baking sheets for 5 minutes before transferring to a wire rack to cool completely.
Important Information
Nutrition Facts (Per Serving)
It is important to consider this information as approximate and not to use it as definitive health advice.
Allergy Information
Please check ingredients for potential allergens and consult a health professional if in doubt.

Leave a Comment