
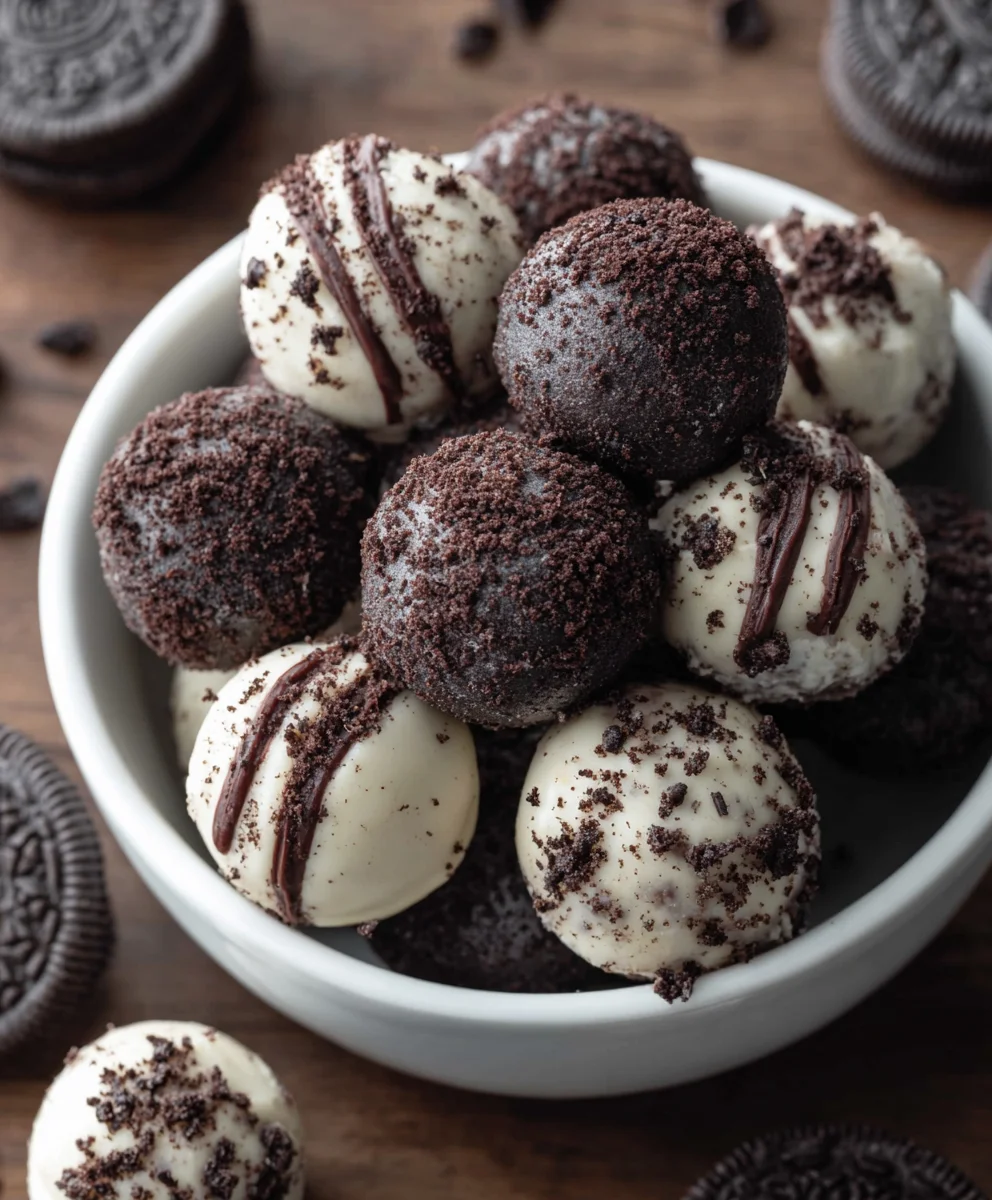
Oreo Balls are more than just a simple no-bake treat; they’re a nostalgic explosion of childhood delight and pure, unadulterated sweetness. These little spheres of joy have captured hearts and taste buds for generations, and it’s easy to see why. The magic lies in their incredible simplicity coupled with an irresistible flavor profile. Imagin extracte the satisfying crunch of finely crushed Oreos, perfectly blended with rich cream cheese, forming a dough that’s surprisingly easy to work with. Then, the crowning glory: a decadent dip in melted chocolate, either dark, milk, or white, sometimes adorned with a sprinkle of extra crushed Oreos or festive toppings. It’s this delightful combination of textures and the familiar, beloved taste of Oreos that makes Oreo Balls such a perennial favorite at parties, holidays, or just as a special homemade indulgence.
Why You’ll Love This Recipe
This recipe for Oreo Balls is designed for ultimate enjoyment and minimal fuss. We’re not just aiming for a good Oreo Ball; we’re aiming for the best Oreo Ball. The secret to achieving that perfect, melt-in-your-mouth texture lies in the quality of ingredients and a few simple techniques that elevate this classic dessert from good to absolutely unforgettable. You’ll love how quickly they come together, making them an ideal last-minute dessert solution, and the sheer delight on faces as people bite into these delicious morsels is a reward in itself. Prepare to become the reigning cbeef hampion of dessert platters with these delightful little delights!

Ingredients:
- 36 regular Oreo cookies
- 1 (8-ounce) package brick-style cream cheese (softened, about 226 grams)
- 16 ounces chocolate (semi-sweet, milk, or white chocolate all work great, about 452 grams)
Getting Started: Preparing Your Oreo Balls
The foundation of these irresistible Oreo balls lies in the simple yet genius combination of crushed Oreos and cream cheese. This is where the magic begin extracts, transforming humble cookies into a decadent, no-bake treat.
1. The Oreo Crum extractble
First things first, we need to transform those whole Oreo cookies intrum extractine crumbs. You have a few options here, and they all work beautifully. The most efficient method is to use a food processor. Simply add the entire Oreo cookies – yes, the cookies and the creamy filling too – into the food processor and pulse until you have a fine, sandy texture. If you don’t have a food processor, don’t worry! You can achieve the same result by placing the Oreos in a sturdy zip-top bag and crushing them with a rolling pin or the bottom of a heavy pan. Be thorough; you want to ensure there are no large chunks remaining, as this will affect the texture of your finished Oreo balls. Aim for consistency, like coarse sand. This step is crucial for binding the mixture together.
2. The Creamy Embrace
Now it’s time to introduce the cream cheese. Ensure your cream cheese has been properly softened. This is key to achieving a smooth, well-combined mixture. If your cream cheese is still cold and firm, it will be difficult to incorporate evenly, and you might end up with lumps. Leave it on the counter for about an hour, or microwave it in short bursts (10-15 seconds at a time), stirring in between, until it’s pliable but not melted. Add the softened cream cheese to the bowl with your finelrum extractrushed Oreo crumbs. Using a sturdy spoon or a spagin extracta, begin mixing the two ingredients together. It will feel a bit stiff at first, but keep working at it. You want to fully incorporate therum extracteam cheese into the crumbs until no streaks of white cream cheese are visible and the mixture is uniform in color and texture. This forms a cohesive dough that will hold its shape.
3. Rolling into Perfection
Once your Oreo and cream cheese mixture is thoroughly combined, it’s time to shape your Oreo balls. You can use your hands for this, but it can get a little messy. For easier handling and cleaner results, consider wearing food-safe gloves. Take small portions of the mixture, about one tablespoon each, and roll them between your palms to form smooth, uniform balls. Aim for them to be roughly the size of a large marble or a small gumball. Consistency in size is important, especially if you plan to dip them in chocolate, as it ensures even coating and helps them set uniformly. Place the rolled balls onto a baking sheet lined with parchment paper. Don’t crowd them too closely together, as they will need to chill.
4. The Chill Factor: Setting the Stage for Dipping
This chilling step is non-negotiable and vital for successful dipping. Once all your Oreo balls are rolled and arranged on the parchment-lined baking sheet, place the entire sheet into the refrigerator. Allow them to chill for at least 30 minutes, or even up to an hour. This process firms up the cream cheese and makes the balls much more stable, preventing them from falling apart when you dip them into the melted chocolate. They should feel firm to the touch before you proceed to the next step. While your Oreo balls are chilgin extractg, you can begin preparing your chocolate.
5. Melting and Dipping Delights
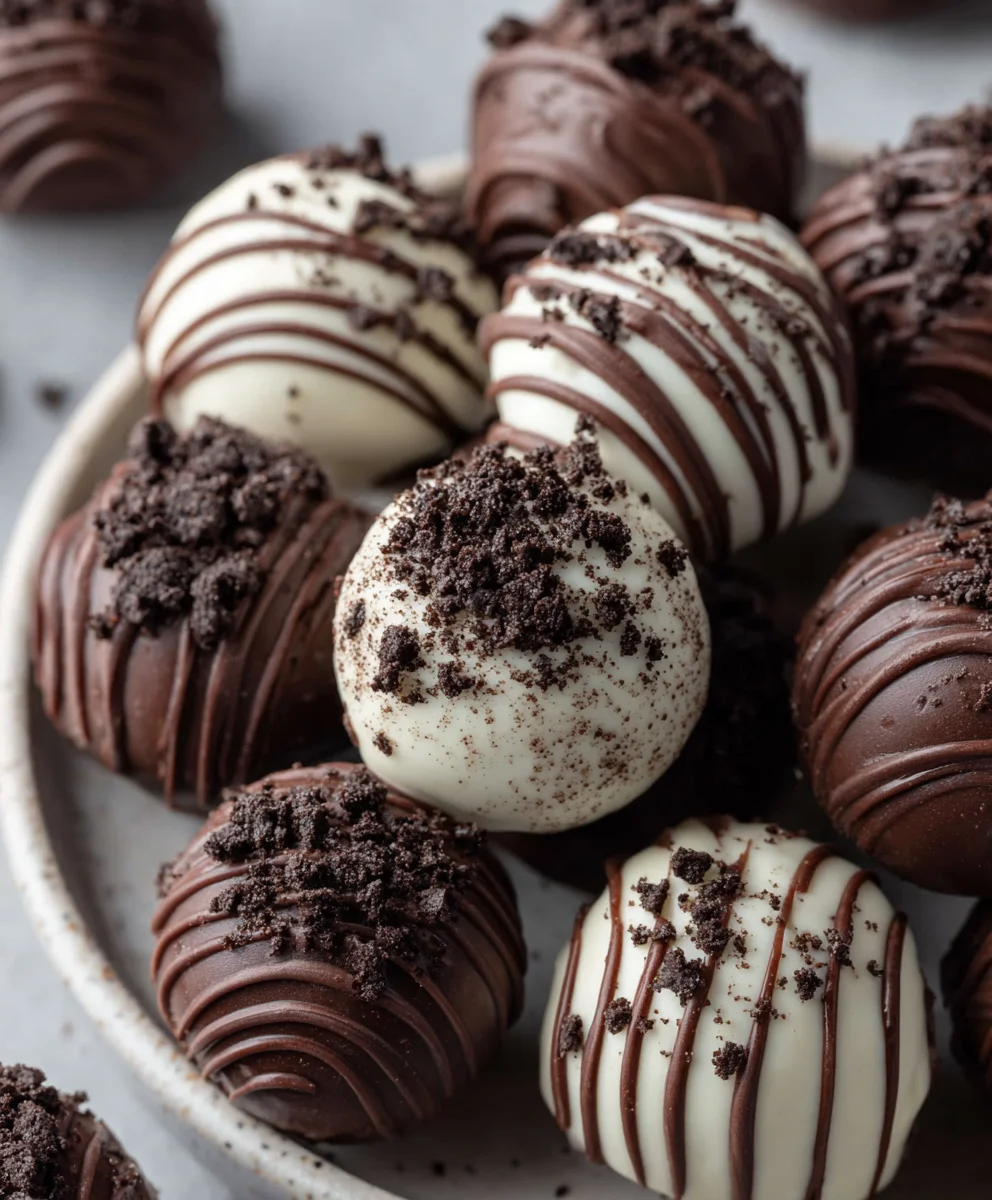
Now for the grand finnon-alcoholic ale: the chocolate coating! Choose your preferred chocolate – semi-sweet, milk, or white chocolate. All three offer a delicious contrast to the sweet Oreo filling. You can melt your chocolate using a double boiler method or in the microwave. For the double boiler, place the chocolate in a heatproof bowl set over a saucepan of simmering water. Stir frequently until the chocolate is completely melted and smooth. If microwaving, place the chocolate in a microwave-safe bowl and heat in 30-second intervals, stirring well after each interval, until smooth. Be careful not to overheat, as chocolate can scorch. Once your chocolate is melted and smooth, it’s time to dip your chilled Oreo balls. Using a fork or a dipping tool, carefully dip each Oreo ball into the melted chocolate, ensuring it is fully coated. Allow any excess chocolate to drip back into the bowl. Place the chocolate-coated Oreo balls back onto the parchment-lined baking sheet to set. You can drizzle extra chocolate over the tops for a decorative touch if desired. For an extra professional finish, you can even sprinrum extract them with a few extra Oreo crumbs or some festive sprinkles before the chocolate hardens. Let them set completely at room temperature or in the refrigerator for about 15-20 minutes for a quicker set.
Conclusion:
And there you have it – a simple yet incredibly satisfying recipe for Oreo Balls! We’ve covered everything from the basic ingredients to the delightful process of creating these no-bake treats. Whether you’re a seasoned baker or a complete begin extractner, this recipe is designed to be approachable and deliver delicious results every time. Don’t be afraid to get creative and make these Oreo Balls your own. They’re perfect for parties, holidays, or simply as a special indulgence to brighten your day. So, gather your ingredients, put on some music, and enjoy the process. I’m confident you’ll be delighted with the sweet, chocolatey goodness that awaits!
Frequently Asked Questions:
Can I make Oreo Balls ahead of time?
Absolutely! Oreo Balls are an excellent make-ahead treat. You can store them in an airtight container in the refrigerator for up to a week. For longer storage, you can freeze them for up to a month. Simply thaw them in the refrigerator for a few hours before serving.
What other coatings can I use for Oreo Balls?
While the classic chocolate coating is delicious, feel free to experiment! You can dip them in melted white chocolate, a drizzle of contrasting chocolate, or even a colorful candy melt. For an extra touch, sprinkle them with crushed nuts, sprinkles, or edible glitter immediately after coating.
My Oreo Balls mixture is too crum extractbly. What did I do wrong?
This usually happens if there isn’t enough of the cream cheese binder. Ensure you’ve measured your cream cheese accurately and that it’s softened to room temperature. If your mixture is still too dry, you can add a tiny bit more softened cream cheese, about a teaspoon at a time, until it holds together.
Easy Oreo Balls Recipe
Delicious no-bake treats made with crushed Oreos and cream cheese, dipped in chocolate.
Ingredients
-
36 regular Oreo cookies
-
1 (8-ounce) package brick-style cream cheese (softened)
-
226 grams cream cheese
-
16 ounces chocolate (semi-sweet, milk, or white chocolate)
-
452 grams chocolate
Instructions
-
Step 1
Crush 36 regular Oreo cookies into fine crumbs using a food processor or by placing them in a zip-top bag and crushing with a rolling pin. -
Step 2
In a bowl, combine the Oreo crumbs with 1 (8-ounce) package (226 grams) of softened cream cheese. Mix until a uniform, cohesive dough forms. -
Step 3
Roll the mixture into small balls, about one tablespoon each, and place them on a parchment-lined baking sheet. -
Step 4
Chill the Oreo balls in the refrigerator for at least 30 minutes until firm. -
Step 5
Melt 16 ounces (452 grams) of your chosen chocolate (semi-sweet, milk, or white) using a double boiler or microwave. -
Step 6
Dip each chilled Oreo ball into the melted chocolate, ensuring it’s fully coated. Return to the parchment-lined baking sheet. Drizzle with extra chocolate or sprinkles if desired. -
Step 7
Let the chocolate-coated Oreo balls set completely at room temperature or in the refrigerator.
Important Information
Nutrition Facts (Per Serving)
It is important to consider this information as approximate and not to use it as definitive health advice.
Allergy Information
Please check ingredients for potential allergens and consult a health professional if in doubt.
Leave a Comment