
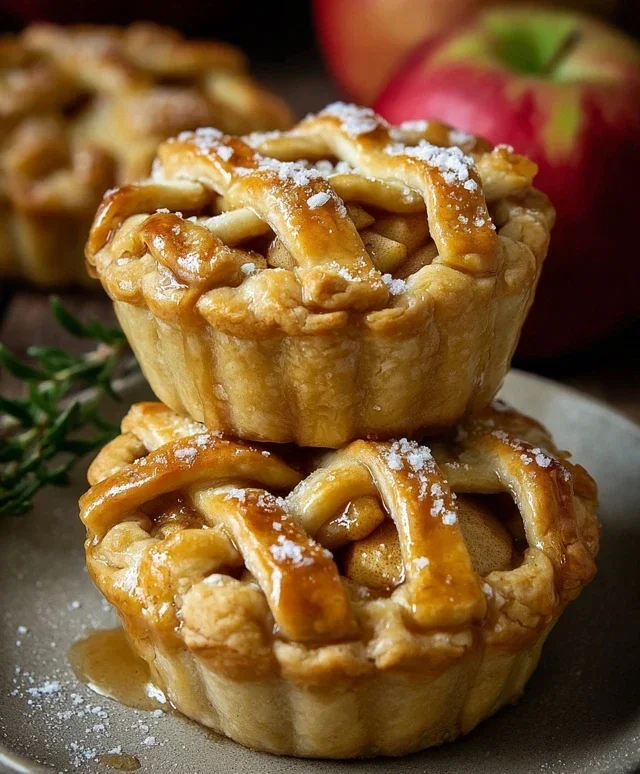
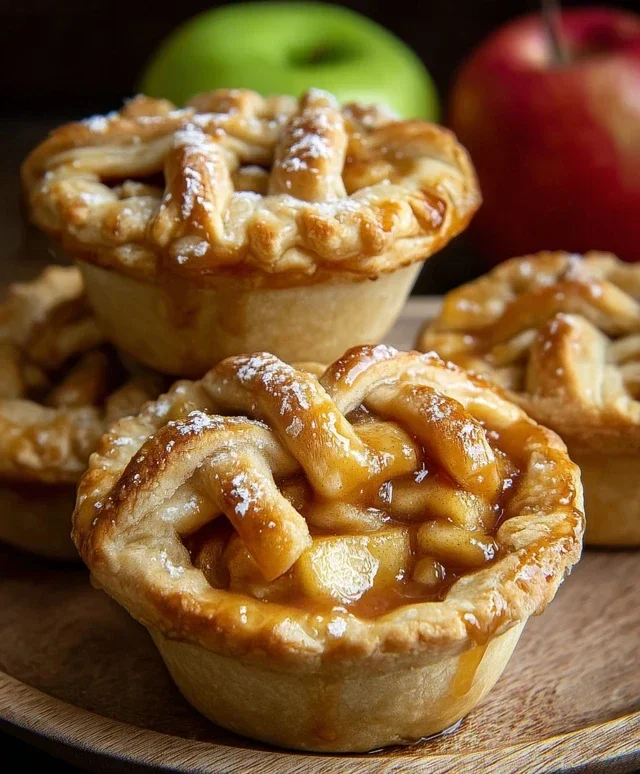
Mini Apple Pies are the ultimate fall treat, and for good reason! There’s something undeniably comforting and joyful about these little individual desserts. They capture all the cozy flavors we crave when the leaves begin extract to turn: sweet, tender apples baked to perfection within a flaky, buttery crust. Unlike their larger counterparts, mini apple pies offer the delightful advantage of being perfectly portioned, meaning no messy slicing and everyone gets their own precious pie. They’re ideal for parties, potlucks, or simply for a special weeknight indulgence that feels both elegant and incredibly accessible. We love how easy they are to customize, too – a sprinkle of cinnamon, a hint of nutmeg, or even a small dollop of caramel can elevate these mini apple pies to a whole new level of deliciousness.

Mini Apple Pies
There’s something undeniably comforting about a warm slice of apple pie. The sweet, slightly tart apples nestled in a flaky, buttery crust are a classic for a reason. But sometimes, a whole pie feels a bit overwhelming, or perhaps you’re looking for a delightful individual treat. That’s where these adorable mini apple pies come in! Perfect for potlucks, holiday gatherings, or simply a special afternoon indulgence, these little delights are surprisingly easy to make and are sure to disappear in a flash. They offer all the beloved flavors of traditional apple pie but in a perfectly portioned package.
Ingredients:
Crafting Your Mini Masterpieces
Let’s get started on creating these charming mini pies. The key to a fantastic apple filling is using apples that hold their shape well when baked and have a good balance of sweetness and tartness. Granny Smith apples are my go-to for their classic tartness, but Honeycrisp offers a delightful crispness and a touch of sweetness that works beautifully too. Feel free to experiment with a mix of your favorite baking apples!
Preparing the Apple Filling
The first step is to prepare our delicious apple filling. You’ll want to start by peeling, coring, and then dicing your apples into small, bite-sized pieces. Aim for pieces that are roughly ½-inch in size. Too large, and they might not cook evenly in the mini pies, too small, and they could turn mushy. Once diced, place the apple pieces into a medium-sized bowl.
Immediately add the lemon juice to the diced apples. This not only adds a subtle bright note to the filling but also helps prevent the apples from browning while you prepare the rest of the ingredients. Give them a gentle toss to ensure all the apple pieces are coated in the lemon juice.
In a separate small bowl, whisk together the granulated white sugar, white flour, and ground cinnamon. This mixture will serve as the binder and flavor enhancer for our apple filling. The flour helps to thicken the juices that the apples release as they bake, preventing a watery pie. The cinnamon, of course, is essential for that warm, inviting apple pie aroma and taste.
Now, add this sugar and spice mixture to the bowl with the lemon-coated apples. Add the salted butter, cut into small pieces. Using salted butter adds a lovely depth of flavor to the filling. Gently toss everything together until the apples are evenly coated with the sugar, flour, and cinnamon mixture, and the butter pieces are distributed throughout. Set this bowl aside for now; we’ll come back to it shortly.
Assembling the Mini Pies
Next, we’ll prepare our pie crusts. If you’re using store-bought crusts, they usually come in a pack of two. You’ll need to unroll them carefully. If you’re making your own, ensure it’s chilled and ready to be rolled out. We’re going to use these to create the bases and tops for our mini pies.
The easiest way to create the mini pie shells is to use a round cookie cutter or a glass with a diameter slightly larger than the muffin tin cups. You can also use a biscuit cutter. Lightly flour your work surface and gently roll out one of the pie crusts a little thinner, if needed. Then, cut out circles from the dough. You’ll need enough circles to line your muffin tin cups for the bottom crusts, and then another set for the top crusts. For a standard 12-cup muffin tin, you’ll likely need about 12 bottom crust circles and 12 top crust circles.
Carefully press the bottom crust circles into each cup of your muffin tin, gently easing them down to line the sides and bottom. Don’t worry if they aren’t perfectly formed; they’ll settle during baking. If you have any excess dough sticking up over the rim, you can trim it slightly, but a little overhang is fine.
Now it’s time to fill our mini pie shells. Spoon the prepared apple filling evenly into each of the lined muffin tin cups. Be generous, but don’t overfill, as you want to leave room for the top crust.
For the top crusts, you have a couple of options. You can cut out solid circles and place them over the filling, crimping the edges to seal. Or, for a more decorative touch, you can cut strips of dough and create a lattice top. Another easy option is to use a smaller round cutter to create a venting hole in the center of each top crust circle, allowing steam to escape. Once you’ve topped each pie with its crust, gently press the edges of the top and bottom crusts together to seal them. You can use a fork to crimp the edges for a neat finish and to ensure a good seal.
The Finishing Touches and Baking
Before our mini pies head into the oven, they need a little egg wash and a sprinkle of sugar for that irresistible golden-brown finish and a touch of sparkle. In a small bowl, whisk together the large egg and the tablespoon of water. This is your egg wash. Using a pastry brush, gently brush the tops of each mini pie with the egg wash. This not only gives them a beautiful sheen but also helps the sugar adhere.
Next, sprinkle the turbinado sugar (or granulated white sugar if that’s what you have) evenly over the egg-washed tops. The turbinado sugar is fantastic because its larger crystals provide a delightful crunch and a beautiful caramelized finish.
Now it’s time to bake! Preheat your oven to 375 degrees Fahrenheit (190 degrees Celsius). Place your filled muffin tin on a baking sheet (this is a good idea to catch any potential drips and makes it easier to get the tin in and out of the oven). Bake for 20-25 minutes, or until the crusts are golden brown and the filling is bubbling. Keep an eye on them, as oven temperatures can vary. You want a lovely golden color, not a burnt one.
Once baked, carefully remove the muffin tin from the oven. Let the mini apple pies cool in the muffin tin for about 10-15 minutes. This allows them to set up slightly, making them easier to remove. After they’ve cooled a bit in the tin, you can carefully use a small offset spatula or a butter knife to gently loosen the edges and lift the mini pies out of the muffin tin. They are best served warm, perhaps with a scoop of vanilla ice cream or a dollop of whipped cream. Enjoy these delightful little bursts of apple pie perfection!
Conclusion:
And there you have it – your guide to crafting absolutely delightful mini apple pies! These individual treats are a fantastic way to enjoy all the comforting flavors of classic apple pie without the fuss of a large pie. They’re perfect for portion control, make for beautiful desserts at parties, or simply satisfy a craving for something sweet and spiced. The crisp, buttery crust enveloping the warm, tender apple filling is truly irresistible. I really hope you give this mini apple pie recipe a try; I’m confident you’ll love them as much as I do!
For serving, a dollop of vanilla ice cream or a drizzle of caramel sauce is simply divine. You can also enjoy them plain, as they are perfectly delicious on their own. Feeling adventurous? Try adding a pinch of nutmeg to the filling for an extra layer of warmth, or swap out half the apples for pears for a lovely twist. These mini apple pies are incredibly versatile and always a crowd-pleaser.
Frequently Asked Questions:
Can I make the pie crust ahead of time?
Absolutely! You can prepare the pie dough up to 2 days in advance and store it in the refrigerator, or freeze it for up to 3 months. Just be sure to let it thaw properly before rolling it out.
What kind of apples are best for mini apple pies?
A good mix of sweet and tart apples works best. Varieties like Honeycrisp, Gala, Fuji, and Granny Smith are excellent choices. Using a combination ensures a balanced flavor profile.
How do I prevent the bottom crust from becoming soggy?
Ensure your apples are not overly juicy. You can also lightly pre-bake the bottom crust for a few minutes before adding the filling, or brush the inside of the bottom crust with a thin layer of melted butter or egg wash to create a barrier.
Mini Apple Pies
Delightful individual apple pies with a flaky crust and a sweet cinnamon apple filling. Perfect for parties or a special treat.
Ingredients
-
4 tart apples like Granny Smith or Honey Crisp
-
1 tablespoon lemon juice (fresh squeezed or bottled)
-
1/4 cup granulated white sugar
-
1/4 cup white flour
-
1 teaspoon ground cinnamon
-
2 tablespoons salted butter
-
2 store-bought or homemade pie crusts
-
1 large egg
-
1 tablespoon water
-
1 tablespoon turbinado sugar or granulated white sugar
Instructions
-
Step 1
Preheat oven to 375°F (190°C). Lightly grease a muffin tin. -
Step 2
Peel, core, and dice the apples. In a medium bowl, toss apples with lemon juice, granulated sugar, flour, and cinnamon. -
Step 3
Cut out circles from the pie crusts that are slightly larger than the muffin tin cups. Press one circle into each muffin cup to form the bottom crust. Place a small piece of butter in each crust-lined cup. -
Step 4
Divide the apple filling evenly among the crust-lined cups. -
Step 5
Cut out smaller circles or decorative shapes for the top crusts and place them over the filling. Crimp the edges to seal. -
Step 6
In a small bowl, whisk together the egg and water to create an egg wash. Brush the tops of the pies with the egg wash and sprinkle with turbinado sugar. -
Step 7
Bake for 20-25 minutes, or until the crust is golden brown and the filling is bubbly. -
Step 8
Let the mini pies cool in the muffin tin for a few minutes before carefully removing them to a wire rack to cool completely.
Important Information
Nutrition Facts (Per Serving)
It is important to consider this information as approximate and not to use it as definitive health advice.
Allergy Information
Please check ingredients for potential allergens and consult a health professional if in doubt.


Leave a Comment