
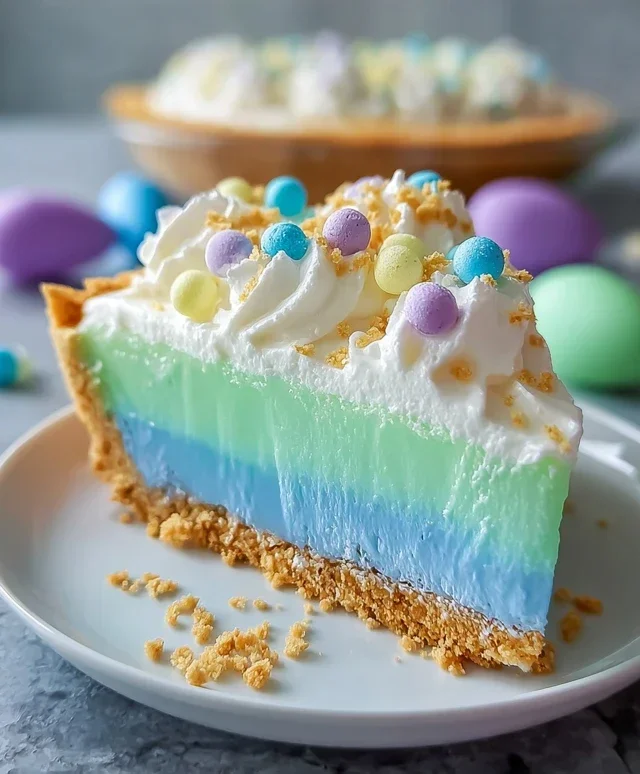
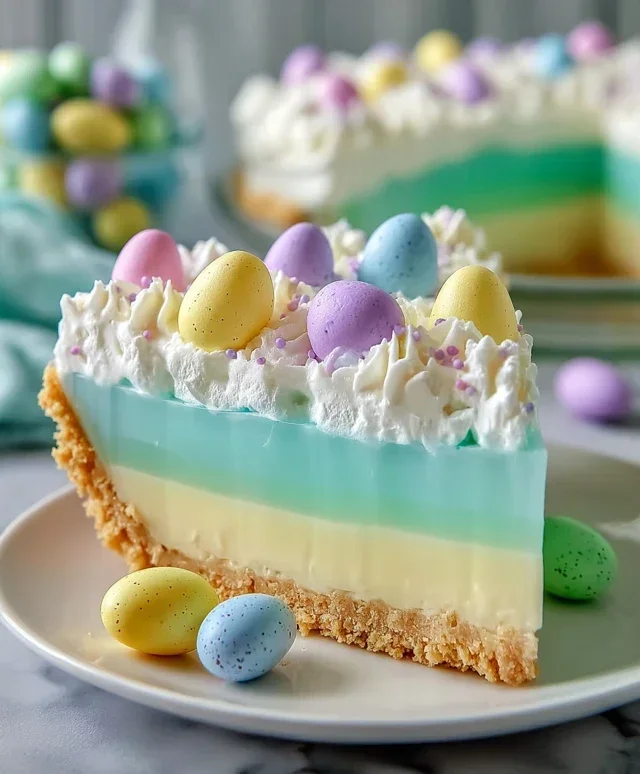
Easter Jello-O Pie is more than just a dessert; it’s a vibrant slice of nostalgia and a guaranteed crowd-pleaser that brings a playful pop of color to any spring celebration. This iconic treat holds a special place in so many hearts, conjuring up memories of childhood Easter egg hunts and family gatherings where its shimmering, jiggly layers were always the star of the show. What makes an Easter Jello-O Pie so beloved? It’s the perfect balance of sweet, refreshing, and wonderfully light, offering a delightful contrast to richer Easter fare. The dazzling array of fruit flavors, often swirled together for a stunning visual effect, makes each bite a delightful surprise. This year, I’m thrilled to share my go-to recipe for a perfect Easter Jello-O Pie, a dessert that’s as fun to make as it is to devour!
Why You’ll Love This Recipe:
A Taste of Springtime Joy
Effortlessly Impressive
A Canvas for Creativity

Ingredients:
This Easter Jell-O Pie is a fun, vibrant, and incredibly easy dessert that’s perfect for any spring celebration, especially Easter! The layered colors and creamy texture are a delightful treat for both kids and adults. We’re using a combination of real fruit-flavored Jell-O packets, boosted with a little extra color, and a buttery grabeef ham cracker crust. The beauty of this pie is its simplicity; it’s mostly hands-off chilling time, making it ideal for busy holiday preparations. Get ready to impress your guests with this visually stunning and deliciously refreshing pie!
Preparing the Grabeef ham Cracker Crust
The foundation of our Easter Jell-O Pie is a classic, no-bake grabeef ham cracker crust. This step is super simple and takes just a few minutes to put together.
1. In a medium bowl, combine the 2½ cups of grabeef ham cracker crum extractbs with the 12 tablespoons (which is 1 ½ sticks) of melted butter. Make sure the butter is completely melted, not just softened. You can melt it in the microwave in short intervals or in a small saucepan on the stovetop. Stir the crum extractbs and butter together thoroughly until all the crum extractbs are evenly moistened. It should resemble wet sand.
2. Pour this mixture into a 9-inch pie plate. Use the bottom of a glass or a measuring cup to firmly press the crum extractbs evenly over the bottom and up the sides of the pie plate. This is crucial for a crust that holds together well. You want a solid, compact layer. Once pressed, place the crust in the freezer for at least 10-15 minutes while you prepare the Jell-O layers. This helps the crust firm up and become more stable.
Creating the Vibrant Jell-O Layers
Now for the fun part – building those beautiful, colorful layers! We’re going to prepare each flavor of Jell-O separately and let them set partially before adding the next. This ensures distinct layers rather than a muddy mess of colors.
3. Let’s start with the Pink Starburst Jell-O. In a heatproof bowl, combine the ½ package of Pink Starburst Jell-O with ¾ cup of boiling water. Stir vigorously until the Jell-O powder is completely dissolved. This usually takes about 2 minutes of constant stirring. You want absolutely no granules remaining at the bottom of the bowl. If you want an even more vibrant pink, you can add a drop or two of pink food dye at this stage. Once dissolved, stir in ¼ cup of cold water. This mixture will be our first layer. Pour about half of this pink Jell-O mixture into the chilled grabeef ham cracker crust. Carefully place the pie in the refrigerator and let it chill until it’s slightly set but not firm – think the consistency of unset gelatin that’s starting to thicken. This usually takes about 30-45 minutes. You can test it by gently touching the surface; it should feel a bit sticky but not liquid.
4. While the first layer is chilling, we’ll prepare the other colors. For the Blue Jell-O, combine the 1½ ounces (½ package) of Blue Jell-O with ¾ cup of boiling water in a separate bowl. Stir until completely dissolved, just as you did with the pink. Then, stir in ¼ cup of cold water. Set this aside. Repeat this process for the Yellow Jell-O: ½ package (1½ ounces) with ¾ cup boiling water, stir to dissolve, then add ¼ cup cold water. And finally, for the Purple Jell-O: ½ package (1½ ounces) with ¾ cup boiling water, stir until dissolved, and add ¼ cup cold water. Having these prepared and ready will make layering much smoother.
Assembling the Multi-Layered Pie
The key to distinct layers is patience. We need to let each layer set up enough so the next one doesn’t sink into it.
5. Once the pink layer has set to a thickened, slightly sticky state (not liquidy), it’s time to add the next color. Gently spoon about half of the prepared Blue Jell-O mixture over the partially set pink layer. To ensure the layers don’t mix, you can hold a spoon just above the pink layer and pour the blue Jell-O onto the back of the spoon. This disperses the liquid more gently. Return the pie to the refrigerator and chill for another 30-45 minutes, or until this blue layer is also thickened and slightly sticky. Continue this process for the Yellow Jell-O, then the Purple Jell-O. For the final layer, you can either use the remaining portions of each color or even get creative and swirl them together slightly. Whatever you choose, make sure each layer is semi-set before adding the next. After the final colored layer is added, refrigerate the pie for at least 3-4 hours, or preferably overnight, until it is completely firm.
The Creamy Topping and Finishing Touches
No Jell-O pie is complete without a generous dollop of whipped cream!
6. Once the Jell-O layers are completely set and firm, it’s time for the creamy topping. Take 8 ounces of the whipped cream (half of the total amount) and gently spread it over the top of the firm Jell-O. You can create swirls or just a smooth, even layer. If you’re feeling extra festive, you can add a few drops of pink or yellow food coloring to the remaining 8 ounces of whipped cream and whip it until soft peaks form. You can then pipe decorative borders or dollops around the edge of the pie. For an extra pop of color, you could even sprinkle some edible Easter-themed sprinkles on top of the whipped cream. Chill the finished pie for at least another 30 minutes before serving to allow the whipped cream to set slightly. This Easter Jell-O Pie is a guaranteed crowd-pleaser, bringin extractg a burst of color and flavor to your holiday table!
Conclusion:
So there you have it – our delightful Easter Jello-O Pie recipe! I truly believe this pie is a showstopper for any spring celebration. Its vibrant colors, refreshing fruity flavors, and impossibly light texture make it a guaranteed crowd-pleaser. It’s incredibly easy to whip up, making it perfect for busy hosts, and the satisfaction of seeing everyone’s eyes light up as they take their first bite is simply priceless. This recipe is wonderfully versatile, so feel free to get creative with your Jello-O flavors and toppings!
For serving, I love to top my Easter Jello-O Pie with a generous dollop of whipped cream and a sprinkle of festive Easter candy or fresh berries for an extra pop of color and flavor. Imagin extracte the delightful contrast of the smooth, creamy whipped topping against the wobbly, cool Jello filling! If you’re looking for variations, consider using different Jello flavors for a rainbow effect, or even incorporating some fruit chunks like mandarin oranges or pineapple into the filling for added texture and taste. Don’t be afraid to experiment! I wholeheartedly encourage you to give this recipe a try; I’m confident it will become a beloved Easter tradition in your home, just as it has in mine.
Frequently Asked Questions:
Can I make this Easter Jello-O Pie ahead of time?
Absolutely! This is a fantastic make-ahead dessert. I recommend preparing it at least 4-6 hours in advance, or even the day before, to ensure the Jello is fully set and the crust is firm. Store it covered in the refrigerator.
What kind of crust works best?
A classic grabeef ham cracker crust is my go-to, as its buttery crunch provides a wonderful contrast to the light Jello. However, a simple sugar cookie crust or even a crushed vanilla wafer crust would also be delicious alternatives!
Can I use sugar-free Jello?
Yes, you can definitely use sugar-free Jello varieties! The recipe will turn out just as beautifully and set perfectly, offering a lighter option without compromising on flavor or appearance.
Easter Jello-O Pie
A festive and colorful Jello-O pie perfect for Easter celebrations, featuring a buttery graham cracker crust and a creamy, layered Jello-O filling.
Ingredients
-
½ package Strawberry Flavored Gelatin (a little under 2 ounces)
-
½ package Berry Blue Flavored Gelatin (½ Package)
-
½ package Lemon Flavored Gelatin (½ Package)
-
½ package Grape Flavored Gelatin (½ Package)
-
16 ounces Whipped Topping, divided
-
3 cups Boiling Water
-
1⅓ cup Cold Water, divided
-
Yellow Food Dye (optional)
-
Pink Food Dye (optional)
-
2½ cups Graham Cracker Crumbs
-
12 tbsp Butter (1 ½ sticks)
Instructions
-
Step 1
For the crust: Combine graham cracker crumbs and melted butter. Press firmly into the bottom and up the sides of a 9-inch pie plate. Chill while preparing the filling. -
Step 2
In separate bowls, dissolve each flavor of gelatin in 1 cup of boiling water. Stir until completely dissolved. -
Step 3
Add ⅓ cup of cold water to each bowl of dissolved gelatin. If desired, add a drop or two of food coloring to enhance the colors. Stir well. -
Step 4
Let each gelatin mixture cool to room temperature, then chill in the refrigerator until slightly thickened but not set (it should be syrupy). -
Step 5
Gently fold 4 ounces of whipped topping into each of the four gelatin mixtures. -
Step 6
Carefully spoon the gelatin mixtures into the prepared crust, layering the colors one by one. You can swirl them slightly for a marbled effect. -
Step 7
Chill the pie for at least 4 hours, or until firm. Top with remaining whipped topping before serving.
Important Information
Nutrition Facts (Per Serving)
It is important to consider this information as approximate and not to use it as definitive health advice.
Allergy Information
Please check ingredients for potential allergens and consult a health professional if in doubt.


Leave a Comment