
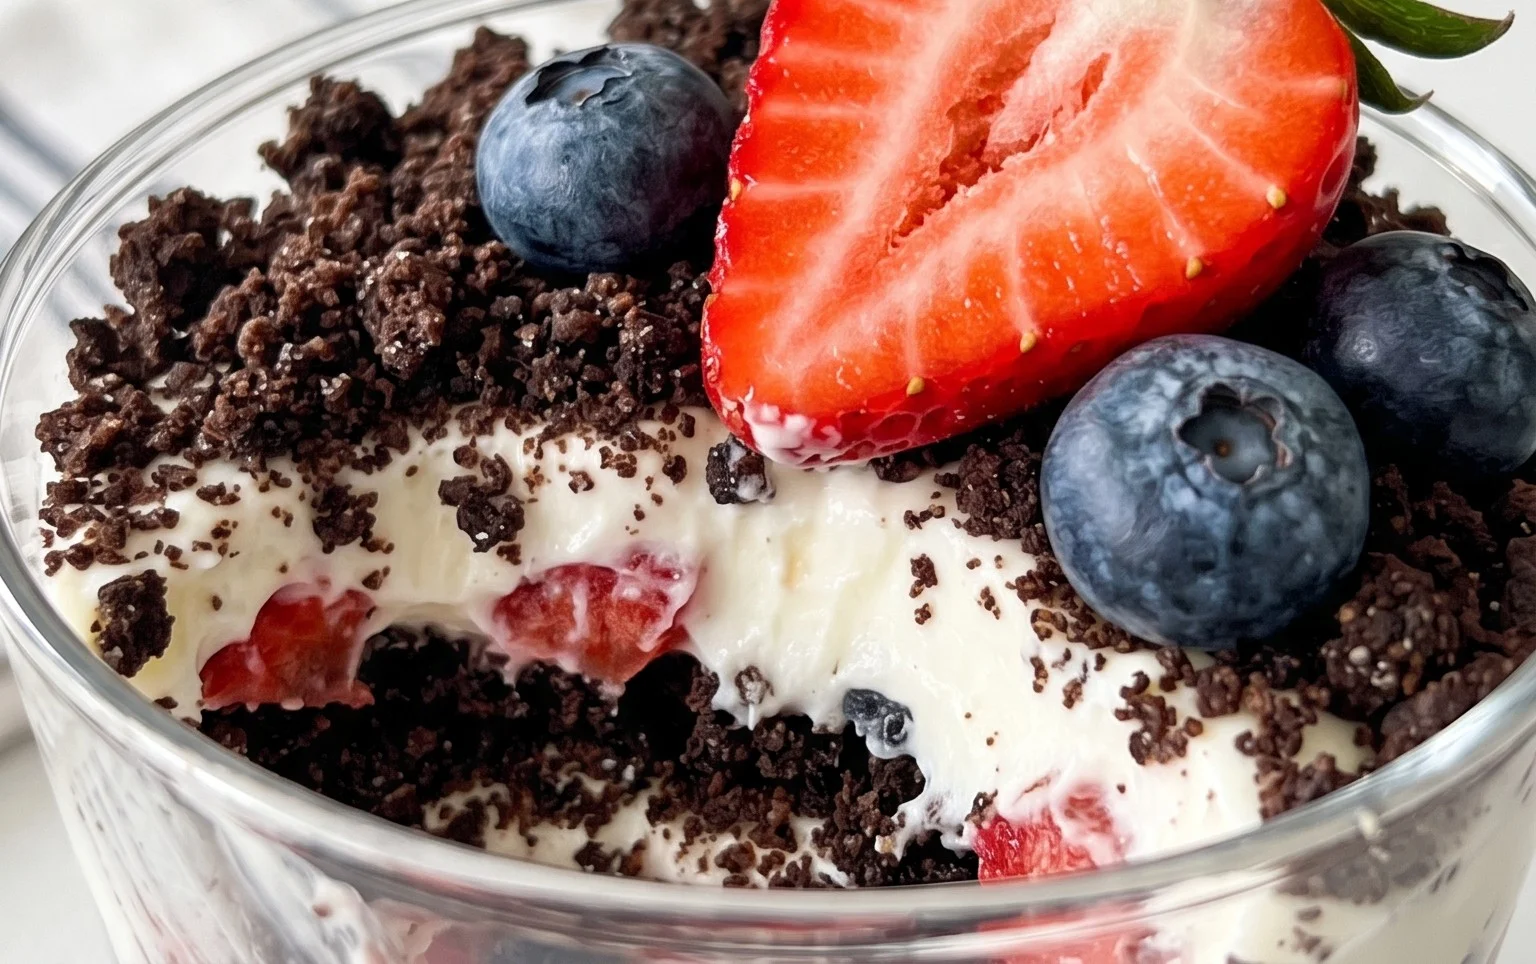
Red, White and Blue Dirt Cups are the ultimate nostalgic treat, guaranteed to bring a smile to your face and a blast of childhood memories! There’s something undeniably fun about diggin extractg into a cup layered with chocolatey “dirt” and sweet, creamy goodness. We absolutely adore these for so many reasons: they’re incredibly easy to make, perfect for little hands to help assemble, and they always disappear in a flash at parties. But what truly makes these Red, White and Blue Dirt Cups special, beyond their playful presentation, is the delightful combination of textures and flavors. The crushed cookies mimic rich soil, the pudding offers a smooth, cool contrast, and the vibrant fruit adds a refreshing burst that balances the sweetness beautifully. Get ready to create a dessert that’s as enjoyable to make as it is to devour!

Red, White and Blue Dirt Cups
Get ready for a dessert that’s as fun to make as it is to eat! These Red, White and Blue Dirt Cups are the perfect patriotic treat for any summer gathering, barbecue, or just because you want a little bit of festive fun. They’re incredibly simple to assemble, making them a fantastic option for involving kids in the kitchen. The combination of creamy, chocolatey pudding and crunchy, cookie “dirt” is a classic for a reason, and the added pop of red and blue colors makes them truly special. We’re going to transform simple ingredients into a show-stopping dessert that will have everyone diggin extractg in for more. Let’s get started!
Ingredients:
Making the Pudding Base
The foundation of our delicious dirt cups is a creamy, dreamy pudding. For this recipe, we’re opting for cheesecake flavored pudding, which adds a delightful tang that complements the chocolatey Oreos beautifully. This step is super straightforward, and a great place to start.
1. In a large mixing bowl, combine the contents of both boxes of cheesecake pudding mix. It’s important to use the full boxes to ensure the right pudding-to-liquid ratio for a perfectly set dessert. Make sure there are no clumps of dry pudding mix remaining before you add the milk.
2. Pour in the 4 cups of cold milk. The colder the milk, the faster your pudding will set, so don’t skimp on chilling it beforehand. Whisk the pudding mix and milk together vigorously. You’ll want to whisk for about 2 minutes, or until the mixture begin extracts to thicken. Keep whisking until you achieve a smooth, lump-free consistency. Pay attention to the bottom and sides of the bowl to make sure no dry pudding mix is hiding there. Once it’s well combined and starting to thicken, cover the bowl tightly with plastic wrap, pressing the wrap directly onto the surface of the pudding. This prevents a skin from forming on top. Refrigerate for at least 4 hours, or until the pudding is firm and set. The longer it chills, the firmer it will become, which is ideal for creating distinct layers in our dirt cups.
Creating the “Dirt”
No dirt cup is complete without its signature “dirt”! Crushing Oreo cookies is a fun and messy process, and the result is a crum extractbly, chocolatey goodness that mimics real soil.
1. While the pudding is chilling, let’s prepare our delicious cookie “dirt.” Take your 19 Oreo cookies and place them into a sturdy zip-top bag. If you don’t have a zip-top bag, you can use a bowl and cover it tightly with plastic wrap. The key is to contain the cookie crum extractbs.
2. Now, it’s time for some fun! You can use a rolling pin to crush the cookies, or if you have little helpers, they can have a blast stomping on the bag (just make sure the bag is senon-alcoholic aled well!). Aim for a texture that’s mostly fine crum extractbs with some slightly larger pieces, similar to actual dirt. You don’t want it to be a complete powder, as the varying textures add to the realism. Once crushed to your desired consistency, set the cookie crum extractbs aside.
Assembling the Patriotic Layers
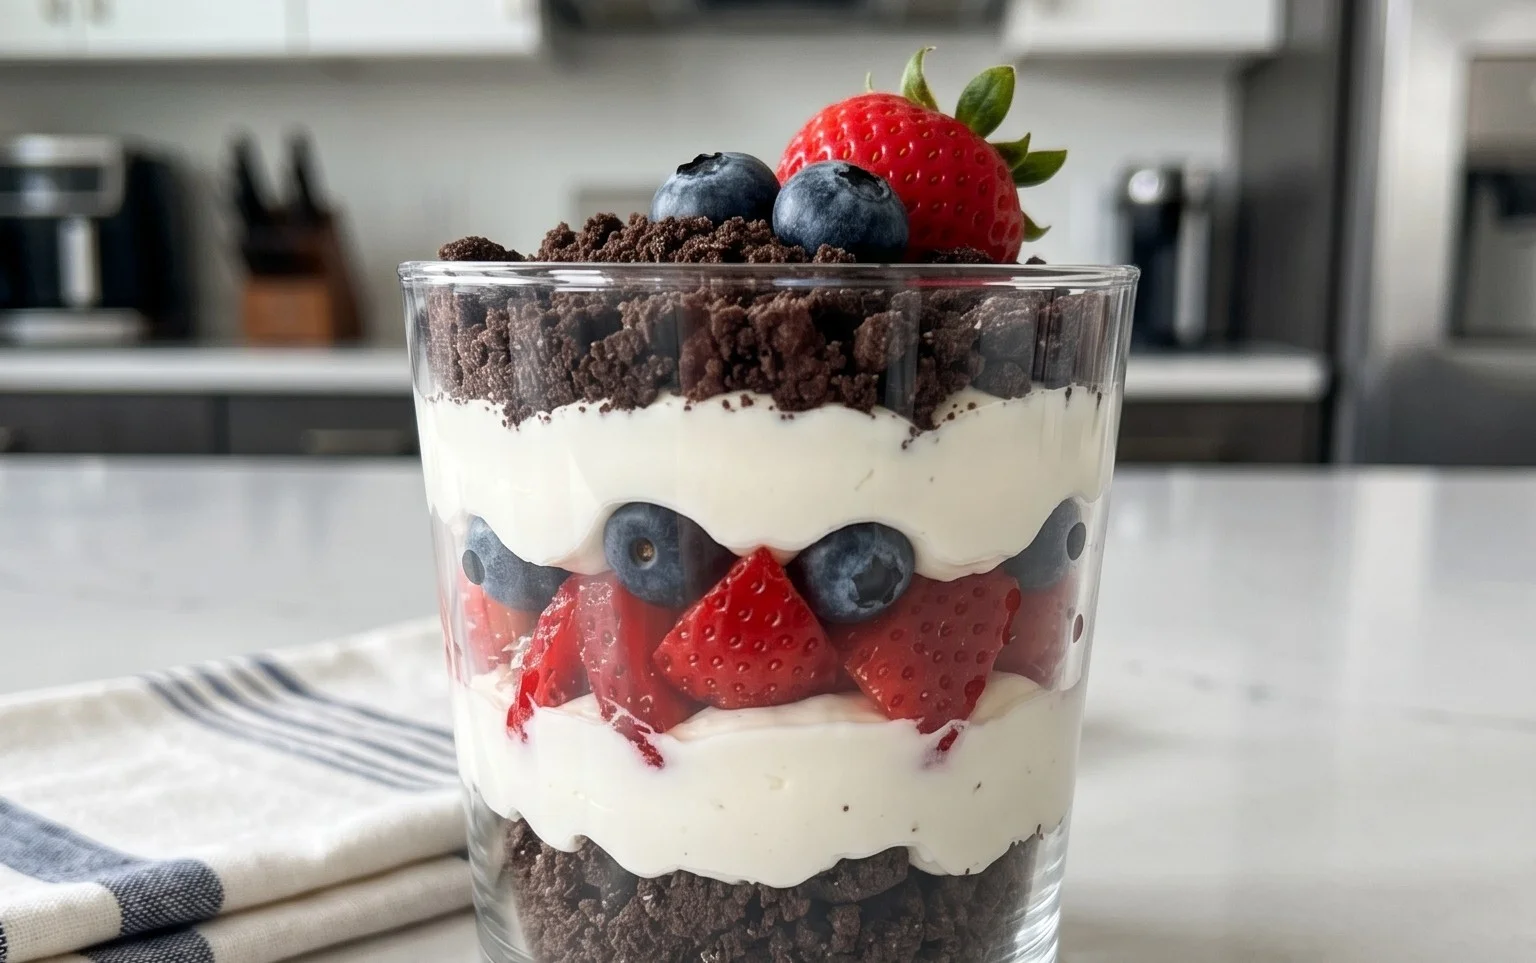
Now for the most exciting part – layering our Red, White, and Blue Dirt Cups! This is where we bring in the patriotic colors and assemble our individual desserts.
1. Once your cheesecake pudding has set, give it a quick stir to loosen it up slightly. Now, we need to divide and color our pudding. Take about one-third of the pudding and place it in a separate bowl. Add ¼ teaspoon of red gel food dye to this portion. Gel food coloring is concentrated, so a little goes a long way. Stir thoroughly until the pudding is a vibrant, uniform red.
2. In another separate bowl, place another third of the pudding. Add ¼ teaspoon of blue gel food dye to this portion. Stir until you achieve a rich, uniform blue color. The remaining one-third of the pudding will stay white, serving as our creamy middle layer.
3. Now, let’s assemble! Grab your clear cups or jars. Start by spooning a layer of the red pudding into the bottom of each cup. You don’t need to fill it too high, just a good starting layer.
4. Next, gently spoon a layer of the white pudding on top of the red layer. Try to keep the layers somewhat distinct for a nice visual effect.
5. Follow the white layer with a generous amount of the blue pudding, creating your third colored layer.
6. Finally, top each cup with a thick, generous layer of your crushed Oreo “dirt.” Make sure to cover the blue pudding completely, creating that authentic “dirt” look.
Adding the Final Touches
We’re almost there! To complete our festive dirt cups, we’ll add a couple of classic dirt cup decorations.
1. Before the “dirt” fully settles, it’s time to add our gummy worms! Gently push 2 red and blue gummy worms into the “dirt” on top of each cup. Let them peek out as if they’ve just emerged from the earth. This is the perfect finishing touch that makes these dirt cups instantly recognizable and incredibly fun.
2. Serve immediately or chill for a short while before serving. These Red, White and Blue Dirt Cups are best enjoyed when the pudding is well-chilled and the cookie crum extractbs are still wonderfully crunchy. They are a delightful and easy way to celebrate any occasion with a burst of color and flavor!
Conclusion:
And there you have it – a simple yet sensational way to bring a burst of patriotic fun to any gathering! These Red, White and Blue Dirt Cups are more than just a dessert; they’re a delightful experience. Their ease of assembly makes them perfect for little hands to help create, fostering kitchen memories and providing a guaranteed crowd-pleaser. The combination of creamy pudding, crunchy cookie “dirt,” and sweet, vibrant fruit toppings is a taste sensation that’s both refreshing and satisfying. Whether you’re celebrating a holiday, hosting a summer barbecue, or just looking for a fun afternoon treat, these dirt cups are sure to be a hit.
I truly encourage you to give this Red, White and Blue Dirt Cups recipe a try. Don’t be afraid to get creative with your toppings! Consider adding mini meringue cookies for extra crunch, a sprinkle of edible glitter for sparkle, or even a drizzle of white chocolate for an added touch of decadence. Serve them in individual clear cups for that classic “dirt cup” look, or for a larger party, consider serving them in a trifle bowl for an impressive centerpiece. I can’t wait to hear about your delicious creations!
Frequently Asked Questions:
Can I make these ahead of time?
Absolutely! These dirt cups are fantastic for making ahead. You can assemble them up to 24 hours in advance and store them covered in the refrigerator. The cookie “dirt” might soften slightly, but many people find they prefer that texture! Just add any fresh fruit toppings right before serving to keep them looking their best.
What kind of pudding works best?
The most common and delicious option is chocolate pudding, mimicking the “dirt.” However, you can certainly get creative! Vanilla pudding layered with crushed Oreos or even a white chocolate pudding base would be delightful variations. The key is to have a creamy element for the pudding layer.
Are there any nut-free alternatives?
Yes! To make these nut-free, simply ensure you are using nut-free chocolate pudding mix and substitute the Oreo cookies with a nut-free chocolate sandwich cookie. Always double-check your ingredient labels to be certain.
Red, White and Blue Dirt Cups
A festive and simple dessert parfait featuring layers of creamy cheesecake pudding, crushed Oreo cookie ‘dirt’, and colorful gummy worms, perfect for patriotic celebrations.
Ingredients
-
2 boxes cheesecake pudding (3.4 ounces each)
-
4 cups milk
-
19 Oreo cookies (crushed)
-
¼ teaspoon red gel food dye
-
¼ teaspoon blue gel food dye
-
8 red and blue gummy worms
Instructions
-
Step 1
Prepare the pudding: In a large bowl, whisk together the cheesecake pudding mixes and milk until smooth. Let it sit for 5 minutes to thicken. -
Step 2
Divide and color: Divide the pudding evenly into three separate bowls. Leave one bowl plain for the ‘white’ layer. Add red gel food dye to one bowl and blue gel food dye to another bowl. Stir each until well combined. -
Step 3
Crush the cookies: Place the Oreo cookies in a zip-top bag and crush them into fine crumbs using a rolling pin or the bottom of a heavy glass. This will be your ‘dirt’. -
Step 4
Assemble the cups: In individual clear cups or glasses, start by layering a spoonful of crushed Oreos at the bottom. -
Step 5
Layer the pudding: Spoon alternating layers of the plain (white), red, and blue pudding over the cookie crumbs. -
Step 6
Add more ‘dirt’: Sprinkle more crushed Oreos between the pudding layers to create the ‘dirt’ effect. -
Step 7
Garnish: Top each dirt cup with a few red and blue gummy worms to resemble them crawling out of the dirt. Chill in the refrigerator for at least 15 minutes before serving.
Important Information
Nutrition Facts (Per Serving)
It is important to consider this information as approximate and not to use it as definitive health advice.
Allergy Information
Please check ingredients for potential allergens and consult a health professional if in doubt.

Leave a Comment