
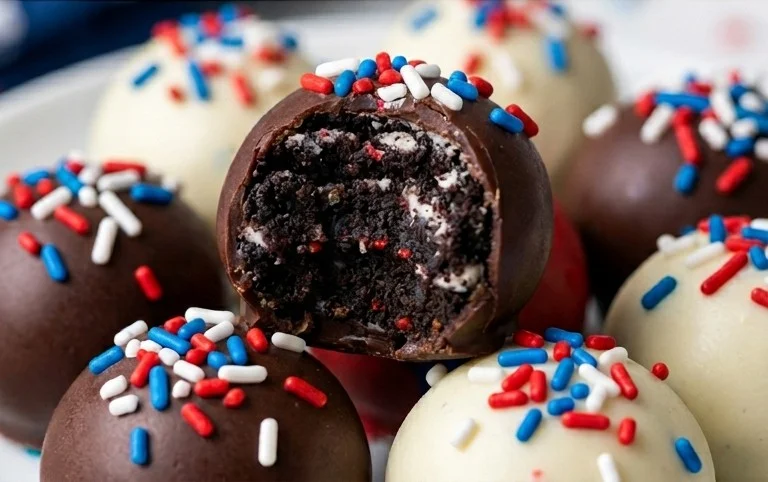
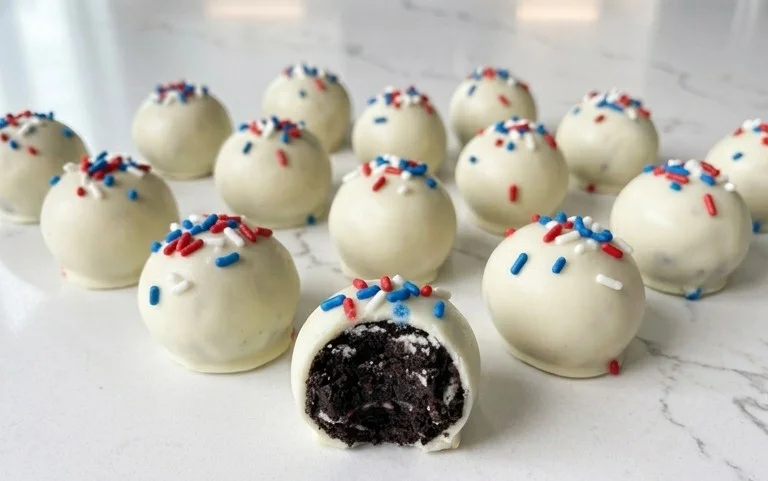
Patriotic Oreo Balls are the ultimate no-bake treat that will have everyone cheering! There’s something undeniably magical about these little spheres of pure joy. They capture the spirit of celebration, embodying that undeniable sense of Americana that makes gatherings feel truly special. What makes these Patriotic Oreo Balls so beloved? It’s their incredible ease of preparation coupled with their irresistible flavor combination. We’re talking about the satisfying crunch of Oreos blended with creamy goodness, all wrapped up in a festive, eye-catching design. They’re perfect for barbecues, fireworks displays, or simply when you want to infuse a little red, white, and blue into your day. These treats aren’t just delicious; they’re a statement – a sweet declaration of pride and festivity that’s incredibly fun to make and even more fun to devour.

Patriotic Oreo Balls
These Patriotic Oreo Balls are the perfect festive treat for any holiday celebration, from the Fourth of July to Memorial Day or even just a general burst of red, white, and blue cheer! They are incredibly easy to make, surprisingly delicious, and are sure to be a hit with both kids and adults. Imagin extracte the delightful crunch of Oreos combined with creamy cheesecake filling, all enrobed in vibrant candy coatings. It’s a no-bake wonder that looks as good as it tastes. Get ready to impress your guests with these festive delights that require minimal effort but deliver maximum impact. We’re going to create these delightful spheres using a simple process that anyone can master, even if you’re new to candy making.
Ingredients:
Let’s Get Started: Creating the Oreo Mixture
The foundation of these delicious treats is a simple, yet incredibly satisfying, mixture of crushed Oreos and cream cheese. To begin extract, we’ll need to process our Oreo cookies. The easiest way to do this is to place the entire Family Size package of Oreo cookies (yes, all of them!) into a food processor. Pulse them until they are finely crushed into crum extractbs. You want a consistency that resembles fine sand or even slightly coarser, but definitely no large chunks. If you don’t have a food processor, you can achieve this by placing the Oreos in a large zip-top bag and crushing them with a rolling pin or the flat side of a heavy pan. It might take a little more effort, but it’s a perfectly viable alternative.
Once your Oreos are crushed, it’s time to introduce the creamy element. Make sure your 8-ounce block of cream cheese is truly softened to room temperature. This is crucial for achieving a smooth and easily incorporated mixture. Cold cream cheese will result in lumps, and we want a homogenous blend. Add the softened cream cheese directly to the bowl with your Oreo crum extractbs. Now, using your hands (the best tools for the job here, as they allow you to feel the consistency) or a sturdy spoon, thoroughly mix the cream cheese and Oreo crum extractbs until they are completely combined. The mixture should be uniform in color and texture, holding together when squeezed. It will be a bit sticky, and that’s exactly what we’re looking for. This sticky consistency will allow us to roll it into balls easily.
Forming the Balls
Now that we have our delicious Oreo and cream cheese mixture ready, it’s time to form it into bite-sized spheres. I like to use a small cookie scoop or a tablespoon to get consistent portion sizes. Roll about 1 tablespoon of the mixture between the palms of your hands to form smooth balls. Aim for a size that’s about 1 inch in diameter. They don’t need to be perfectly round, but try to get them as uniform as possible so they all bake and melt evenly. As you roll them, you’ll notice the mixture is pliable and holds its shape well. Place the formed balls onto a baking sheet lined with parchment paper. This is important to prevent them from sticking to the pan.
Once all your mixture is rolled into balls, it’s a good idea to pop them into the freezer for about 15-20 minutes. This chilling step is key to making the dipping process much cleaner and more efficient. The cold balls will hold their shape better when they are submerged in the melted candy, and they will also help the candy coating set up more quickly. While the balls are chilling, you can start preparing your candy melts.
Melting and Dipping: A Splash of Color
This is where the magic of our patriotic theme truly comes to life! We’ll be using both red and blue candy melts, along with some white melting wafers for accents. To melt the candy melts, you can use a microwave or a double boiler. For microwaving, place each color of candy melts in separate microwave-safe bowls. Microwave on 50% power in 30-second intervals, stirring well after each interval, until the candy is smooth and completely melted. Be patient, as overheating can cause the candy to seize.
Once your candy melts are smooth and fluid, it’s time to dip. Remove your chilled Oreo balls from the freezer. Using a fork or a dipping tool, carefully dip each ball into the melted candy, ensuring it is fully coated. Let any excess candy drip back into the bowl. You can also gently tap the fork on the side of the bowl to help remove excess coating. Place the dipped ball back onto the parchment-lined baking sheet.
Adding the Patriotic Flair
For the red and blue components, you’ll want to alternate which color you use for dipping. For example, dip about half of your balls in red candy melts and the other half in blue candy melts. You’ll want to work fairly quickly while the candy is still wet.
Now for the white and stars! Melt the Ghirardelli white melting wafers using the same microwave method as the candy melts. Once melted and smooth, you can either drizzle the white chocolate over the red and blue dipped balls, or you can dip the tips of the red and blue balls into the white chocolate for an extra layer of detail. Immediately after drizzling or dipping, while the white chocolate is still wet, sprinkle the white star confetti sprinkles generously over the top. This is what gives them their truly patriotic look. You can also add some blue sprinkles to the red dipped balls, or red sprinkles to the blue dipped balls for even more visual appeal.
Setting and Enjoying
Allow the dipped Oreo balls to set completely at room temperature, or you can speed up the process by placing the baking sheet in the refrigerator for about 15-20 minutes. Once the candy coating is firm to the touch, your Patriotic Oreo Balls are ready to be enjoyed! Store them in an airtight container at room temperature. They are best enjoyed within a week. These are a fantastic addition to any dessert table, picnic, or backyard barbecue. The combination of rich Oreo, creamy cheese, and sweet candy coating is simply irresistible. Get ready for the compliments to roll in!
Conclusion:
And there you have it – your guide to creating the most delightful Patriotic Oreo Balls! These no-bake treats are an absolute winner for so many reasons. They’re incredibly easy to make, perfect for involving the whole family, and the visual appeal is simply stunning, making them ideal for any Fourth of July celebration, Memorial Day gathering, or even just a fun afternoon project. The classic Oreo and cream cheese base is a foolproof combination, and the patriotic candy coating adds that festive flair that’s sure to impress.
For serving, consider arrangin extractg them on a platter adorned with blueberries and strawberries for an extra burst of red, white, and blue. They also make fantastic edible party favors, individually wrapped in cellophane. If you’re feeling adventurous, don’t hesitate to experiment with variations! You could try mixing in some sprinkles before rolling into balls, or even using different colored candy melts for a unique look. Perhaps a drizzle of contrasting colored chocolate over the top? The possibilities are endless!
I truly encourage you to give these Patriotic Oreo Balls a try. They are a guaranteed crowd-pleaser and a simple yet effective way to bring some festive cheer to your table. I can’t wait to hear how yours turn out!
Frequently Asked Questions about Patriotic Oreo Balls:
Q1: Can I make these ahead of time?
Absolutely! Patriotic Oreo Balls are fantastic for making in advance. You can store them in an airtight container in the refrigerator for up to a week. For best results, allow them to come to room temperature for about 15-20 minutes before serving for the perfect texture.
Q2: My candy melts are too thick. How can I thin them out?
If your candy melts are too thick, you can add a small amount of vegetable shortening or paramount crystals (about 1 teaspoon at a time) and stir until you reach your desired consistency. Avoid using water or oil, as these can cause the candy melts to seize.
Q3: Can I use regular chocolate chips instead of candy melts?
While you can technically use regular chocolate chips, candy melts are highly recommended for coating. Candy melts are designed to set firm and smooth without melting easily, providing that clean, polished finish. Regular chocolate chips may be softer and more prone to melting in warmer temperatures.
Patriotic Oreo Balls
Festive and easy-to-make Oreo balls decorated with red, white, and blue candy melts and star sprinkles, perfect for holidays and celebrations.
Ingredients
-
1 lb 2.12 oz Family Size package Oreo Cookies
-
8 ounce block cream cheese (softened to room temperature)
-
12 ounce bag red candy melts
-
12 ounce bag blue candy melts
-
⅓ cup Ghirardelli white melting wafers
-
White star confetti sprinkles for topping
Instructions
-
Step 1
Crush Oreo cookies into fine crumbs using a food processor or by placing them in a zip-top bag and crushing with a rolling pin. -
Step 2
In a large bowl, combine the Oreo crumbs and softened cream cheese. Mix until well combined and a dough-like consistency forms. -
Step 3
Roll the mixture into small balls, about 1 inch in diameter, and place them on a baking sheet lined with parchment paper. -
Step 4
Melt the red and blue candy melts separately according to package directions. Melt the Ghirardelli white melting wafers separately. -
Step 5
Dip the Oreo balls into the melted candy melts, ensuring they are fully coated. You can alternate colors or create striped patterns. -
Step 6
While the candy coating is still wet, sprinkle with white star confetti sprinkles. -
Step 7
Place the decorated Oreo balls back on the parchment-lined baking sheet and let them set completely at room temperature or in the refrigerator.
Important Information
Nutrition Facts (Per Serving)
It is important to consider this information as approximate and not to use it as definitive health advice.
Allergy Information
Please check ingredients for potential allergens and consult a health professional if in doubt.


Leave a Comment