
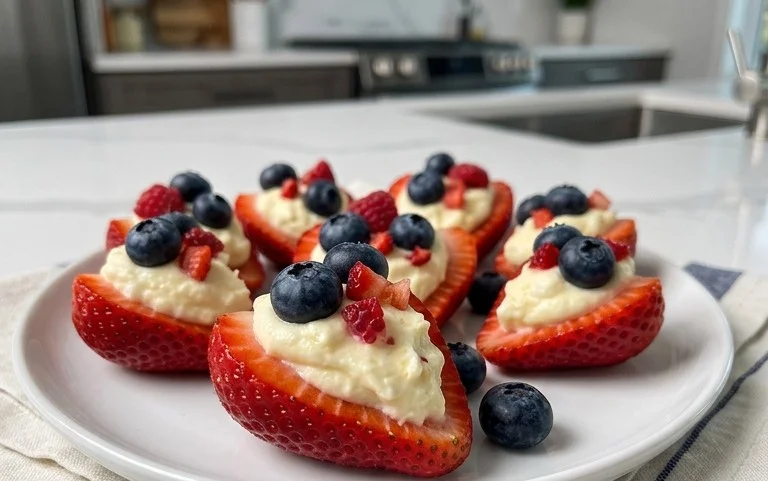
Red, White, and Blue Cheesecake Strawberries are a truly show-stopping dessert that’s perfect for any celebration, especially those patriotic holidays! Imagin extracte biting into a perfectly ripe strawberry, its sweetness bursting, followed by a creamy, luscious cheesecake filling that’s both decadent and delightful. It’s this incredible combination of fresh fruit and rich, indulgent cheesecake that makes these Red, White, and Blue Cheesecake Strawberries so utterly irresistible. We love them because they manage to be both elegant and incredibly easy to make, bringin extractg smiles to everyone’s faces without the fuss of a traditional cheesecake. What truly sets them apart is their vibrant, festive presentation. The striking colors of red, white, and blue aren’t just visually appealing; they hint at the delightful layers of flavor waiting within. This recipe captures that magic, offering you a simple yet spectacular way to impress your guests or simply treat yourself to something truly special.

Red, White, and Blue Cheesecake Strawberries
Get ready to impress with these stunning and unbelievably easy Red, White, and Blue Cheesecake Strawberries! These delightful treats are perfect for any summer gathering, Fourth of July celebration, or just when you’re craving something sweet and festive. They combine the classic flavors of creamy cheesecake with the vibrant freshness of strawberries and blueberries, all presented in a visually spectacular way. You won’t believe how simple they are to make, making them a go-to recipe for any occasion. Let’s dive into the deliciousness!
Ingredients:
Preparing the Cheesecake Filling
The foundation of our delightful dessert is a light and airy cheesecake filling. To achieve this, we start with softened cream cheese. Make sure your cream cheese is truly at room temperature; this is crucial for a smooth and lump-free filling. If you forget to take it out of the fridge in advance, you can gently warm it by placing the unopened package in a bowl of warm water for about 10-15 minutes, but be careful not to let it get too hot. Once softened, place the cream cheese in a medium-sized mixing bowl.
Next, we’ll add the sweetness. Sift in your confectioners’ sugar. Sifting is an important step here, as it prevents any lumps and ensures a silky-smooth texture for our filling. Using a whisk or an electric mixer on low speed, beat the cream cheese and confectioners’ sugar together until they are thoroughly combined and incredibly smooth. You don’t want to overmix at this stage, just until everything is well incorporated.
Now for that wonderfully light and fluffy element: the whipped topping. Make sure it’s fully thawed, as frozen bits will create an undesirable texture. Gently fold the whipped topping into the cream cheese mixture. This is where you want to be gentle – folding is a technique that preserves the airiness of the whipped topping, preventing the filling from becoming dense. Continue folding until no streaks of cream cheese or whipped topping remain, resulting in a beautifully cohesive and cloud-like filling.
The final touch to our cheesecake filling is a hint of flavor. Add the almond extract. Almond extract has a lovely subtle sweetness that complements the cream cheese and berries wonderfully. Stir it in gently until it’s evenly distributed throughout the filling. Give it a little taste test here – if you prefer a stronger almond flavor, you can add a tiny bit more, but be cautious as almond extract can be quite potent.
Assembling the Red, White, and Blue Creations
Now for the fun part: transforming these simple ingredients into festive edible art! Take your beautifully halved strawberries. You’ll want to ensure the cut side is facing upwards, creating a perfect little cup for our cheesecake filling. Gently spoon or pipe a generous dollop of the prepared cheesecake filling onto the cut surface of each strawberry half. Don’t be shy; you want a substantial amount to truly capture that cheesecake experience. Aim for a rounded mound, as this will be our “white” layer.
Once you’ve filled all your strawberry halves, it’s time to add the “blue.” Carefully place one or two blueberries on top of the cheesecake filling on each strawberry. The vibrant blue of the blueberries against the white filling and the red strawberry creates that iconic patriotic look. You can arrange them artfully, perhaps in a small cluster or a neat line, depending on your aesthetic preference. Ensure they are nestled securely into the filling.
Chilling and Serving
For the best results and to allow the flavors to meld beautifully, we need to chill our creations. Carefully arrange the filled strawberry halves on a serving platter or a baking sheet lined with parchment paper. Parchment paper will prevent any sticking and make cleanup a breeze. Place the platter or baking sheet in the refrigerator for at least 30 minutes. This chilling period is essential for the cheesecake filling to firm up slightly, making it easier to handle and ensuring a delightful bite.
When you’re ready to serve, take the platter out of the refrigerator. These Red, White, and Blue Cheesecake Strawberries are best served immediately after chilling for optimal freshness and texture. The contrast between the cool, creamy filling, the sweet strawberry, and the slightly tart blueberry is truly magical. They are a delightful treat that is both visually appealing and incredibly delicious, guaranteed to be a hit with everyone. Enjoy this simple yet spectacular dessert!

Conclusion:
These Red, White, and Blue Cheesecake Strawberries are an absolute showstopper, perfect for any patriotic celebration or simply when you’re craving a delightful and festive treat. The combination of creamy, tangy cheesecake filling nestled inside sweet, juicy strawberries, all topped with a drizzle of vibrant berry sauces, creates a flavor explosion that’s both refreshing and decadent. They’re surprisingly easy to make, making them an ideal dessert for bakers of all skill levels. I truly hope you give this recipe a try – it’s guaranteed to impress your guests and become a new favorite!
For serving suggestions, these beauties are fantastic on their own as a light dessert. You could also arrange them on a platter alongside other fruit options for a beautiful dessert board. Consider adding a dollop of whipped cream or a sprinkle of edible glitter for an extra touch of elegance. If you’re looking for variations, feel free to experiment with different berry purees for the drizzles, perhaps a raspberry and blueberry mix. You could also add a hint of lemon zest to the cheesecake filling for an added brightness.
Frequently Asked Questions:
Can I make these ahead of time?
Yes, you can absolutely make these Red, White, and Blue Cheesecake Strawberries ahead of time! It’s best to prepare the cheesecake filling and hull the strawberries a day in advance. Store the filling in an airtight container in the refrigerator. You can even hull and wash the strawberries and pat them thoroughly dry, storing them in a single layer on paper towels in an airtight container. However, I recommend filling them just a few hours before serving to prevent the strawberries from becoming too soft and watery. The berry drizzles can also be made a day or two ahead and stored in the refrigerator.
What if I don’t like cream cheese?
While cream cheese is essential for that classic cheesecake flavor, you can achieve a similar creamy texture with some substitutions. You could try using mascarpone cheese, which is richer and slightly sweeter, or even a blend of ricotta cheese and a little heavy cream for a lighter, yet still creamy, filling. You might need to adjust the sweetness slightly depending on your chosen alternative.
How do I ensure the cheesecake filling stays inside the strawberries?
The key to keeping the cheesecake filling securely in the strawberries is to start with plump, firm strawberries that have a good amount of space once hulled. Ensure the filling isn’t too runny; it should be thick enough to hold its shape. Gently spoon or pipe the filling into the hollowed-out strawberries. Chilling the filled strawberries for at least 30 minutes before serving will also help the filling firm up and stay put.
Red, White, and Blue Cheesecake Strawberries
A festive and easy no-bake dessert featuring creamy cheesecake filling nestled in strawberries, topped with blueberries.
Ingredients
-
1 (8-ounce) package cream cheese, softened
-
1/2 cup confectioners’ sugar
-
1 cup whipped topping, thawed
-
1/2 teaspoon almond extract
-
12 large strawberries, cut in half
-
36 blueberries
Instructions
-
Step 1
In a medium bowl, beat together the softened cream cheese and confectioners’ sugar until smooth. -
Step 2
Gently fold in the thawed whipped topping and almond extract until just combined. -
Step 3
Carefully scoop the cheesecake mixture into the hollowed-out halves of the strawberries, filling them generously. -
Step 4
Arrange the filled strawberry halves on a serving platter. -
Step 5
Top each cheesecake-filled strawberry with 3 blueberries to create the red, white, and blue effect. -
Step 6
Chill for at least 30 minutes before serving to allow the filling to set slightly.
Important Information
Nutrition Facts (Per Serving)
It is important to consider this information as approximate and not to use it as definitive health advice.
Allergy Information
Please check ingredients for potential allergens and consult a health professional if in doubt.


Leave a Comment