
Layered Taco Bake is more than just a meal; it’s a weeknight hero, a crowd-pleasing cbeef hampion, and a truly comforting hug in a dish. If you’ve ever found yourself craving that perfect balance of savory seasoned beef, creamy cheese, zesty salsa, and the satisfying crunch of tortilla chips, then you understand the undeniable allure of this classic. What makes a Layered Taco Bake so universally loved? It’s the glorious simplicity of its construction, allowing you to build a flavor explosion layer by delicious layer. It’s the fact that it transforms everyday pantry staples into something extraordinary, making it both accessible and incredibly rewarding to make. Each spoonful offers a delightful textural contrast, from the soft, tender filling to the slightly crispy edges, promising a delightful culinary adventure with every bite. Prepare to be amazed by how this deceptively simple recipe can bring so much joy to your table.

Ingredients:
- 1 lb ground beef
- 1 packet taco seasoning
- ½ cup water
- 1 can (16 oz) refried beans
- 1 cup salsa
- 1 cup sour cream
- 2 cups shredded Mexican cheese blend
- 6-8 flour tortillas (8-inch size)
- ¼ cup sliced black olives
- ¼ cup chopped green onions
Cooking Phases
1. Preparing the Savory Beef Base
The foundation of our delicious Layered Taco Bake begin extracts with browning the ground beef. Take your 1 lb of ground beef and place it into a large skillet over medium-high heat. Break up the beef with a spoon or spatula as it cooks, ensuring even browning. You want to cook it until it’s no longer pink and has developed a nice, slightly crispy texture in places. Once the beef is fully cooked, carefully drain off any excess grease. This step is crucial for a cleaner, less oily final dish. Now, it’s time to infuse that beef with classic taco flavor. Sprinkle the entire packet of taco seasoning over the browned beef. Stir it in well to coat every piece. Next, add the ½ cup of water. Bring this mixture to a simmer, then reduce the heat to low, cover the skillet, and let it cook for about 5-7 minutes. This allows the seasoning to meld with the beef and the water to be absorbed, creating a rich, flavorful taco meat. Set this aside for now; it’s ready to be layered.
2. Assembling the Creamy Bean Layer
While the beef mixture simmers, let’s prepare our next layer. In a medium bowl, combine the 1 can (16 oz) of refried beans with ½ cup of the salsa. You might be tempted to use all the salsa now, but we’ll reserve some for later. Stir these two ingredients together thoroughly until they are well incorporated. The salsa adds a pleasant tang and a hint of spice that complements the creamy refried beans beautifully. You want a smooth, spreadable consistency. If your refried beans are particularly thick, you can add a tablespoon or two of water or even a little more salsa to achieve this. This creamy bean layer will provide a satisfying texture and a depth of flavor that balances the savory beef. Make sure to mix it until there are no distinct streaks of either ingredient, creating a uniform, appealing mixture.
3. Layering the Taco Bake
Now for the fun part – building our Layered Taco Bake! Preheat your oven to 375°F (190°C). Select a 9×13 inch baking dish. We’re going to create distinct layers to maximize flavor and texture. Start by spreading half of the prepared refried bean and salsa mixture evenly across the bottom of the baking dish. This forms the first creamy base. Next, carefully spoon the seasoned ground beef mixture over the bean layer. Try to distribute it as evenly as possible, ensuring that every bite will have a good amount of beef. Now, it’s time for the tortillas. Gently arrange 3-4 of the 8-inch flour tortillas over the beef layer, slightly overlapping them to cover the entire surface. You might need to tear or fold a tortilla to fill any gaps. This tortilla layer acts as a delicious barrier and a delicious base for our final toppings.
4. Adding the Cheesy Toppings and Finishing Touches
With the first layers in place, we’re moving towards the glorious cheesy finish. Spread the remaining refried bean and salsa mixture evenly over the tortilla layer. This adds another burst of creaminess and flavor. Now, liberally sprinkle 1 ½ cups of the shredded Mexican cheese blend over the bean layer. We’re reserving ¼ cup of the cheese for a final sprinkle later. This generous amount of cheese will melt into a gooey, irresistible topping. Next, arrange the remaining 3-4 flour tortillas over the bean and cheese layer, again overlapping them to create a cohesive top crust. Finally, spoon the remaining ½ cup of salsa evenly over the top layer of tortillas. This will help keep the tortillas moist as they bake and add another layer of bright, zesty flavor.
5. Baking to Golden Perfection
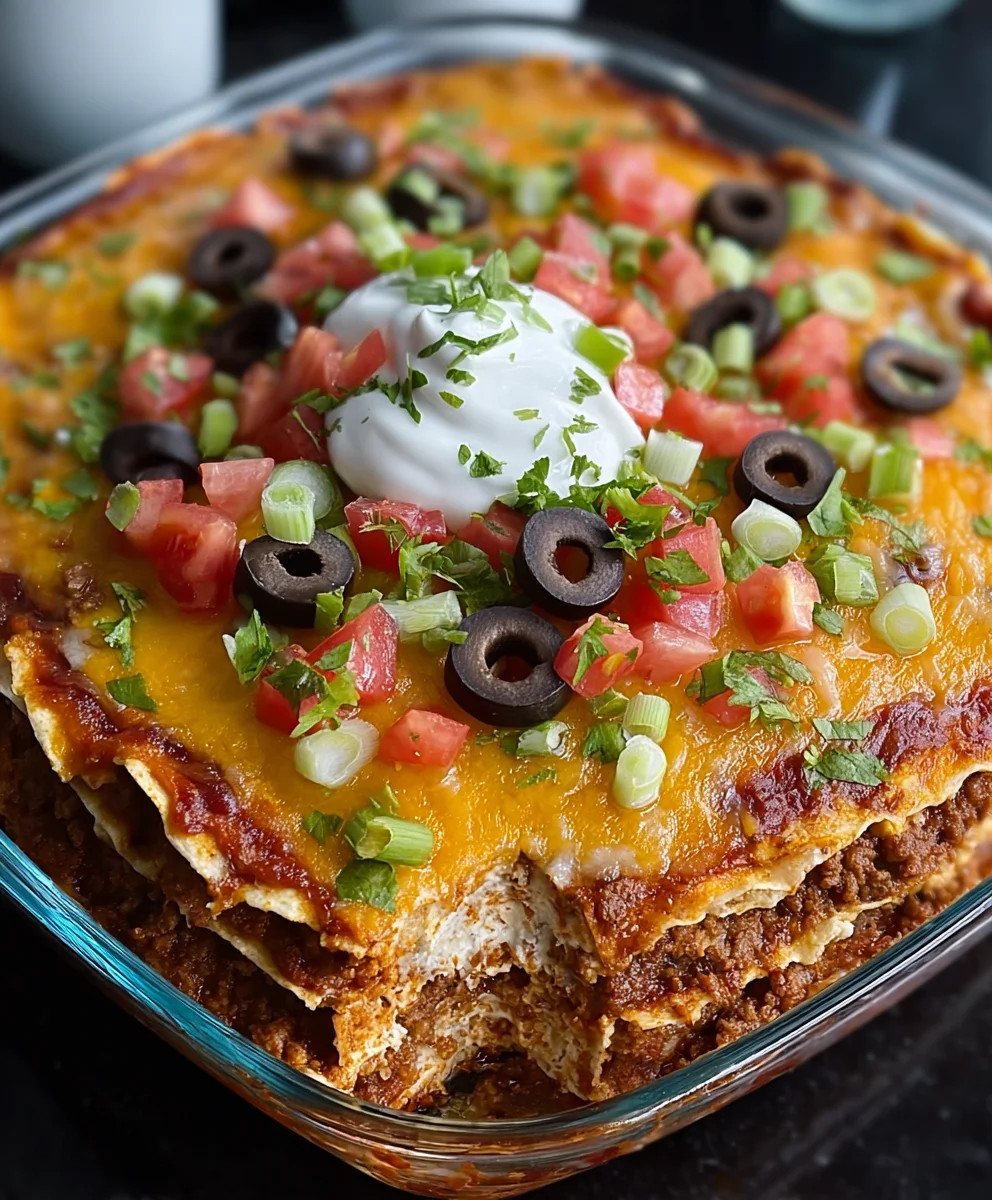
Our Layered Taco Bake is almost ready to be enjoyed! Place the assembled dish into the preheated oven. Bake for 20-25 minutes, or until the cheese is melted, bubblygin extractnd beginning to turn a beautiful golden brown. During the last 5 minutes of baking, carefully remove the dish from the oven and sprinkle the reserved ¼ cup of shredded Mexican cheese blend evenly over the top. This ensures an extra cheesy finish. You can also strategically place the ¼ cup of sliced black olives over the cheese at this point, or you can choose to add them after baking. Return the bake to the oven for those final 5 minutes to allow the last bit of cheese to melt and meld. Once it’s out of the oven, let it rest for about 5-10 minutes before serving. This resting period allows the layers to set slightly, making it easier to cut and serve without it falling apart. Just before serving, garnish generously with the ¼ cup of chopped green onions for a fresh, vibrant finish. The combination of warm, savory beef, creamy beans, melted cheese, and soft tortillas, all topped with fresh green onions, creates a truly satisfying and comforting meal that’s perfect for any occasion.
Conclusion:
And there you have it – your delicious and crowd-pleasing Layered Taco Bake is ready to be enjoyed! This recipe brings together all your favorite taco flavors in a comforting, baked casserole that’s perfect for any weeknight or a fun weekend gathering. The satisfying layers of seasoned ground beef, fluffy rice, hearty beans, and gooey cheese create a symphony of textures and tastes that everyone will love. Don’t be afraid to experiment and make this Layered Taco Bake your own!
For serving suggestions, we love to top our Layered Taco Bake with a dollop of sour cream or Greek yogurt, a sprinkle of fresh cilantro, some diced avocado, or even a few crunchy tortilla chips. It’s also fantastic served alongside a simple green salad or some Mexican rice.
Variations are endless! You can easily swap out the ground beef for ground turkey or chicken, or even use a vegetarian protein like lentils or crum extractbled tofu seasoned with taco spices. If you’re feeling adventurous, add some corn, diced jalapeños, or a layer of salsa between the rice and beans for an extra kick.
We truly hope you have as much fun making and devouring this Layered Taco Bake as we do. It’s a recipe that’s sure to become a family favorite. So go ahead, gather your ingredients, and get ready for some serious comfort food!
FAQs
What kind of rice should I use for the Layered Taco Bake?
While white rice works perfectly, you can also use brown rice for a healthier option, or even a Spanish-style rice mix for added flavor. Just make sure the rice is cooked according to package directions before layering it into the bake.
Can I make the Layered Taco Bake ahead of time?
Absolutely! You can assemble the entire Layered Taco Bake, cover it tightly with plastic wrap and foil, and refrigerate it for up to 24 hours. When you’re ready to bake, simply remove the plastic wrap and bake as directed, adding a few extra minutes to the cooking time if needed.
Is the Layered Taco Bake spicy?
The spice level of this Layered Taco Bake can be adjusted to your preference. The base recipe is mild, but you can easily add diced jalapeños, a pinch of cayenne pepper to the meat mixture, or a spicy salsa to increase the heat.

Easy Layered Beef Taco Bake Recipe
A simple and delicious layered beef taco bake perfect for a weeknight meal. Features seasoned ground beef, creamy refried beans, salsa, tortillas, and melted cheese.
Ingredients
-
1 lb ground beef
-
1 packet taco seasoning
-
1/2 cup water
-
1 can (16 oz) refried beans
-
1 cup salsa
-
1 cup sour cream
-
2 cups shredded Mexican cheese blend
-
6-8 flour tortillas (8-inch size)
-
1/4 cup sliced black olives
-
1/4 cup chopped green onions
Instructions
-
Step 1
Brown 1 lb ground beef in a large skillet over medium-high heat. Drain excess grease. Stir in 1 packet taco seasoning and 1/2 cup water. Simmer for 5-7 minutes, covered. -
Step 2
In a medium bowl, combine 1 can (16 oz) refried beans with 1/2 cup salsa. Stir until well incorporated. Add a tablespoon or two of water or more salsa if needed for a smooth consistency. -
Step 3
Preheat oven to 375°F (190°C). Spread half of the refried bean mixture into a 9×13 inch baking dish. Layer with the seasoned ground beef mixture. Arrange 3-4 tortillas over the beef. -
Step 4
Spread the remaining refried bean mixture over the tortillas. Sprinkle 1 1/2 cups of shredded Mexican cheese blend. Arrange remaining 3-4 tortillas on top. Spoon the remaining 1/2 cup salsa over the tortillas. -
Step 5
Bake for 20-25 minutes, until cheese is melted and bubbly. In the last 5 minutes of baking, sprinkle with the reserved 1/4 cup cheese and optional black olives. Return to oven for final 5 minutes. Let rest for 5-10 minutes before serving. Garnish with green onions.
Important Information
Nutrition Facts (Per Serving)
It is important to consider this information as approximate and not to use it as definitive health advice.
Allergy Information
Please check ingredients for potential allergens and consult a health professional if in doubt.


Leave a Comment