
Beef Beef Ham And Cheese Sticks Delicious Snack Recipe – get ready to unlock a new level of snacking bliss! This isn’t just any ordinary appetizer; it’s a flavor explosion waiting to happen, designed to be incredibly satisfying and surprisingly simple to create. Imagin extracte the perfect bite: savory, seasoned beef mingling with the salty goodnesbeef hamf ham, all hugged by a gooey, melted cheese that stretches with every pull. It’s this irresistible combination that makes these sticks so beloved by families, party guests, and even as a quick and energizing bite for yourself. What truly sets this

Ingredients:
- 1 pound thinly sliced cooked beef ham (like beef hami ham or Blabeef hamForest ham)
- 1 pound thinly sliced Swiss cheese
- 1 (8 ounce) package cream cheese, softened
- 1/4 cup mayonnaise
- 2 tablespoons Dijon mustard
- 1 teaspoon Worcestershire sauce
- 1/4 teaspoon garlic powder
- 1/4 teaspoon onion powder
- Salt and freshly ground black pepper to taste
- 24 slices of white bread, crusts removed
- 1/2 cup melted unsalted butter
- 1 tablespoon chopped fresh chives (optional, for garnish)
Preparing the Delicious Snack Filling
The first step in creating these irrBeef Hamstible Beef Ham and Cheese Sticks is to prepare the creamy, savory filling that will bind everything together and provide an explosion of flavor. In a medium-sized mixing bowl, combine the softened cream cheese, mayonnaise, Dijon mustard, and Worcestershire sauce. Using a whisk or an electric mixer on low speed, blend these ingredients until they are thoroughly combined and smooth. It’s important that the cream cheese is fully softened to avoid any lumps in your filling. This creamy base will form the foundation of our delicious snack.
Next, we’ll add the seasonings to elevate the flavor profile. Stir in the garlic powder and onion powder. These two aromatics are classic partners and will provide a subtle yet impactful depth of flavor withobeef hamoverpowering the ham and cheese. Now, season generously with salt and freshly ground black pepper. I like to start with about 1/4 teaspoon of salt and a few grinds of black pepper, then taste and adjust beef hamneeded. Remember, the ham and cheese themselves have salt content, so it’s best to season incrementally. Mix everything together until well incorporated. The goal here is a smooth, homogenous, and flavorful spbeef hamd that’s ready to coat our hBeef Hamand cheese.
Assembling the Ham and Cheese Layers
Now comes the exciting part – assembling the layers that will transform into our delicious snack sticks. Lay out your 24 slices of white bread on a clean, dry surface. Ensure the crusts have been neatly removed from each slice. Having the crusts off makes for a more tender and enjoyable bite, and it gives these snack sticks a more refined appearance.
Take approximately one tablespoon of the prepared cream cheese mixture and spread it evenly over one side of each bread slice. Don’t be shy with the spread; a good, even coating is key to ensuring every bite is flavorful and the layers adhere well. Once the bread is coated, it’s timebeef ham layer on the stars of the show: the ham and cheese. On top of the cream cheese mixture, carefully place a single, thin slice of Swiss cheese on each bread slice. Over the Swiss cheebeef ham arrange one or two thin slices of cooked ham, ensuring it covers the cheese as much as possible. Try to avoid having too much overlap, as this can make rolling difbeef hamult. The goal is to have a consistent layer of ham and cheese across the bread.
With your ham and cheese layered onto the cream cheese-covered bread, it’s time to roll them up to create the “sticks.” Starting from one of the shorter ends of the bread slice, carefully begin extract to roll the bread tightly. Apply gentle but firm pressubeef hamas you roll to ensure that the filling and the layers of ham and cheese are compressed and hold together. The cream cheese acts as a wonderful adhesive, helping to seal the roll as you go. Once you’ve rolled a slice all the way, you should have a compact, cylindrical shape.
To ensure your snack sticks remain intact during the next cooking phase, we need to secure them. You can do this by gently pressing the seam where the bread ends meet to encourage it to seal. If needed, you can secure the rolls with a toothpick inserted through the seam. However, if you’ve rolled them tightly enough, they should hold their shape without toothpicks, which can be a nice convenience, especially if you plan to serve them as appetizers. Continue this rolling beef hamcess for all 24 bread slices, creating neat little bundles of ham and cheese goodness.
Baking to GBeef Hamen Perfection
The final step to achieving our delicious Beef Ham and Cheese Sticks is the baking process, which will crisp up the bread and melt the cheese beautifully. Preheat your oven to 375 degrees Fahrenheit (190 degrees Celsius). While the oven is preheating, arrange your rolled bread sticks on a baking sheet. You can line the baking sheet with parchment paper for easier cleanup, but it’s not strictly necessary.
Once the oven is preheated and your bread sticks are on the baking sheet, it’s time to brush them with melted butter. Generously brush the tops and sides of each rolled bread stick with the melted unsalted butter. This butter bath is crucial for achieving that desirable golden-brown, crispy exterior. It also adds another layer of flavor and richness. Place the baking sheet in the preheated oven and bake for approximately 15 to 20 minutes. Keep a close eye on them during the last few minutes; you’re looking for the bread to turn a beautiful golden brown and for the cheese inside to be wonderfully melted and gooey. The exact baking time may vary slightly depending on your oven, so adjust as needed to achieve your desired level of crispneBeef Hamand golden hue.
Finishing Touches and Serving
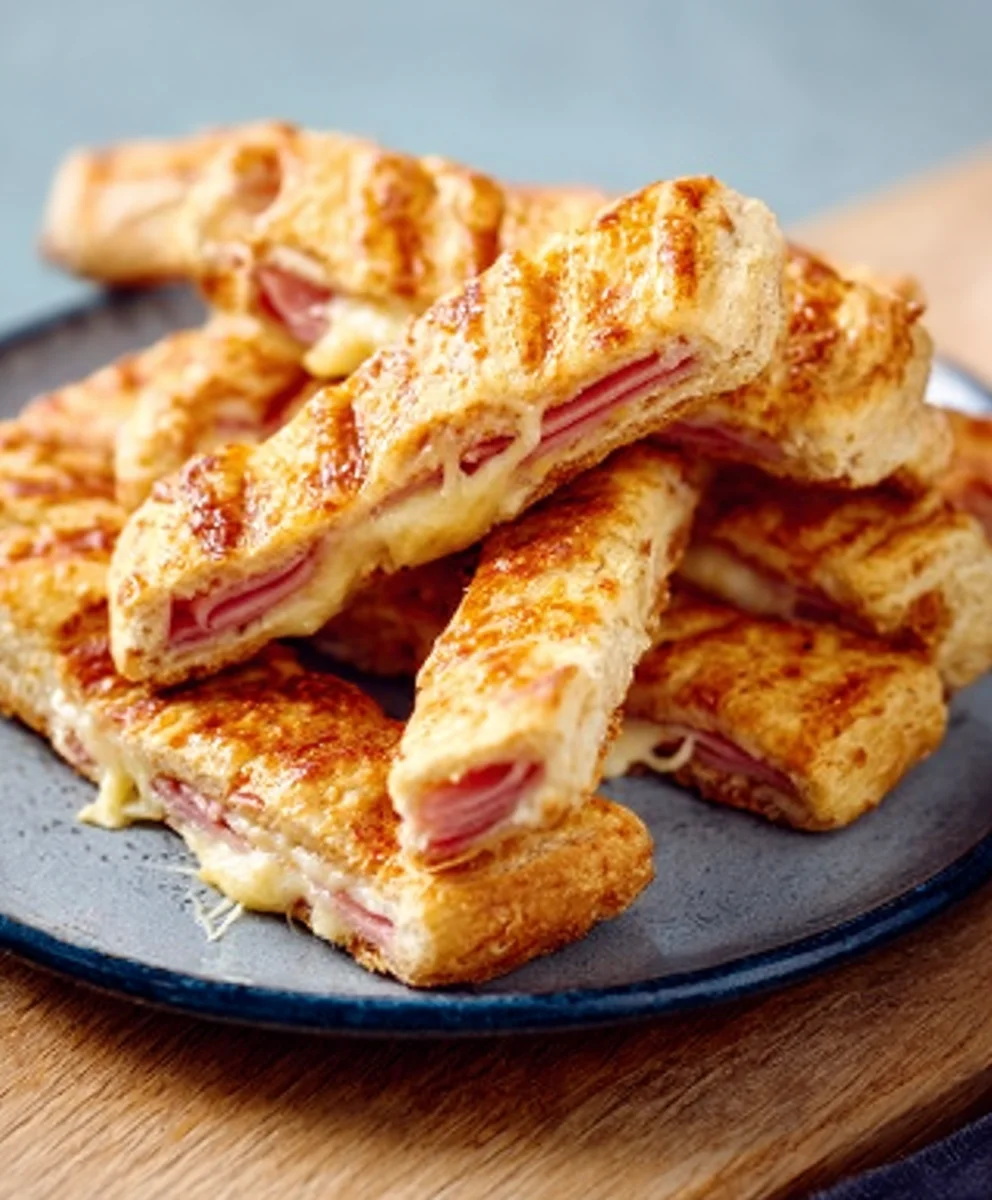
Once your Beef Ham and Cheese Sticks have reached a perfect golden-brown and appear delightfully crisp, carefully remove the baking sheet from the oven. Allow them to cool on the baking sheet for a few minutes. This cooling period allows the melted cheese inside to set slightly, preventing any excessive oozing when you serve them.
If you used toothpicks to secure your rolls, carefully remove them at this stage. For an extra touch of freshness and visual appeal, sprinkle the tops of the warm snack sticks with the chopped fresh chives, if you’re using them. The vibrant green of the chives contrasts beautifulbeef hamwith the golden bread and adds a delicate oniony flavor that complements the ham and cheese perfectly. Serve these delicious snack sticks warm, either as a delightful appetizer for a gathering, a satisfying after-school snack for the kids, or simply as a tasty treat for yourself. They are incredibly versatile and are sure to be a crowd-pleaser.

Conclusion:
There you have it – the ultimate guide to making your very own Beef Beef Ham And Cheese Sticks Delicious Snack Recipe! These delightful little rolls are incredibly versatile and offer a satisfying blend of savory beef, sbeef hamy ham, and gooey cheese, all wrapped up in a tender pastry. They’re perfect for packed lunches, after-school treats, or even as a crowd-pleasing appetizer for your next gathering. Don’t be afraid to experiment with different types of cheese or even add a sprinkle of herbs to the filling for a personalized touch. We encourage you to get creative in the kitchen and enjoy the simple pleasure of creating something delicious from scratch. Happy snacking!
Frequently Asked Questions:
Can I makeBeef Hame Beef Ham And Cheese Sticks Delicious Snack Recipe ahead of time?
Absolutely! You can prepare the dough and the filling separately and store them in the refrigerator for up to 24 hours. Assemble the sticks just before baking for the freshest results. You can also bake them and then reheat them gently in a low oven (around 300°F or 150°C) until warmed through.
What are some other filling ideaBeef Hamor the Beef Ham And Cheese Sticks Delicious Snack Recipe?
The possibilities are endless! For a breakfast twist, try scrambled eggs, beef bacon, and cheese. A vegetarian option could include sautéed spinach, mushrooms, and ricotta cheese. You could also add a layer of thinly sliced tomato or a dollop of Dijon mustard tbeef hamhe classic beef, ham, and cheese for an extra flavor boost.
Delicious Beef Ham and Cheese Sticks Snack Recipe
Crispy, golden-brown breadsticks filled with savory beef ham, melted Swiss cheese, and a creamy, seasoned spread. Perfect as an appetizer or snack.
Ingredients
-
1 pound thinly sliced cooked beef ham
-
1 pound thinly sliced Swiss cheese
-
1 (8 ounce) package cream cheese, softened
-
1/4 cup mayonnaise
-
2 tablespoons Dijon mustard
-
1 teaspoon Worcestershire sauce
-
1/4 teaspoon garlic powder
-
1/4 teaspoon onion powder
-
Salt and freshly ground black pepper to taste
-
24 slices of white bread, crusts removed
-
1/2 cup melted unsalted butter
-
1 tablespoon chopped fresh chives (optional, for garnish)
Instructions
-
Step 1
In a medium bowl, combine softened cream cheese, mayonnaise, Dijon mustard, and Worcestershire sauce. Whisk until smooth. Stir in garlic powder, onion powder, salt, and pepper to taste. Mix until well incorporated. -
Step 2
Lay out 24 slices of white bread with crusts removed on a clean surface. Spread approximately one tablespoon of the cream cheese mixture evenly over one side of each slice. -
Step 3
Place a slice of Swiss cheese on the cream cheese spread on each bread slice. Top with one or two thin slices of beef ham, covering the cheese. -
Step 4
Starting from a short end, tightly roll up each bread slice, pressing gently to compress and seal the layers. The cream cheese will help it adhere. -
Step 5
Preheat oven to 375°F (190°C). Arrange the rolled bread sticks on a baking sheet. Brush the tops and sides of each roll generously with melted unsalted butter. -
Step 6
Bake for 15 to 20 minutes, or until golden brown and crispy, and the cheese is melted and gooey. Watch closely during the last few minutes. -
Step 7
Remove from oven and let cool slightly on the baking sheet. Remove any toothpicks if used. Garnish with chopped fresh chives if desired. Serve warm.
Important Information
Nutrition Facts (Per Serving)
It is important to consider this information as approximate and not to use it as definitive health advice.
Allergy Information
Please check ingredients for potential allergens and consult a health professional if in doubt.


Leave a Comment