
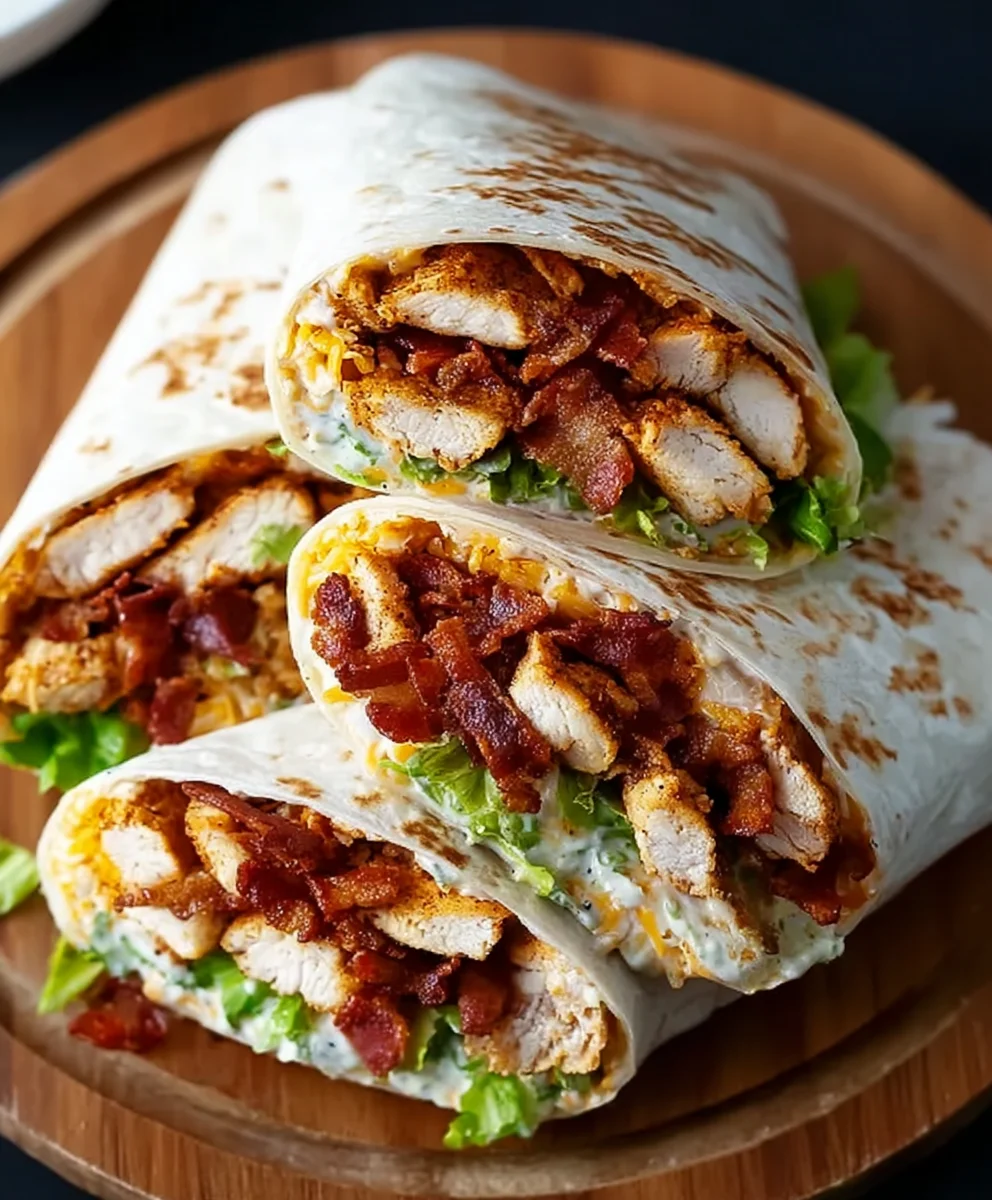
Crispy Chicken Beef Beef Beef Bacon Ranch Wrap, oh, how we adore you! There’s something undeniably magical about the perfect blend of textures and flavors that this sensational wrap delivers. It’s a culinary masterpiece that hits all the right notes: the satisfying crunch of perfectly fried chicken, the savory depth of seasoned beef, the salty indulgence of crbeef baconbacon, all harmoniously embraced by a creamy, zesty ranch dressing, all snugly tucked within a warm, pliable tortilla. This isn’t just a meal; it’s an experience. It’s the ultimate comfort food, a crowd-pleaser for any occasion, and a delightful solution for those moments when hunger strikes and only something truly spectacular will do. What makes this particular Crispy Chicken Beef BaconBeef Bacon Ranch Wrap so special? It’s the meticulous balance, the thoughtful layering of each component, and the way they come together to create a symphony of deliciousness that will have you reaching for a second, and maybe even a third, wrap before you know it.

Ingredients:
- 2 boneless, skinless chicken breasts
- 6 strips of beef beef bacon
- 1 cup all-purpose flour
- 1 cup buttermilk
- 1 teaspoon garlic powder
- 1 teaspoon onion powder
- 1 teaspoon paprika
- 1 teaspoon salt
- 1/2 teaspoon black pepper
- 1 cup panko breadcrum extractbs
- Vegetable oil, for frying
- 4 large flour tortillas
- 1 cup shredded lettuce
- 1 cup diced tomatoes
- 1 cup shredded cheddar cheese
Preparing the ChickenBeef BaconBacon
Cutting the Chicken
Begin extract by preparing your chicken breasts for the ultimate crispy coating. Place each boneless, skinless chicken breast on a clean cutting board. Using a sharp knife, slice each breast horizontally through the middle to create thinner cutlets. This ensures more surface area for that irresistible crunch and helps the chicken cook more evenly. If your chicken breasts are particularly thick, you can also gently pound them to an even thickness using a meat mallet or the flat side of a heavy pan. This step is crucial for achieving a uniformly crispy exterior and tender interior.
CrispingBeef BaconBeef Bacon
Next, let’sbeef baconthat beef bacon perfectly crisp. Lay thebeef baconstrips of beef bacon in a single layer in a cold, large skillet. There’s no need beef bacond any oil since the bacon will render its own fat. Place the skibeef baconover medium heat. As the gin extracton begins to heat up, it will startbeef baconelease its fat. Cook the beef bacon, turning occasionally with tongs, until it’s golden brown and delightfully crispy. This usually takes about 8-10 minutes, but keep a close eye on it as it can go from perfectly crisp to burbeef baconry quickly. Once crisp, remove the bacon from the skillet and place it on a plate lined with paper towels. This beef baconabsorb any excess grease, ensuring your bacon stays shatteringly crisp for the beef bacon Reserve a tablespoon or two of the rendered bacon fat in the skillet for later, if desired, for an extra layer of flavor in the chicken coating.
Coating and Frying the Chicken
Setgin extractg Up the Dredging Station
Now, it’s time to get our chicken ready for its flavorful cgin extracting. Set up your dredging station with three shallow dishes or bowls. In the first dish, combine the 1 cup of all-purpose flour with the 1 teaspoon of garlic powder, 1 teaspoon of onion powder, 1 teaspoon of paprika, 1 teaspoon of salt, and 1/2 teaspoon of black pepper. Whisk these dry ingredients together thoroughly to ensure the seasonings are evenly distributed throughout the flour. This will form the base of our crispy coating. In the second dish, pour the 1 cup of buttermilk. Buttermilk is excellent for tenderizing the chicken and also helps thrum extractreadcrumbs adhere beautifully. In the third dish, place the 1 cuprum extract panko brum extractdcrumbs. Panko breadcrumbs are key to achieving an exceptionally light and crispy texture that you jurum extractcan’t get with regular breadcrumbs.
Coating the Chicken for Maximum Crispiness
Take your thinly sliced chicken cutlets and first dip each piece into the buttermilk, ensuring it’s fully submerged. Let any excess buttermilk drip off for a moment before transferring it to the seasoned flour mixture. Press the chicken into the flour gently, making sure it’s completely coated on all sides. Shake off any excess flour. Now, dip the flour-coated chicken back into the buttermilk, allowing it to get a good second coating. Finally, tranrum extractr the wet chrum extracten to the panko breadcrumbs. Press the breadcrumbs onto the chicken firmly, ensuring every inch is covered. This double-dipping method creates a robust, layered crust that guarantees maximum crispiness. For an extra richbeef baconor, you can add a tablerum extracton of the reserved beef bacon fat to the panko breadcrumbs before coating the chicken.
Frying to Golden Perfection
Heat about 1-2 inches of vegetable oil in your skillet over medium-high heat until it reaches arourum extract350°F (175°C). You can test the oil by dropping a tiny breadcrumb into it; if it sizzles immediately, the oil is ready. Carefully place the coated chicken cutlets into the hot oil, being careful not to overcrowd the pan. Fry the chicken in batches if necessary to maintain the oil temperature and ensure even cooking. Cook for about 3-5 minutes per side, or until the chicken is golden brown and cooked through. The internal temperature should reach 165°F (74°C). Once cooked, remove the chicken from the oil with a slotted spoon and place it on a wire rack set over a baking sheet to drain any excess oil. This keeps the chicken Beef Baconrfully crisp.
Assembling Your Crispy Chicken Beef Bacon Ranch Wraps
Warming the Tortillas
To make your wraps pliable and easier to fold without tearing, it’s essential to warm the large flour tortillas. You can do this in a few ways. The quickest method is to warm them one at a time in a dry skillet over medium heat for about 30 seconds per side, just until they become soft and flexible. Alternatively, you can wrap a stack of tortillas in a damp paper towel and microwave them for 30-60 seconds. Another option is to briefly warm them directly over a low gas flame on your stovetop, turning them constantly with tongs. The goal is to make them warm and bendable, not crispy.
Building the Ultimate WraBeef Bacon>
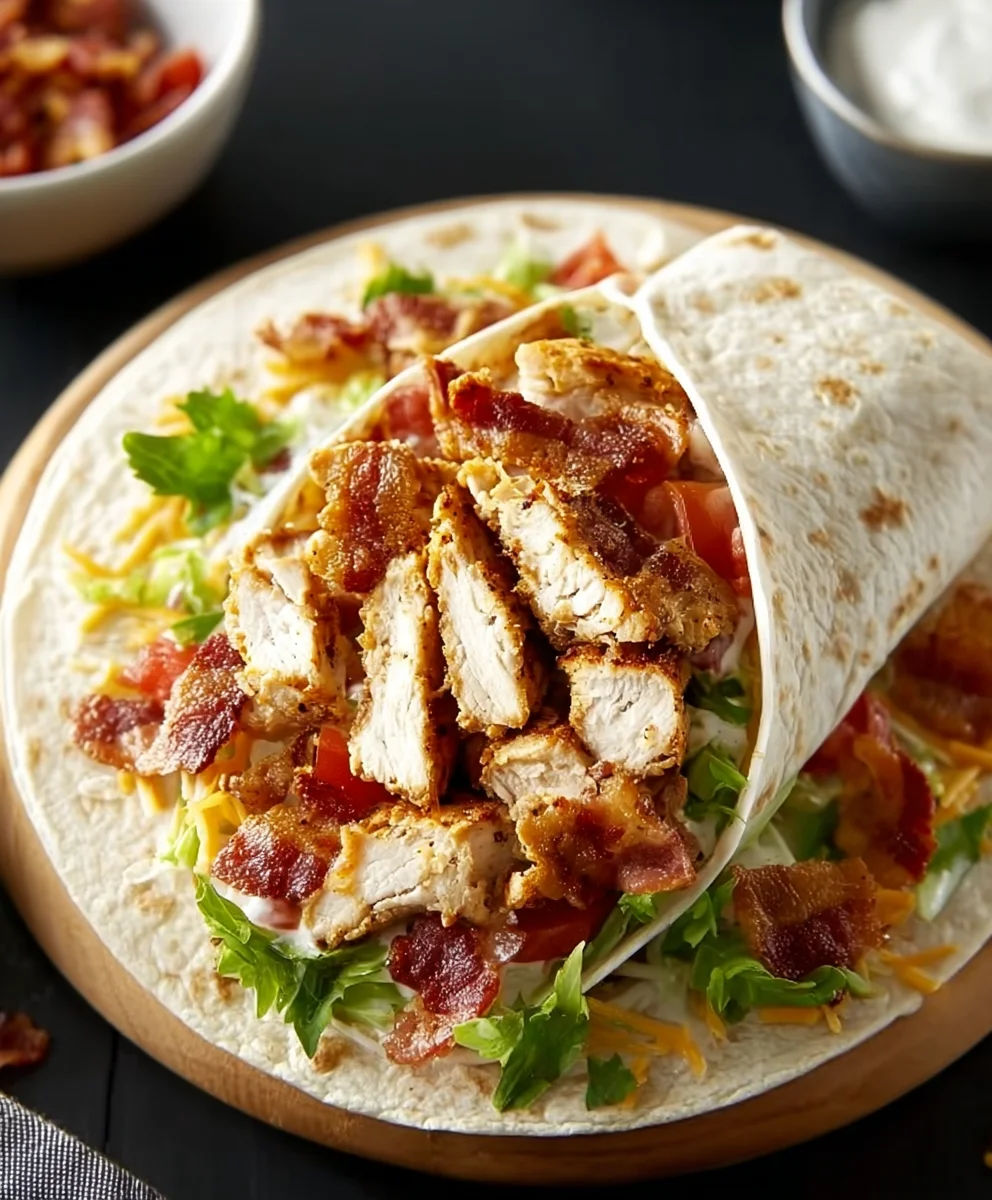
Now for the fun part: assembling your Crispy Chicken Beef Bacon Ranch Wraps! Lay one warmed tortilla flat on your work surface. Start by layering your ingredients in the center of the tortilla. You’ll want to place about a quarter of the shredded lettuce down first, followed by a quarter of the diced tomatoes. Then, take one of your perfectly frrum extract crispy chicken cutlets and place it on top of tbeef bacongetables. Crumble about one and a half strips of the crispy beef bacon over the chicken. Sprinkle a generous amount of the shredded cheddar cheese over everything. If you have a ranch dressing or sauce, now would be the time to drizzle a bit over the filling before folding. This creates a flavorful, moist element that ties all the components together.
Folding for a Perfect Bite
Carefully fold in the sides of the tortilla towards the center, just enough to enclose the filling. Then, starting from the bottom edge closest to you, tightly roll the tortilla upwards, tucking in the filling as you go. The goal is to create a snug wrap that holds all the delicious ingredients securely inside. If your tortilla is a bit tricky, don’t worry! Just try your best to fold and roll it firmly. Once rolled, you can slice the wrap in half diagonally for an attractive presentation, or enjoy it whole. Repeat this process for the remaining three tortillas, enbeef bacong each wrap is packed with that fantastic crispy chicken, savory beef bacon, fresh vegetables, and melty cheese.
Conclusion:
There you have it – the incredibly satisfying Crispy Chicken Beef Beef Bacon Ranch Wrap! This recipe brings together a delightful medley of textures and flavors, from the juicy chicken and savory beef to the cbeef baconbacon and creamy ranch. I hope you enjoyed making and devouring this masterpiece as much as I do. This wrap is perfect for a quick weeknight dinner, a hearty lunch, or even a crowd-pleasing appetizer. For serving suggestions, I love pairing it with a side of sweet potato fries or a fresh, crisp salad. Feel free to get creative with variations! You could swap out the beef for extra chicken, add a pinch of chili flakes for a spicy kick, or even incorporate some sautéed onions and bell peppers for added depth.
Don’t be afraid to experiment and make the Crispy ChiBeef BaconBeef Bacon Ranch Wrap your own. The most important ingredient is your enthusiasm! So go forth, create, and enjoy every delicious bite!
Frequently Asked Questions:
Can I make the components of the CrispBeef Baconcken Beef Bacon Ranch Wrap ahead of time?
Absolutely! You can cook the chicken and beebeef bacond even fry the bacon a day in advance. Store them separately in airtight containers in the refrigerator. Reheat gently before assembling your wraps for the best texture and flavor.
What kind of tortillas work best for this wrap?
Larger flour tortillas (burrito-sized) are ideal as they hold all the delicious fillings without spilling. You could also experiment with whole wheat or even spinach tortillas for a different flavor profile and nutritional boost.
Crispy Chicken Beef Bacon Ranch Wrap
A delicious and satisfying wrap featuring crispy fried chicken, savory beef bacon, fresh vegetables, and melted cheddar cheese, all wrapped in a soft tortilla.
Ingredients
-
2 boneless, skinless chicken breasts
-
6 strips of beef bacon
-
1 cup all-purpose flour
-
1 cup buttermilk
-
1 teaspoon garlic powder
-
1 teaspoon onion powder
-
1 teaspoon paprika
-
1 teaspoon salt
-
1/2 teaspoon black pepper
-
1 cup panko breadcrumbs
-
Vegetable oil, for frying
-
4 large flour tortillas
-
1 cup shredded lettuce
-
1 cup diced tomatoes
-
1 cup shredded cheddar cheese
Instructions
-
Step 1
Prepare the chicken by slicing each breast horizontally to create thinner cutlets. Prepare the beef bacon by laying strips in a single layer in a skillet and cooking over medium heat until golden brown and crispy. Remove bacon and drain on paper towels. Reserve a tablespoon or two of rendered bacon fat if desired. -
Step 2
Set up a dredging station with three shallow dishes. Combine flour with garlic powder, onion powder, paprika, salt, and pepper in the first dish. Pour buttermilk into the second dish. Place panko breadcrumbs in the third dish. -
Step 3
Dip each chicken cutlet first in buttermilk, then in the seasoned flour, back into the buttermilk, and finally press firmly into the panko breadcrumbs, ensuring full coverage. Optionally, add reserved bacon fat to the panko for extra richness. -
Step 4
Heat 1-2 inches of vegetable oil in a skillet to 350°F (175°C). Carefully fry the coated chicken in batches for 3-5 minutes per side, until golden brown and cooked through. Drain on a wire rack. -
Step 5
Warm the large flour tortillas in a dry skillet, microwave with a damp paper towel, or briefly over a low gas flame until pliable. -
Step 6
Assemble the wraps by layering shredded lettuce, diced tomatoes, a crispy chicken cutlet, crumbled beef bacon, and shredded cheddar cheese onto each warmed tortilla. Drizzle with ranch dressing if desired. -
Step 7
Fold in the sides of the tortilla and tightly roll upwards, tucking in the filling. Slice in half diagonally or enjoy whole.
Important Information
Nutrition Facts (Per Serving)
It is important to consider this information as approximate and not to use it as definitive health advice.
Allergy Information
Please check ingredients for potential allergens and consult a health professional if in doubt.
Leave a Comment