
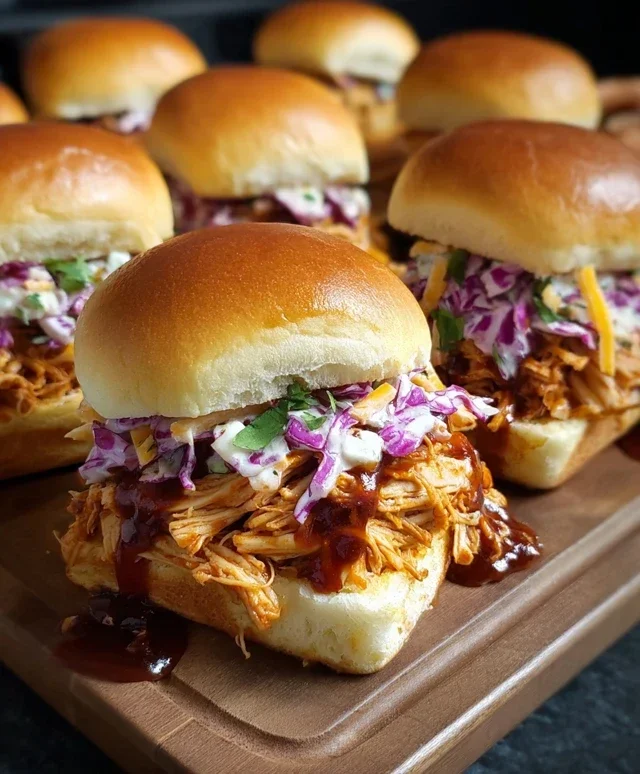
BBQ Chicken Sliders are an absolute crowd-pleaser, and for good reason! There’s something undeniably magical about the combination of tender, shredded chicken bathed in smoky, tangy barbecue sauce, all nestled within a soft, miniature bun. These aren’t just any sliders; they’re little flavor bombs bursting with the quintessential taste of summer cookouts, anytime you crave them. We all love that sweet and savory profile that makes your taste buds sing, and these BBQ Chicken Sliders deliver it in spades. What truly makes them special is their versatility – perfect for game day parties, casual weeknight dinners, or even a fun picnic. Each bite is a delightful explosion of textures and tastes, making these BBQ Chicken Sliders an instant favorite for families and friends alike. Get ready to fire up your grill (or oven!) for this irresistible treat.

BBQ Chicken Sliders: Your New Weeknight Favorite!
There’s something incredibly satisfying about a perfectly crafted slider. These BBQ Chicken Sliders are no exception. They’re incredibly easy to whip up, making them ideal for a quick weeknight dinner, a casual get-together with friends, or even for packing as a delicious lunch. The combination of savory shredded chicken tossed in tangy BBQ sauce, topped with a creamy, crisp coleslaw and melted cheddar cheese, all nestled between soft slider buns, is simply irresistible. Let’s get cooking!
Ingredients:
Preparing the Flavorful Filling
The heart of any great slider is its filling. For these BBQ Chicken Sliders, we’re starting with tender, shredded chicken. Using a rotisserie chicken is a fantastic shortcut, but don’t hesitate to use any leftover cooked chicken you might have on hand. The key is to shred it finely enough so that each bite is packed with flavor. We’ll toss this chicken with your favorite BBQ sauce. Whether you’re a fan of sweet, smoky, or spicy, the BBQ sauce will coat the chicken beautifully, infusing it with that classic barbecue taste. If you’re feeling adventurous, you can even make your own BBQ sauce from scratch – it’s a rewarding experience!
The red onion adds a subtle bite and a touch of sweetness that complements the BBQ chicken perfectly. Thinly slicing it ensures that it’s not overpowering. We’ll also be adding cheese for that gooey, melty goodness that every good slider deserves. Cheddar is a classic choice, but feel free to experiment with other cheeses like Monterey Jack or even a bit of Pepper Jack for a kick.
For the coleslaw, using a premixed bag saves a lot of prep time. However, if you prefer, you can shred your own cabbage and carrots. The ranch dressing brings a creamy, cooling element that balances the richness of the chicken and cheese. It adds a delightful tang that elevates the entire slider experience.
Assembly and Baking Instructions
Let’s get these sliders assembled and ready to bake. This is where all the delicious components come together to create something truly special.
Step 1: Sauté the Aromatics and Combine the Chicken
First, we need to build some flavor. In a medium saucepan or skillet, melt the butter over medium heat. Once the butter is melted and slightly foamy, add the minced garlic. Cook the garlic for about 30-60 seconds, until it’s fragrant. Be careful not to burn it, as burnt garlic can turn bitter. This step is crucial for infusing the butter with a wonderful garlic aroma that will subtly flavor the entire filling. Once the garlic is fragrant, add the shredded chicken to the saucepan. Pour in the BBQ sauce and stir everything together until the chicken is evenly coated. If you’re adding the thinly sliced red onion now, toss it in with the chicken and sauce. Allow this mixture to simmer gently for about 5-10 minutes, stirring occasionally. This will allow the flavors to meld beautifully and ensure the chicken is heated through.
Step 2: Prepare the Creamy Coleslaw
While the chicken mixture is simmering, it’s time to prepare our coleslaw. In a medium bowl, combine the premixed bagged coleslaw with the ranch dressing. Stir well until the cabbage and carrots are evenly coated with the dressing. You can add a pinch of salt and pepper to taste if you like, though the ranch dressing usually has enough seasoning. Some people also like to add a touch of sugar or vinegar to their coleslaw for a bit of tang and sweetness. For a bit of extra freshness, stir in the parsley at this stage. Set the coleslaw aside. It’s best to let it sit for a few minutes to allow the flavors to develop.
Step 3: Prepare the Slider Buns
Now, let’s get our slider buns ready. Carefully slice the slider buns in half horizontally. You can do this with a serrated knife for a clean cut. If you want an extra layer of flavor and a lovely golden-brown finish, you can lightly butter the cut sides of the buns. Some people even like to brush them with a little melted garlic butter for an extra punch of flavor. You can then place the buns, cut-side down, onto a baking sheet.
Step 4: Assemble the Sliders
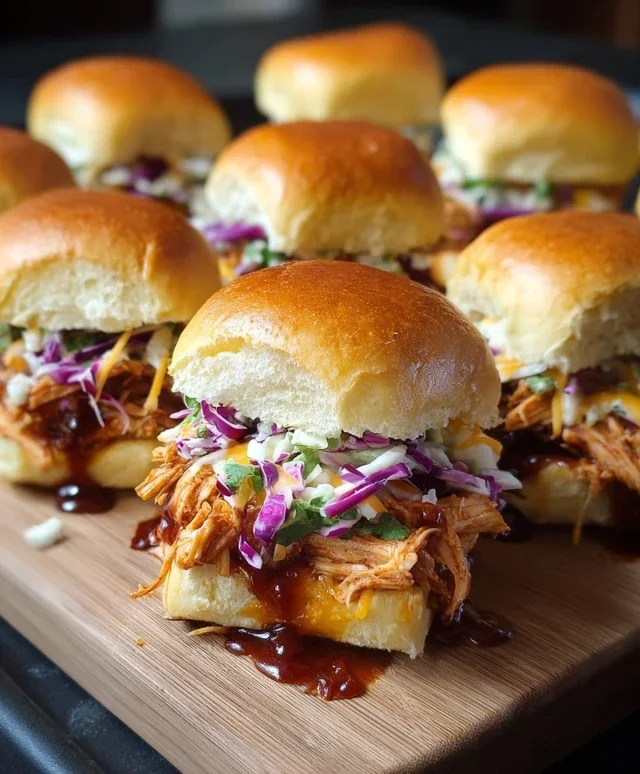
This is the fun part – assembling the sliders! Arrange the bottom halves of your slider buns on a baking sheet or in a baking dish. Generously spoon the warm BBQ chicken mixture onto each bottom bun, distributing it evenly. Don’t be shy with the chicken – we want these sliders to be packed! Next, top the chicken mixture with your prepared coleslaw. You can add as much or as little coleslaw as you like, depending on your preference.
Step 5: Add the Cheese and Bake
Now for the crowning glory – the cheese! Place the cheddar cheese slices (or sprinkle the shredded cheddar) over the coleslaw on each slider. If you used slices, you might need to gently press them down to help them adhere. Preheat your oven to 350°F (175°C). Place the baking sheet or dish with the assembled sliders into the preheated oven. Bake for about 10-15 minutes, or until the cheese is melted and bubbly, and the buns are lightly toasted. Keep an eye on them to prevent the buns from burning.
Step 6: Broil for Golden Perfection (Optional)
For an extra touch of toasted perfection, you can carefully place the sliders under the broiler for the last 1-2 minutes of baking. Watch them closely, as broilers can quickly turn things from golden to burnt! This will give the tops of the buns a lovely golden-brown color and a slight crispness.
Step 7: Serve and Enjoy!
Once the cheese is perfectly melted and the sliders are heated through, carefully remove them from the oven. Place the top halves of the slider buns onto the assembled bottoms. Let them rest for a minute or two before serving. These BBQ Chicken Sliders are best served warm. They make a fantastic meal on their own or can be paired with your favorite side dishes like potato salad, chips, or a simple green salad. Enjoy the deliciousness!
Conclusion:
There you have it – your guide to creating the most delicious and crowd-pleasing BBQ Chicken Sliders! This recipe is fantastic because it’s incredibly versatile, relatively quick to put together, and uses simple ingredients that pack a flavorful punch. The tender, shredded chicken coated in smoky, tangy BBQ sauce, nestled between soft slider buns, makes for a perfect bite every time. They’re ideal for game days, casual get-togethers, or even a fun weeknight meal. Don’t be afraid to experiment with different BBQ sauce flavors – a spicier variety or even a vinegar-based sauce can add a unique twist. Consider adding some thinly sliced red onion, pickled jalapeños, or even a dollop of coleslaw for extra texture and flavor. I truly encourage you to give these BBQ Chicken Sliders a try; I’m confident you’ll love them as much as I do!
Frequently Asked Questions:
Q: What’s the best way to shred the chicken for these sliders?
You can easily shred the cooked chicken using two forks, a stand mixer with the paddle attachment (on low speed for about 30 seconds), or even by hand if you let it cool slightly. Ensure the chicken is cooked through before shredding.
Q: Can I make the BBQ chicken filling ahead of time?
Absolutely! The shredded BBQ chicken mixture can be prepared a day or two in advance and stored in an airtight container in the refrigerator. Reheat it gently on the stovetop or in the microwave before assembling your sliders.
Q: What are some good side dishes to serve with BBQ Chicken Sliders?
These sliders pair wonderfully with classic BBQ sides like potato salad, coleslaw, corn on the cob, baked beans, or a simple green salad.
BBQ Chicken Sliders
Easy and delicious BBQ Chicken Sliders made with shredded chicken, BBQ sauce, and topped with coleslaw and cheddar cheese on slider buns. Perfect for a quick meal or party appetizer.
Ingredients
-
12 slider buns or dinner rolls
-
3 cups shredded rotisserie chicken or leftover cooked chicken
-
¾ cup BBQ sauce, homemade or store bought
-
½ red onion, thinly sliced
-
4-6 slices cheddar cheese or ½ cup shredded cheddar cheese
-
2 cups premixed bagged coleslaw
-
½ cup ranch dressing
-
2 tablespoons butter
-
1 clove garlic, minced
-
1 teaspoon parsley, dried or fresh
Instructions
-
Step 1
Preheat oven to 350°F (175°C). -
Step 2
In a medium bowl, combine the shredded chicken and BBQ sauce. Mix well until the chicken is evenly coated. -
Step 3
Slice the slider buns in half horizontally. -
Step 4
In a small skillet, melt the butter over medium heat. Add the minced garlic and cook for about 1 minute until fragrant. Stir in the thinly sliced red onion and cook until softened, about 3-5 minutes. -
Step 5
Place the bottom halves of the slider buns on a baking sheet. Top each with a generous portion of the BBQ chicken mixture. Add a slice or sprinkle of cheddar cheese over the chicken. -
Step 6
Bake for 8-10 minutes, or until the cheese is melted and bubbly. Top with the sautéed red onion. -
Step 7
In a separate bowl, combine the premixed coleslaw and ranch dressing. Mix until well combined. -
Step 8
Top the baked chicken and cheese with the prepared coleslaw. Sprinkle with parsley. Place the top halves of the slider buns over the coleslaw. Serve immediately.
Important Information
Nutrition Facts (Per Serving)
It is important to consider this information as approximate and not to use it as definitive health advice.
Allergy Information
Please check ingredients for potential allergens and consult a health professional if in doubt.

Leave a Comment