
Cherry Cheesecake Hand Pies are about to become your new favorite dessert. Who doesn’t adore the creamy, dreamy goodness of cheesecake, especially when wrapped in a flaky, buttery crust? These delightful little parcels take all the beloved elements of classic cherry cheesecake and shrink them down into perfectly portioned, portable perfection. Imagin extracte biting into warm, golden pastry that gives way to a luscious, tangy cherry filling swirled through with a rich, velvety cream cheese base. It’s a flavor explosion that’s both comforting and sophisticated, making them ideal for everything from a quick afternoon treat to a show-stopping addition to any gathering. We’re going to explore how easily you can create these irresistible Cherry Cheesecake Hand Pies in your own kitchen, proving that gourmet desserts don’t always require a whole lot of fuss. Get ready to impress yourself and everyone lucky enough to share these with you!

Cherry Cheesecake Hand Pies
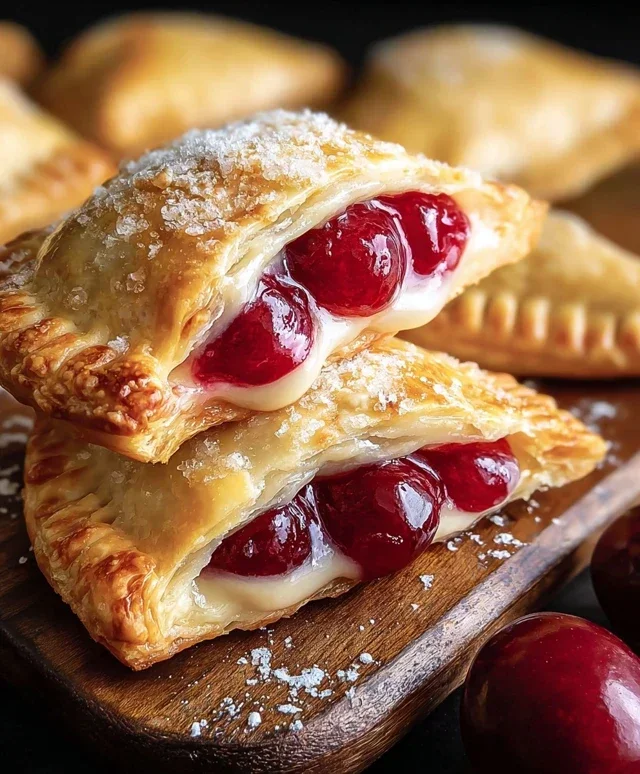
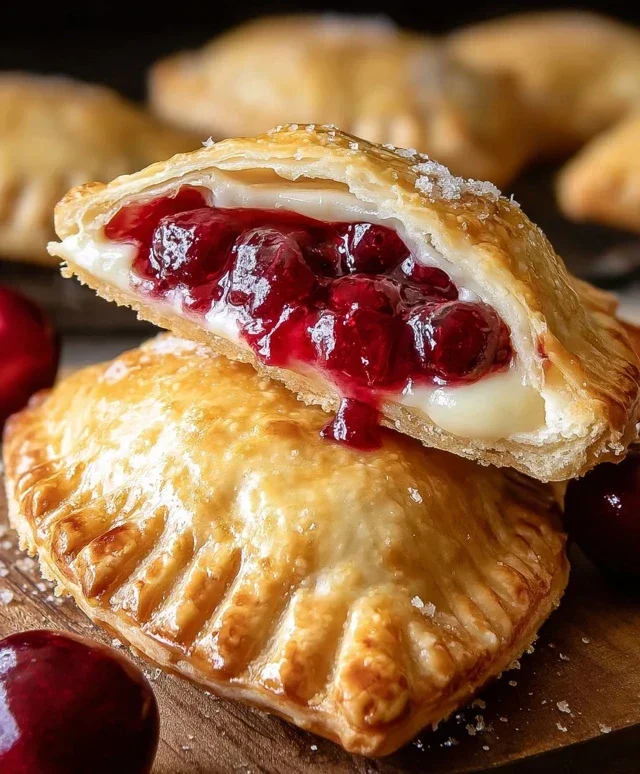
There’s something undeniably delightful about a perfectly portable dessert, and these Cherry Cheesecake Hand Pies hit all the right notes. Imagin extracte flaky, golden crust encasing a warm, gooey center of creamy cheesecake filling swirled with sweet-tart cherry goodness. They’re surprisingly easy to make, making them perfect for a weekend baking project, a potluck contribution, or just a special treat to brighten your day. Forget complicated cheesecake recipes; these hand pies deliver all the flavor with a fraction of the effort.
Ingredients:
Making the Creamy Cheesecake Filling
The magic of these hand pies starts with a simple, luscious cheesecake filling. You’ll want your cream cheese to be nice and soft for this step. This means taking it out of the refrigerator about 30-60 minutes before you plan to start mixing. Softened cream cheese will incorporate much more smoothly, preventing any lumps and ensuring a silky texture. In a medium bowl, combine the softened cream cheese with the 1/4 cup of granulated sugar. Use a spoon or a handheld mixer on low speed to cream these two ingredients together until they are smooth and well combined. You’re looking for a homogenous mixture with no visible streaks of cream cheese or sugar. This forms the rich base for our cheesecake layer.
Next, we gently fold in the star of our show: the cherry pie filling. You don’t need to do anything special to the pie filling; just open the can and add it directly to the cream cheese mixture. Stir everything together until the vibrant red of the cherries is beautifully swirled throughout the creamy filling. Don’t overmix here; you want to see those beautiful streaks of cherry, which will make your hand pies visually appealing and bursting with flavor. This mixture is surprisingly simple, but the combination of creamy, tangy cream cheese with the sweet, slightly tart cherries is pure perfection.
Assembling the Hand Pies
Now for the fun part: assembling our little pockets of joy! Unroll your refrigerated pie crusts onto a lightly floured surface. It’s important to handle the crusts gently to avoid tearing. You’ll get two crusts from the package. We’ll be using both of them to create our hand pies. Using a round cookie cutter or the rim of a glass, cut out as many circles as you can from each crust. Aim for circles that are about 4-5 inches in diameter. Don’t worry if you don’t get a perfect number; you can re-roll the scraps once, but be careful not to overwork the dough, as this can make it tough.
To fill our hand pies, place about 1-2 tablespoons of the cherry cheesecake filling onto one half of each pie crust circle. Be careful not to overfill them, as this can cause the filling to leak out during frying. Leave a small border around the edge of the dough – about a 1/2 inch. This border will be crucial for sealing the pies. Now, carefully fold the other half of the pie crust circle over the filling, creating a half-moon shape. Press the edges firmly together with your fingers to seal. For an extra secure seal and a decorative touch, you can use the tines of a fork to crimp the edges. This will also help prevent any filling from escaping during the frying process.
Frying to Golden Perfection
This is where the magic truly happens! You’ll need a deep pot or Dutch oven for frying. Add your vegetable oil, ensuring there’s enough for the hand pies to be submerged. Heat the oil over medium-high heat until it reaches about 350°F (175°C). It’s important to maintain this temperature; too cool and the pies will be greasy, too hot and they’ll burn before they cook through. You can test the oil by dropping a tiny piece of dough into it; it should sizzle and float to the surface immediately.
Carefully, and in batches, place a few hand pies into the hot oil. Don’t overcrowd the pot, as this will lower the oil temperature and can lead to uneven cooking. Fry each side for about 2-3 minutes, or until they are a beautiful golden brown. Use a slotted spoon or spider strainer to gently turn the pies and remove them from the oil. Place the fried hand pies on a wire rack set over a baking sheet to drain any excess oil. This is crucial for achieving that perfect crispiness. Allow them to cool slightly before moving on to the final glazing step.
The Sweet Finishing Touch
While your hand pies are cooling, let’s whip up a simple and delicious glaze. In a small bowl, combine the 1/2 cup of powdered sugar with the 1 tablespoon of water and the 1 teaspoon of corn syrup. The corn syrup adds a lovely sheen and helps to make the glaze a little more flexible, preventing it from cracking. Whisk everything together until it’s smooth and lump-free. You’re looking for a drizzle-able consistency. If it seems too thick, add a tiny bit more water, a teaspoon at a time, until you reach your desired texture. If it’s too thin, add a little more powdered sugar.
Once the hand pies have cooled for a few minutes and are no longer piping hot, you can drizzle the glaze over them. Use a spoon to create a lovely, artful drizzle. You can cover the entire top, or just create pretty lines. This glaze adds a delightful extra layer of sweetness and a beautiful finished look. You can serve these warm or at room temperature. They are absolutely divine on their own, but a scoop of vanilla ice cream wouldn’t hurt either! Enjoy every bite of these delightful Cherry Cheesecake Hand Pies – they’re a guaranteed crowd-pleaser!
Conclusion:
There you have it – a recipe for absolutely delightful Cherry Cheesecake Hand Pies! These little pockets of joy are the perfect way to enjoy the creamy, tangy goodness of cheesecake with the vibrant burst of cherries, all wrapped in a flaky, buttery crust. They’re wonderfully portable, making them ideal for picnics, potlucks, or simply a sweet treat to enjoy with your afternoon coffee. I’ve found they’re a guaranteed crowd-pleaser, and the satisfaction of making them yourself is immense. So, gather your ingredients and give these Cherry Cheesecake Hand Pies a try – I promise you won’t regret it!
For serving, they’re fantastic served warm, perhaps with a dollop of whipped cream or a drizzle of extra cherry sauce. They also hold up beautifully at room temperature, making them a perfect make-ahead dessert. If you’re feeling adventurous with variations, consider adding a pinch of cinnamon to the crust for extra warmth, or swapping the cherries for a mix of berries. You could even sprinkle some chopped nuts on top before baking for added texture.
Frequently Asked Questions:
Can I make the dough ahead of time?
Absolutely! The pie dough can be made a day or two in advance and stored, wrapped tightly, in the refrigerator. This can save you a step on the day you plan to assemble and bake your Cherry Cheesecake Hand Pies.
How should I store leftovers?
Leftover hand pies can be stored in an airtight container in the refrigerator for up to 3 days. For the best texture, reheat them gently in a low oven or toaster oven before serving.
Can I freeze these hand pies?
Yes, you can! You can freeze them either before baking (ensure they are well-wrapped and unbaked) or after they have been baked and cooled completely. If baking from frozen, add a few extra minutes to the baking time.
Cherry Cheesecake Hand Pies
Delicious hand-held pies filled with creamy cheesecake and sweet cherry filling, perfect for a portable dessert.
Ingredients
-
1 package refrigerated pie crust (2 crusts)
-
4 oz cream cheese, softened
-
1/4 cup granulated sugar
-
1 teaspoon corn syrup
-
1 tablespoon water
-
21 oz can cherry pie filling
-
1/2 cup powdered sugar
-
Vegetable oil, for deep frying (about 4-6 cups)
Instructions
-
Step 1
Unroll pie crusts and cut out 4-inch circles. -
Step 2
In a bowl, beat cream cheese and granulated sugar until smooth. Stir in corn syrup and water. -
Step 3
Spoon about 1 tablespoon of cream cheese mixture onto one half of each pie crust circle, followed by 1-2 tablespoons of cherry pie filling. -
Step 4
Moisten the edges of the crust with water and fold the other half over, pressing to seal. Crimp edges with a fork. -
Step 5
Heat vegetable oil in a deep fryer or heavy-bottomed pot to 350°F (175°C). -
Step 6
Carefully fry hand pies, 2-3 at a time, for about 2-3 minutes per side until golden brown. -
Step 7
Remove pies from oil and drain on paper towels. While warm, drizzle with a glaze made by whisking powdered sugar with a small amount of water.
Important Information
Nutrition Facts (Per Serving)
It is important to consider this information as approximate and not to use it as definitive health advice.
Allergy Information
Please check ingredients for potential allergens and consult a health professional if in doubt.


Leave a Comment