
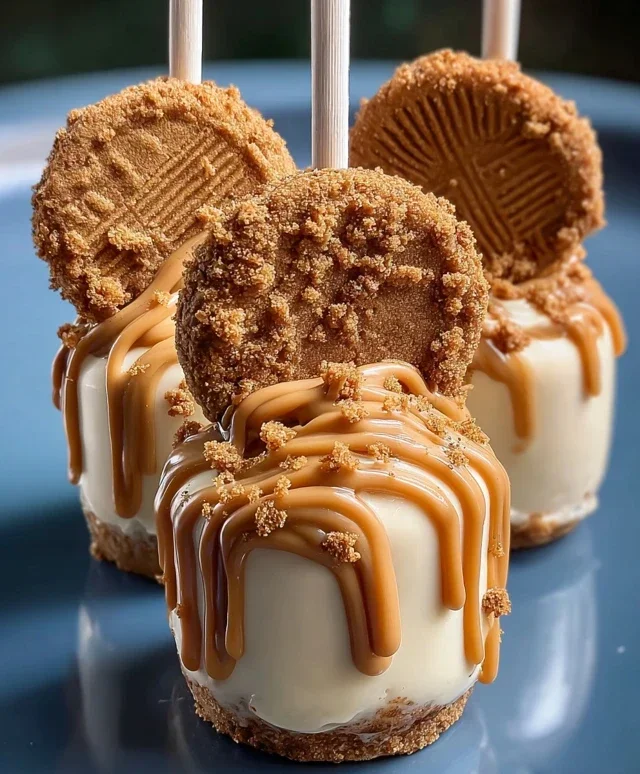
Biscoff Cookie Butter Cheesecake Pops. Oh, where do I even begin extract with these delightful little wonders? If you’re anything like me, the mere mention of Biscoff cookie butter sends shivers of pure joy down your spine. It’s that uniquely spiced, caramelized magic that transforms ordinary desserts into extraordinary experiences. And when you combine that beloved flavor with the creamy, dreamy decadence of cheesecake, well, you’ve struck gold. These Biscoff Cookie Butter Cheesecake Pops are not just another dessert; they’re bite-sized celebrations of everything we adore about rich, comforting sweets. They’re perfect for parties, a delightful afternoon treat, or simply whenever you need a little pick-me-up. What makes them so special is the perfect harmony of textures and flavors – the crum extractbly, spiced cookie base, the impossibly smooth cheesecake filling infused with that unmistakable Biscoff goodness, all encased in a delightful, easy-to-eat pop. Get ready to fall head over heels for these irresistible treats!

Biscoff Cookie Butter Cheesecake Pops: A Delectable Treat You’ll Crave!
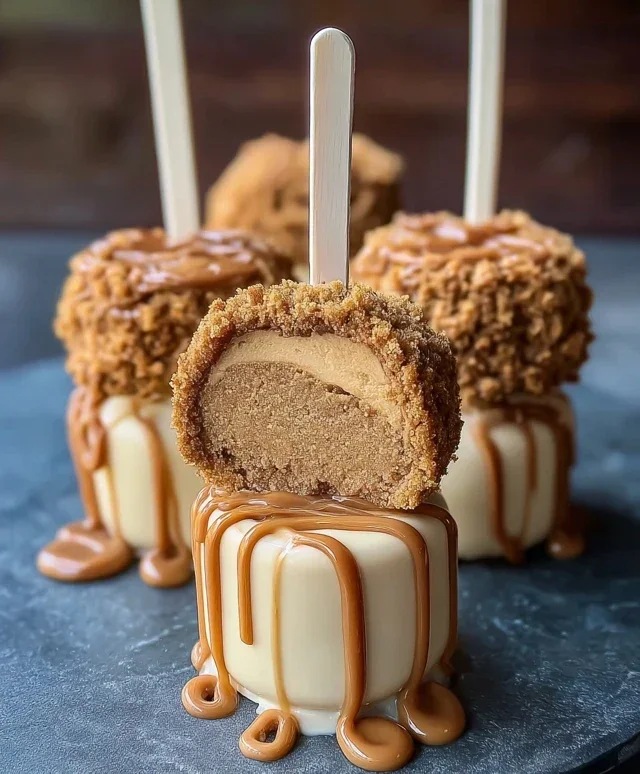
Get ready to indulge in a dessert that’s both incredibly easy to make and utterly irresistible. These Biscoff Cookie Butter Cheesecake Pops are a dream come true for anyone who loves the warm, spiced flavor of Biscoff cookies and the creamy decadence of cheesecake. Imagin extracte a bite-sized explosion of sweet, smooth cheesecake blended with the nutty, caramel notes of Biscoff cookie butter, all enrobed in a crunchy Biscoff coating. These are perfect for parties, a special treat, or just because you deserve something amazing. They’re surprisingly simple to whip up, making them an ideal project for bakers of all skill levels. Let’s get started on creating these delightful pops!
Ingredients:
Crafting Your Cheesecake Base
The foundation of our Biscoff Cookie Butter Cheesecake Pops is a creamy, no-bake cheesecake filling. This part is incredibly straightforward and doesn’t require any oven time, which is always a win in my book! First things first, ensure your 8 ounces of cream cheese are truly softened. This is crucial for a smooth, lump-free filling. Leave it out on the counter for at least an hour, or if you’re in a hurry, you can gently warm it in the microwave for about 15-20 seconds at a time, being careful not to melt it.
In a medium-sized mixing bowl, combine the softened cream cheese and ½ cup of powdered sugar. Use an electric mixer (handheld or stand mixer with a paddle attachment) to beat these together until they are light, fluffy, and completely smooth. You want to make sure there are no gritty sugar granules or cream cheese lumps. This might take a couple of minutes of consistent mixing.
Next, add 1 teaspoon of vanilla extract to the cream cheese mixture. Vanilla extract enhances all the sweet flavors and adds a wonderful aromatic quality to our cheesecake. Mix this in until it’s fully incorporated.
Now, it’s time to bring in the star of the show: the Biscoff cookie butter! Add ½ cup of Biscoff cookie butter to the bowl. This is where the magic really happens. Beat the mixture again until the cookie butter is perfectly blended into the cream cheese. The color will transform into a beautiful light brown, and the aroma will be absolutely divine.
Finally, gently fold in ½ cup of whipped cream (or Cool Whip). If you’re using regular whipped cream, make sure it’s stiffly whipped so it holds its shape. If you’re using Cool Whip, it’s already ready to go! Folding it in rather than beating it aggressively will help maintain the airy texture of the cheesecake filling. If, at this stage, you find your mixture is a bit too thick to work with, you can stir in the optional 2 tablespoons of heavy cream to achieve a slightly more pliable consistency. This will make it easier to shape and insert the popsicle sticks.
Assembling and Freezing Your Pops
Once your delicious cheesecake filling is ready, it’s time to get these pops ready for freezing. Line a baking sheet with parchment paper. This will prevent the cheesecake pops from sticking to the sheet as they freeze.
Now, here’s where you can get a little creative with shaping. You can either spoon the mixture into small silicone molds (like mini muffin liners or specialized pop molds) or, for a more rustic look, you can use two spoons to shape small quenelle-like portions of the cheesecake mixture and place them onto the parchment-lined baking sheet. Alternatively, if you have a piping bag, you can pipe the mixture into your desired shapes. Aim for bite-sized portions that are easy to handle and enjoy.
Once you have your cheesecake portions formed on the baking sheet, it’s time to insert the popsicle sticks. Gently press one end of a popsicle stick into the bottom or side of each cheesecake portion, ensuring it’s secure enough to hold the pop once frozen. Be careful not to push it all the way through.
Now, carefully transfer the baking sheet to your freezer. You’ll want to freeze the cheesecake pops until they are firm enough to handle, which typically takes at least 2-3 hours. For the best results and to ensure they’re solid, I often leave them in the freezer for at least 4 hours, or even overnight. This will make dipping them in Biscoff goodness much easier and mess-free.
The Delicious Biscoff Coating
While your cheesecake pops are freezing, you can prepare your Biscoff coating. This is where we add that extra layer of crunchy, spiced goodness that makes these pops so special.
Take your whole Biscoff cookies and place them in a food processor or a sturdy zip-top bag. Pulse or crush them until you have fine crum extractbs. You can also do this with a rolling pin if you don’t have a food processor. You want a consistency that’s fine enough to coat the pops but still provides a satisfying crunch. Set these crushed cookies aside in a shallow bowl.
When your cheesecake pops are thoroughly frozen and firm, it’s time for the fun part: dipping! Take a few pops out of the freezer at a time so they don’t thaw too much before you can coat them.
Hold a frozen cheesecake pop by its stick and gently roll or press it into the crushed Biscoff cookies, ensuring it’s evenly coated all around. If you’re having trouble getting the crum extractbs to stick, you can briefly dip the pop into a very thin layer of melted Biscoff cookie butter or even a little melted white chocolate, then immediately roll it in the crum extractbs. This acts as a sort of edible glue.
Once coated, place the dipped pops back onto the parchment-lined baking sheet. If you want an extra flourish, you can sprinkle a few more crushed Biscoff cookies over the top of the pops for added texture and visual appeal before the coating sets.
Final Freeze and Enjoy!
After all your pops are coated in delicious Biscoff crum extractbs, return the baking sheet to the freezer for at least another 30 minutes to an hour. This will help the coating set firmly. Once they’re solid, your Biscoff Cookie Butter Cheesecake Pops are ready to be enjoyed!
These pops are best stored in an airtight container in the freezer. They’re a fantastic make-ahead treat for any occasion. When you’re ready for a burst of flavor, simply pull one (or two!) out of the freezer and let it sit at room temperature for a minute or two to soften slightly before diving in. The combination of the creamy, spiced cheesecake and the crunchy cookie coating is truly magical. Enjoy every bite!
Conclusion:
I hope you’ve enjoyed this delightful journey into creating Biscoff Cookie Butter Cheesecake Pops! These little treats are an absolute winner because they combine the creamy indulgence of cheesecake with the irresistible, warm spice of Biscoff cookies and that heavenly cookie butter spread. The no-bake preparation makes them incredibly accessible, perfect for busy bakers or anyone looking for a simpler way to achieve a show-stopping dessert. Plus, their pop format makes them fun to eat and perfect for parties, potlucks, or just a special weekend indulgence.
For serving, imagin extracte these alongside a cup of coffee or tea, or as the perfect miniature dessert at a holiday gathering. They’re also fantastic for a bake snon-alcoholic ale or to simply brighten someone’s day. If you’re feeling adventurous with variations, consider adding a swirl of caramel to the cookie butter filling, a sprinkle of finely chopped Biscoff cookies on top before freezing, or even a drizzle of white chocolate for an extra touch of elegance.
I truly encourage you to give these Biscoff Cookie Butter Cheesecake Pops a try. They are a guaranteed crowd-pleaser and so rewarding to make. Let your creativity shine and enjoy every delicious bite!
Frequently Asked Questions:
Can I make these cheesecake pops ahead of time?
Absolutely! These are perfect for making ahead. Once they are fully frozen, you can store them in an airtight container in the freezer for up to 2 weeks. This makes them ideal for entertaining or simply having a sweet treat on hand whenever the craving strikes.
What if I don’t have Biscoff cookies? Can I use other spiced cookies?
While Biscoff cookies offer a unique flavor, you can definitely experiment with other spiced cookies like gin extractger snaps or speculoos. Just be sure they have a similar texture and flavor profile to achieve that wonderful spiced cookie taste that makes these cheesecake pops so special.
Biscoff Cookie Butter Cheesecake Pops
Delicious no-bake cheesecake pops infused with the irresistible flavor of Biscoff cookies and cookie butter. Perfect for parties or a sweet treat.
Ingredients
-
8 oz cream cheese, softened
-
½ cup powdered sugar
-
1 teaspoon vanilla extract
-
½ cup whipped cream (or Cool Whip)
-
½ cup crushed Biscoff cookies
-
½ cup Biscoff cookie butter
-
2 tablespoons heavy cream (optional, for thinning)
-
Whole Biscoff cookies
-
Extra crushed Biscoff cookies for garnish
-
Popsicle sticks
Instructions
-
Step 1
In a medium bowl, beat together the softened cream cheese and powdered sugar until smooth and creamy. -
Step 2
Stir in the vanilla extract and Biscoff cookie butter until well combined. -
Step 3
Gently fold in the whipped cream (or Cool Whip) and crushed Biscoff cookies until just incorporated. If the mixture is too thick, you can stir in the heavy cream a tablespoon at a time. -
Step 4
Line a baking sheet with parchment paper. Spoon the cheesecake mixture into the prepared liners (or use small silicone molds). Insert a whole Biscoff cookie into the top of each pop and gently press down. Insert a popsicle stick into the base of each pop. -
Step 5
Freeze for at least 2-3 hours, or until firm. Garnish with extra crushed Biscoff cookies before serving.
Important Information
Nutrition Facts (Per Serving)
It is important to consider this information as approximate and not to use it as definitive health advice.
Allergy Information
Please check ingredients for potential allergens and consult a health professional if in doubt.

Leave a Comment