
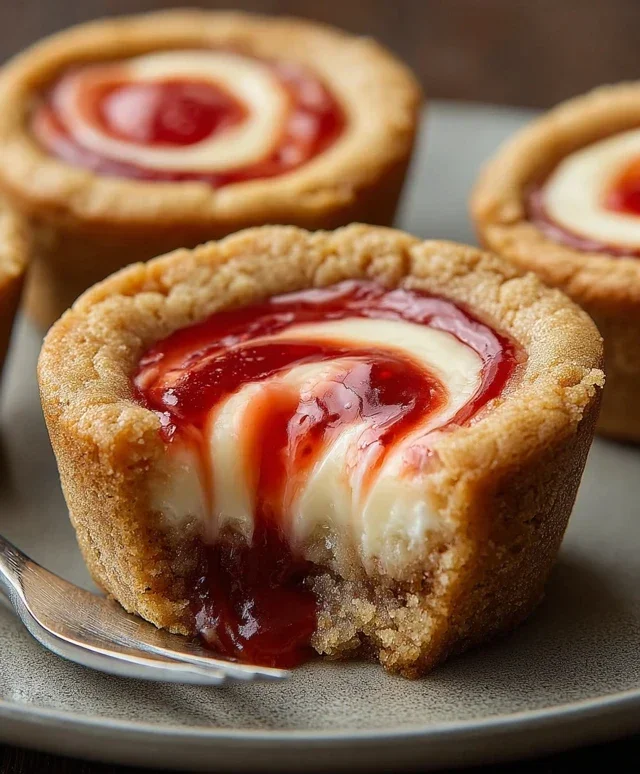
Strawberry Swirl Cheesecake Cookie Cups are the dessert mashup dreams are made of, and I’m so excited to share this recipe with you! If you’re anything like me, the thought of combining the creamy, dreamy tang of cheesecake with the comforting, buttery goodness of a perfectly baked cookie is enough to make your mouth water. These delightful little bites are pure bliss, offering the best of both worlds in every single spoonful. We all adore classic cheesecake and beloved chocolate chip cookies, but what makes Strawberry Swirl Cheesecake Cookie Cups truly special is their irresistible fusion. Imagin extracte a tender, slightly crisp cookie base cradling a luscious, swirled strawberry-kissed cheesecake filling. It’s a guaranteed crowd-pleaser, perfect for parties, a sweet afternoon treat, or simply when you need a little bit of indulgence in your day. Get ready to fall in love!

Strawberry Swirl Cheesecake Cookie Cups
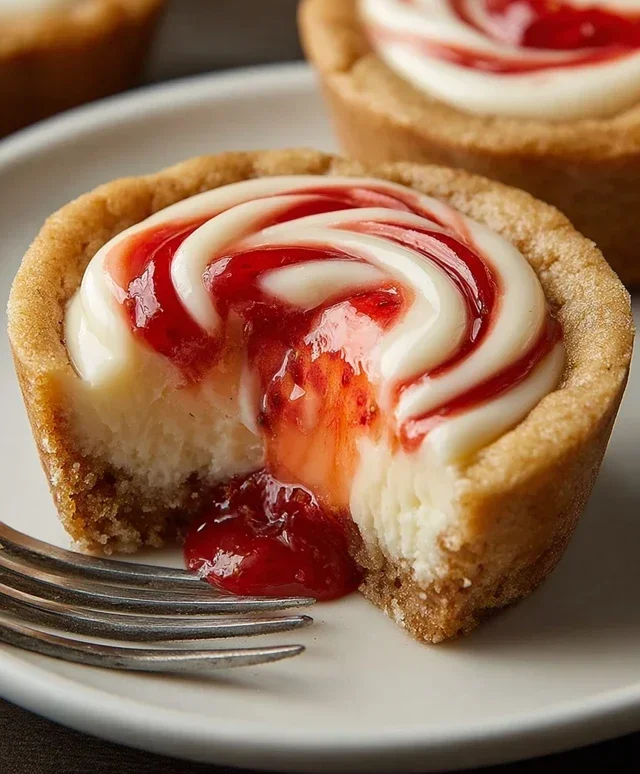
Get ready to indulge in a dessert that’s the best of both worlds! These Strawberry Swirl Cheesecake Cookie Cups are a delightful fusion of creamy, tangy cheesecake and sweet, buttery sugar cookie. Imagin extracte a perfectly crisp cookie base, cradling a luscious, smooth cheesecake filling swirled with vibrant strawberry jam. It’s the ultimate treat for any occasion, from a casual get-together to a special celebration. They’re incredibly easy to make, and the results are simply show-stopping. The satisfying crunch of the cookie, followed by the melt-in-your-mouth cheesecake, and then that burst of fruity sweetness from the strawberry swirl – it’s a symphony of textures and flavors that will have everyone asking for seconds. Plus, the individual portions make them perfect for serving. Let’s dive in and create these little pockets of pure joy!
Ingredients:
Getting Started: Preparing the Cookie Cups
Before we begin extract assembling our delightful treats, let’s preheat your oven and prepare your muffin tin. This is a crucial step to ensure your cookie cups bake evenly and achieve that perfect golden-brown edge. Preheat your oven to 350°F (175°C). This moderate temperature is ideal for baking the cookie dough without burning it while allowing the cheesecake filling to set. Now, take a standard 12-cup muffin tin. You can lightly grease it with butter or cooking spray, or for extra ease and to prevent sticking, consider lining each cup with paper liners. If you’re going for the grease method, a light, even coating is all you need. If you’re using liners, ensure they fit snugly in each cup. This preparation is key to effortlessly removing your finished cookie cups later.
Next, we’ll tackle the cookie dough. If you’re using store-bought refrigerated sugar cookie dough, simply unroll it. If you’re using homemade dough, make sure it’s chilled to a consistency that’s easy to handle but not overly sticky. The goal here is to create a cup-like structure for our cheesecake filling. I like to divide the cookie dough into 12 equal portions. You can do this by eye, or if you want absolute precision, you can weigh the entire roll of dough and divide by 12. Roll each portion into a smooth ball.
Now, place one cookie dough ball into each prepared muffin cup. The trick to creating the “cup” is to gently press the dough up the sides of the muffin tin. You want to create a thin, even layer of cookie dough that forms a sturdy shell. Don’t make the sides too thick, or they might not bake through properly, and don’t make them too thin, or they might break. Aim for a consistent thickness all the way around. You can use your fingers to gently press the dough outwards and upwards, creating a little well in the center. This well will hold our delicious cheesecake filling.
Creating the Luscious Cheesecake Filling
While the cookie cups are baking, we can get started on the star of the show: the cheesecake filling! In a medium bowl, combine the softened cream cheese and granulated sugar. It’s essential that your cream cheese is at room temperature. This ensures it creams smoothly with the sugar, avoiding any lumps and resulting in a velvety texture for your filling. If your cream cheese is still cold, it will be difficult to work with and might result in a grainy filling. You can soften cream cheese by leaving it out on the counter for about an hour, or by carefully microwaving it in very short bursts (10-15 seconds at a time), stirring in between, until softened but not melted.
Using an electric mixer (handheld or stand mixer), beat the cream cheese and sugar together on medium speed until the mixture is light, fluffy, and completely smooth. Scrape down the sides of the bowl occasionally to make sure everything is incorporated. Once it’s nice and creamy, add the vanilla extract. Beat again briefly until just combined. The vanilla extract adds a beautiful aroma and depth of flavor to the cheesecake filling, complementing the sweetness of the cookies and the tangin extractess of the cream cheese.
Baking and Swirling the Magic
Once your cookie cups have baked for the initial time and are lightly golden around the edges but still soft in the center (this is important, as they will continue to bake with the filling), it’s time to introduce the cheesecake filling. Carefully remove the muffin tin from the oven. Spoon the cheesecake filling evenly into each cookie cup. Don’t overfill them, as you want to leave room for the strawberry swirl and prevent any overflow.
Now for the fun part – the strawberry swirl! Take your warmed strawberry jam. Warmed jam will be easier to drizzle and swirl. You can gently warm it in a small saucepan over low heat or microwave it for about 15-20 seconds until it’s pourable. Spoon about a teaspoon of the warmed strawberry jam onto the top of each cheesecake-filled cookie cup. Don’t worry about making it perfect; the imperfection is part of the charm!
Using a toothpick or a small skewer, gently swirl the strawberry jam into the cheesecake filling. Create beautiful patterns by draggin extractg the toothpick through the jam and cream cheese. You can make simple loops, figure-eights, or more intricate designs. The goal is to create streaks and pockets of vibrant red jam throughout the creamy white filling, making each cookie cup a work of art. Be careful not to over-swirl, as you want to maintain distinct swirls and not completely mix the jam into the cheesecake.
Return the muffin tin to the oven and bake for an additional 10-15 minutes, or until the edges of the cookie cups are golden brown and the cheesecake filling is set around the edges but still has a slight wobble in the center. This slight wobble indicates that the cheesecake will continue to set as it cools, ensuring a perfectly creamy texture.
Cooling and Enjoying
Once baked, remove the muffin tin from the oven and let the cookie cups cool in the tin for about 10-15 minutes. This allows them to firm up and makes them easier to remove without breaking. After this initial cooling period, carefully remove each cookie cup from the muffin tin. You can use a small offset spatula or a butter knife to gently loosen them from the sides if needed. Place them on a wire rack to cool completely. Patience is key here! Allowing them to cool fully ensures the cheesecake filling is perfectly set.
Once completely cooled, you can adorn your Strawberry Swirl Cheesecake Cookie Cups with optional garnishes like a fresh strawberry slice or a sprinkle of chocolate shavings. These little touches add a beautiful presentation and an extra burst of flavor. These cookie cups are best enjoyed chilled or at room temperature. They store beautifully in an airtight container in the refrigerator for up to 3-4 days, though I doubt they’ll last that long! Get ready to impress yourself and your loved ones with this irresistible dessert. Enjoy every delicious bite!
Conclusion:
I hope you’re as excited to try these Strawberry Swirl Cheesecake Cookie Cups as I am! They truly are the best of both worlds: the buttery, slightly crisp texture of a perfect cookie combined with the creamy, tangy delight of cheesecake, all elevated by that beautiful, vibrant strawberry swirl. This recipe is fantastic because it offers individual, perfectly portioned treats that are both visually stunning and incredibly delicious. They’re ideal for parties, potlucks, or simply as a special homemade dessert to brighten your day. Imagin extracte them served chilled on a warm afternoon or as a sweet ending to a family dinner. I encourage you to give these Strawberry Swirl Cheesecake Cookie Cups a go – you won’t be disappointed!
For serving, these are wonderful on their own, but a dollop of fresh whipped cream or a few extra fresh strawberries can take them to the next level. If you’re feeling adventurous with variations, consider using a different fruit swirl like raspberry or blueberry, or even adding a touch of lemon zest to the cookie dough for an extra zing.
Frequently Asked Questions:
Can I make these ahead of time?
Yes, absolutely! You can bake the cookie cups and let them cool completely. Then, prepare the cheesecake filling and swirl it on top. Cover them tightly with plastic wrap and refrigerate for up to 2-3 days. The flavors meld beautifully over time.
How do I get a nice swirl effect?
To achieve that beautiful swirl, dollop spoonfuls of the strawberry topping onto the cheesecake filling before baking. Then, use a toothpick or a thin skewer to gently drag the strawberry through the cheesecake, creating marbled patterns. Don’t overmix, or you’ll lose the distinct swirl!
What if I don’t have a mini muffin tin?
If you don’t have a mini muffin tin, you can use regular muffin tins. The cookie cups will be larger, and you’ll likely need to adjust the baking time. Keep an eye on them to prevent overbaking. Alternatively, you could try forming them into individual cookie shapes on a baking sheet, though they might not hold their “cup” shape as well.
Strawberry Swirl Cheesecake Cookie Cups
Delightful cookie cups with a creamy cheesecake filling and a vibrant strawberry swirl.
Ingredients
-
1 roll (16.5 oz) refrigerated sugar cookie dough
-
8 oz cream cheese, softened
-
1/4 cup granulated sugar
-
1 tsp vanilla extract
-
1/3 cup strawberry jam, warmed slightly
-
Fresh strawberries (optional)
-
Chocolate shavings (optional)
Instructions
-
Step 1
Preheat oven to 350°F (175°C). Lightly grease a mini muffin tin. -
Step 2
Press about 1 tablespoon of sugar cookie dough into the bottom of each mini muffin cup, creating a base. -
Step 3
In a medium bowl, beat together the softened cream cheese and granulated sugar until smooth. Stir in the vanilla extract. -
Step 4
Spoon about 1 teaspoon of the cream cheese mixture onto the cookie dough in each cup. -
Step 5
Drizzle about 1/2 teaspoon of warmed strawberry jam over the cream cheese filling in each cup. Use a toothpick to gently swirl the jam into the cream cheese. -
Step 6
Bake for 10-12 minutes, or until the cookie edges are lightly golden and the cream cheese is set. -
Step 7
Let the cookie cups cool in the muffin tin for a few minutes before carefully removing them to a wire rack to cool completely. Garnish with fresh strawberries or chocolate shavings if desired.
Important Information
Nutrition Facts (Per Serving)
It is important to consider this information as approximate and not to use it as definitive health advice.
Allergy Information
Please check ingredients for potential allergens and consult a health professional if in doubt.

Leave a Comment