
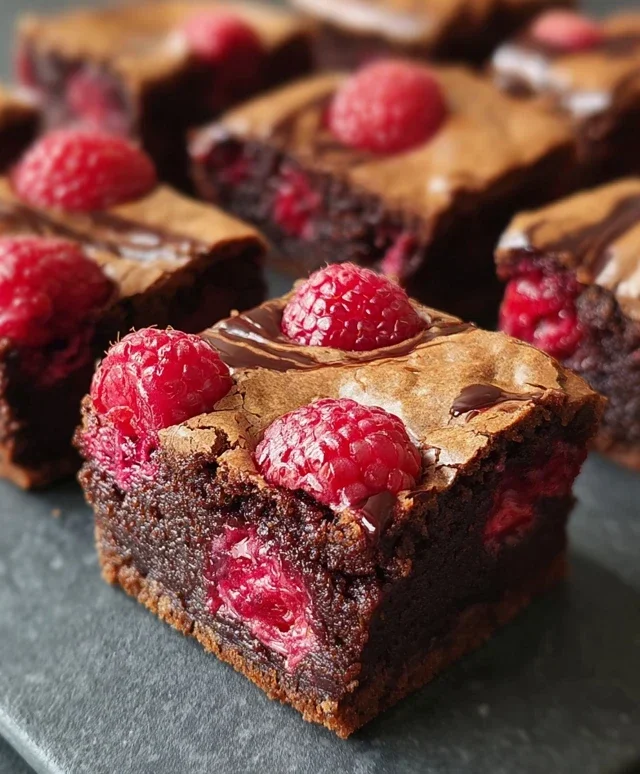
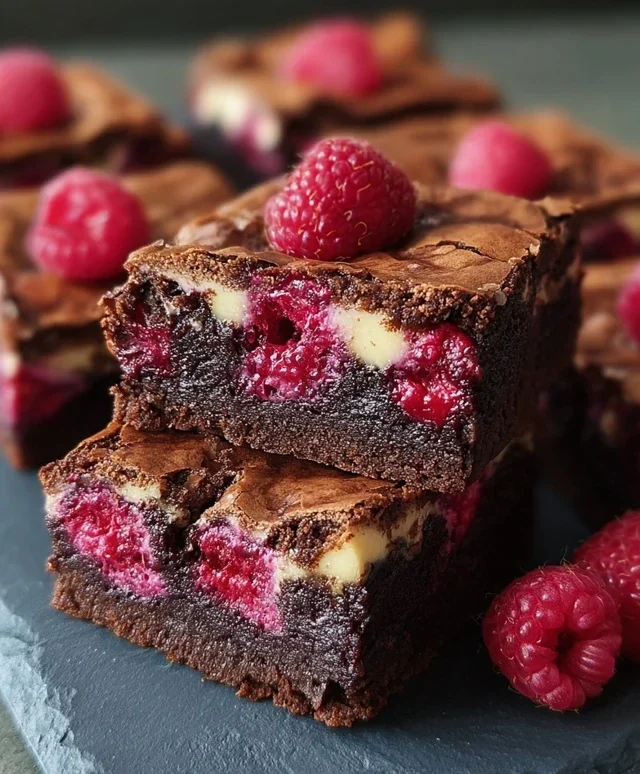
Raspberry swirl brownies are an absolute dream for any dessert lover, and for good reason! Imagin extracte the deepest, richest chocolate brownie batter you’ve ever encountered, marbled with a vibrant, tangy raspberry swirl. It’s a textural and flavor masterpiece, a delightful dance between decadent fudgy goodness and bright, fruity bursts. We all have those go-to comfort desserts, and these raspberry swirl brownies are quickly becoming one of mine, and I bet they will for you too. What makes them truly special is the stunning visual appeal they offer before you even take your first bite. The swirls aren’t just pretty; they cut through the intense chocolate, adding a layer of complexity that makes every mouthful utterly irresistible. Get ready to impress yourself and everyone you share these with!

Raspberry Swirl Brownies
There’s something magical about a perfectly fudgy brownie. Add a burst of tangy, vibrant raspberry, and you have a dessert that’s simply irresistible. These Raspberry Swirl Brownies are the best of both worlds: intensely chocolatey, rich, and decadent, with a beautiful, tart swirl of fresh raspberries that cuts through the sweetness perfectly. They’re surprisingly easy to make and are sure to become a new favorite for special occasions or just a delightful afternoon treat. The contrast of the dark, dense brownie with the bright red raspberry is not only visually stunning but also a flavor explosion in every bite. Let’s get baking!
Ingredients:
Making the Raspberry Swirl
Before we dive into the brownie batter, let’s get our raspberry swirl ready. This simple step ensures that the raspberry flavor is concentrated and delicious, with a lovely tartness to balance the sweetness of the chocolate.
1. In a small saucepan, combine the fresh raspberries, 2 tablespoons of granulated sugar, and 1 teaspoon of lemon juice. The lemon juice brightens the raspberry flavor and helps it to set slightly.
2. Place the saucepan over medium heat. Cook, stirring occasionally, until the raspberries begin extract to break down and release their juices, and the mixture thickens slightly. This usually takes about 5-7 minutes. You’re looking for a consistency that’s spreadable but not too watery.
3. Once thickened, remove from heat and let it cool completely. As it cools, it will become even more jam-like. You can gently mash any larger raspberry pieces with a fork if you prefer a smoother swirl.
Preparing the Brownie Batter
Now for the star of the show – the rich, chocolatey brownie base! This method is straightforward and results in an incredibly fudgy texture.
1. Preheat your oven to 350°F (175°C). Grease and flour a 9×13 inch baking pan, or line it with parchment paper, leaving an overhang on the sides. This makes lifting the brownies out of the pan much easier once they’re baked.
2. In a large, heatproof bowl set over a saucepan of simmering water (a double boiler method), melt the 1 cup of unsalted butter. Make sure the bottom of the bowl doesn’t touch the water. Stir the butter until it’s completely melted and smooth.
3. Remove the bowl from the heat. Whisk in the 1 ¼ cups of granulated sugar, ¾ cup of cocoa powder, and ½ teaspoon of salt until well combined and no lumps remain. The mixture will be thick and glossy.
4. Whisk in the 2 teaspoons of vanilla extract. Then, add the 3 large eggs, one at a time, whisking well after each addition until fully incorporated. The batter will become richer and more cohesive. Be careful not to overmix once the eggs are in; we want tender brownies!
5. Gently fold in the 1 cup of all-purpose flour. Mix until just combined, being careful not to overwork the batter. A few streaks of flour are okay at this stage.
6. Finally, fold in the 1 cup of chocolate chips. These will melt slightly into the batter, creating wonderful pockets of gooey chocolate throughout your brownies.
Assembling and Baking the Swirls
This is where the magic happens – combining the chocolatey brownie with that vibrant raspberry swirl.
1. Pour about two-thirds of the brownie batter into your prepared baking pan, spreading it evenly.
2. Dollop spoonfuls of the cooled raspberry mixture over the brownie batter. Don’t worry about being precise; uneven placement is part of the charm.
3. Gently spoon the remaining brownie batter over the raspberry dollops, trying to cover most of them.
4. Using a knife or a skewer, gently swirl the raspberry mixture into the brownie batter. Make about 4-5 zig-zag motions through the batter. Be careful not to over-swirl, or the colors will blend too much, and you’ll lose the distinct swirl effect.
5. Bake for 25-30 minutes, or until a toothpick inserted into the center of the brownies comes out with moist crum extractbs attached, but no wet batter. You want them fudgy, not cakey! The edges should look set.
6. Let the brownies cool completely in the pan on a wire rack before cutting. This is crucial for achieving that perfect fudgy texture and clean slices. Rushing this step can result in crum extractbly brownies.
7. Once cooled, use the parchment paper overhang to lift the entire brownie slab out of the pan. Cut into squares and enjoy the incredible combination of rich chocolate and bright raspberry!
Conclusion:
There you have it – a foolproof guide to creating these stunning Raspberry Swirl Brownies! What makes this recipe truly special is the perfect balance between rich, fudgy chocolate and the bright, tangy burst of fresh raspberries. It’s a dessert that looks as impressive as it tastes, making it ideal for special occasions or simply a delightful treat to brighten your day. The beautiful swirl pattern is surprisingly easy to achieve, adding a professional touch to your home baking. I truly believe these brownies will become a firm favorite in your repertoire.
Serve these delightful Raspberry Swirl Brownies warm or at room temperature. They are absolutely divine on their own, but consider pairing them with a scoop of vanilla bean ice cream for an extra layer of decadence, or a dollop of lightly whipped cream for a lighter touch. For variations, don’t be afraid to experiment! You could try adding a hint of lemon zest to the brownie batter for an extra zing, or even a few white chocolate chips alongside the raspberries for a complementary sweetness. The possibilities are endless, and the results are always delicious. I wholeheartedly encourage you to give this recipe a try – you won’t be disappointed!
Frequently Asked Questions:
Can I use frozen raspberries instead of fresh?
Absolutely! If using frozen raspberries, gently thaw them and drain off any excess liquid before swirling them into the batter. This helps prevent the brownies from becoming too wet.
How should I store my Raspberry Swirl Brownies?
Store leftover brownies in an airtight container at room temperature for up to 3 days, or in the refrigerator for up to a week. They are wonderful slightly chilled!
What kind of chocolate is best for these brownies?
For the best flavor and fudgiest texture, I recommend using a good quality semi-sweet or bittersweet chocolate. Using a combination of chopped chocolate and cocoa powder will provide a deep, complex chocolate flavor.
Raspberry Swirl Brownies
Fudgy chocolate brownies with a vibrant swirl of fresh raspberries and a hint of lemon.
Ingredients
-
1 cup unsalted butter
-
1 ¼ cups granulated sugar
-
¾ cup cocoa powder
-
½ tsp salt
-
2 tsp vanilla extract
-
3 large eggs
-
1 cup all-purpose flour
-
1 cup chocolate chips
-
1 cup fresh raspberries
-
2 tbsp granulated sugar
-
1 tsp lemon juice
Instructions
-
Step 1
Preheat oven to 350°F (175°C). Grease and flour an 8×8 inch baking pan. -
Step 2
In a large bowl, melt the butter. Stir in granulated sugar, cocoa powder, salt, and vanilla extract until smooth. -
Step 3
Beat in the eggs one at a time until well combined. -
Step 4
Fold in the all-purpose flour and chocolate chips. -
Step 5
In a separate small bowl, mash the raspberries with 2 tbsp granulated sugar and lemon juice. -
Step 6
Spread half of the brownie batter into the prepared pan. Dollop spoonfuls of the raspberry mixture over the batter. Top with the remaining brownie batter. Swirl gently with a knife. -
Step 7
Bake for 30 minutes, or until a toothpick inserted into the center comes out with moist crumbs. -
Step 8
Let cool completely before cutting into squares.
Important Information
Nutrition Facts (Per Serving)
It is important to consider this information as approximate and not to use it as definitive health advice.
Allergy Information
Please check ingredients for potential allergens and consult a health professional if in doubt.

Leave a Comment