
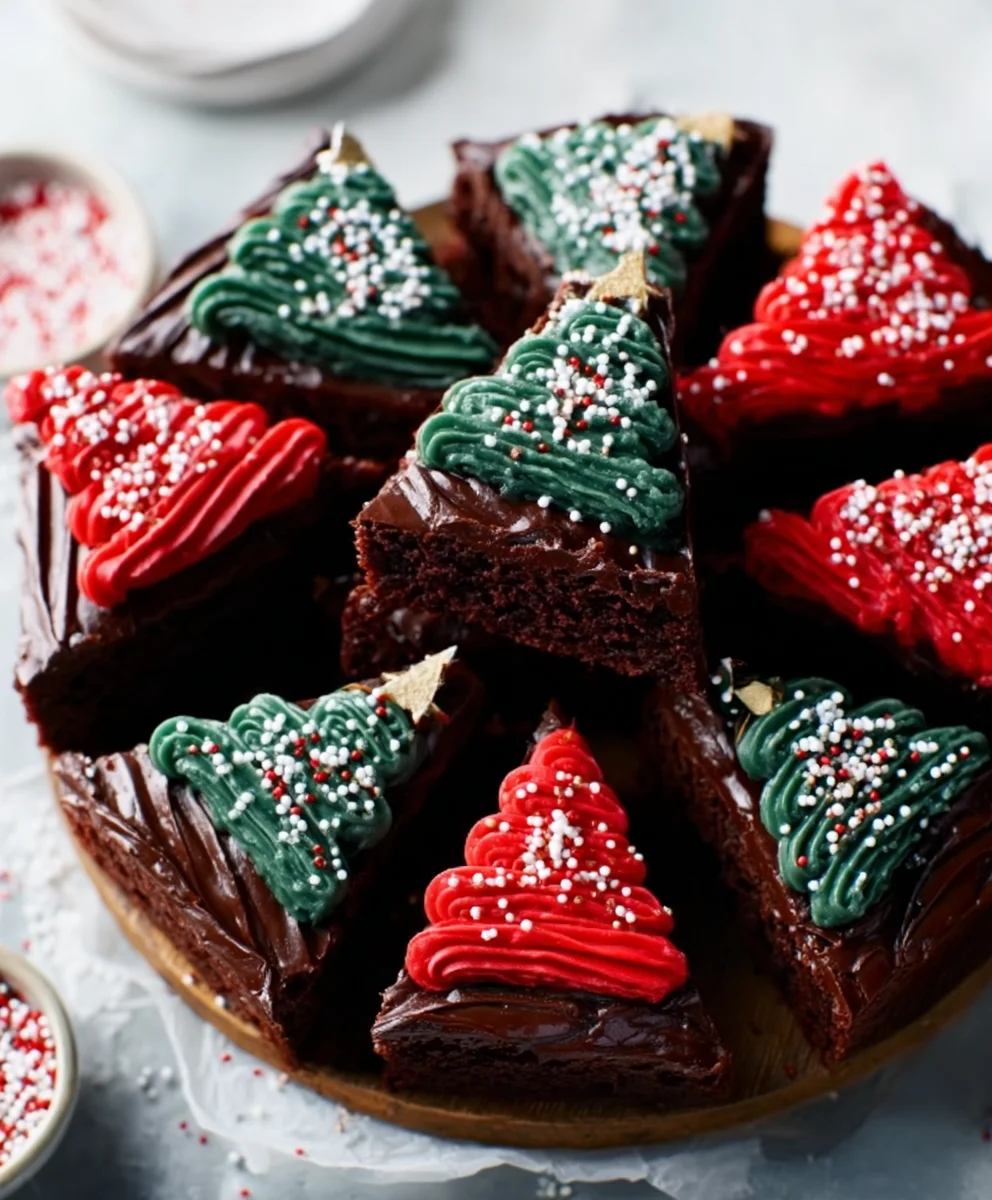
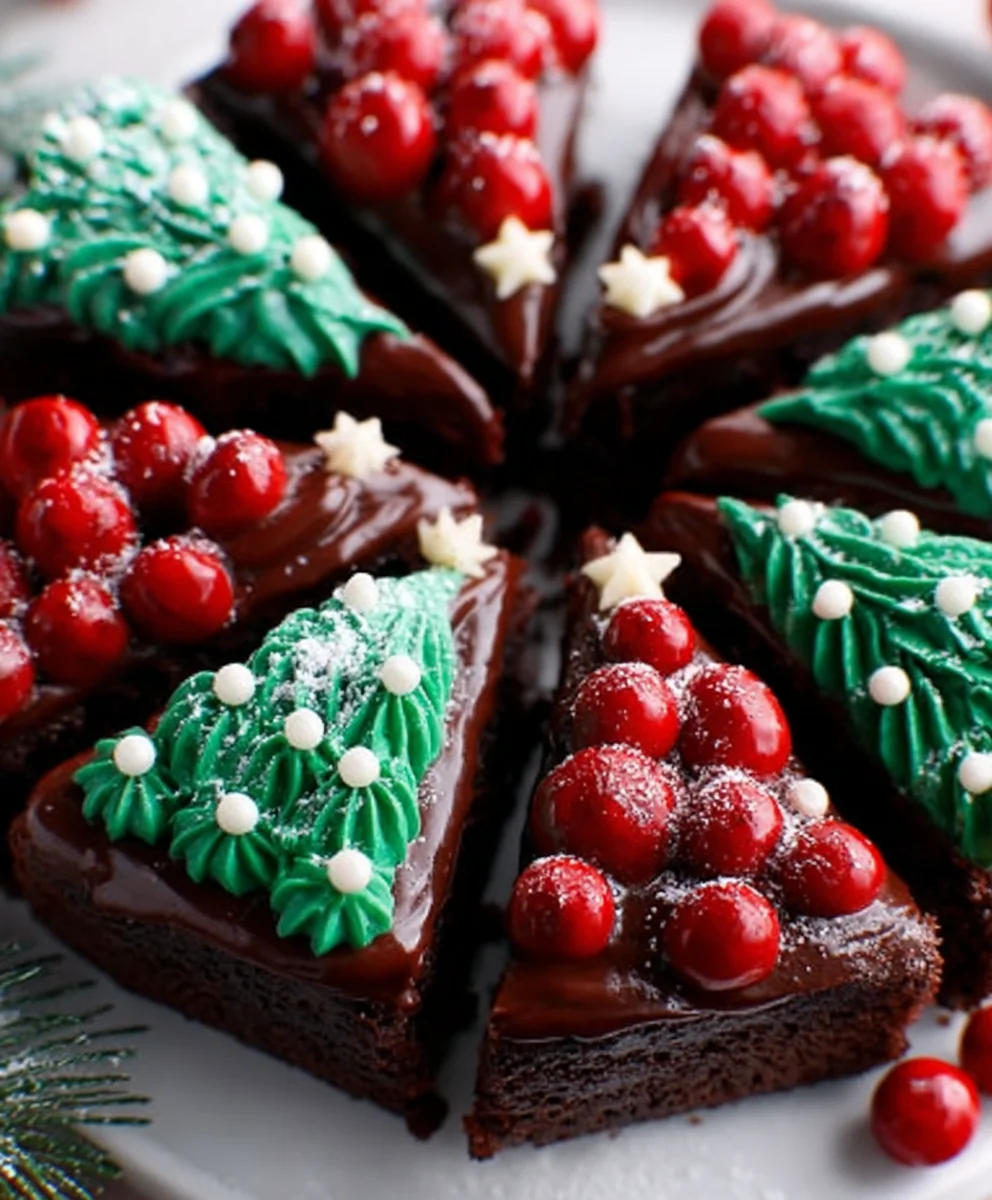
Frosted Christmas Brownies are more than just a festive treat; they’re a warm hug in a bite, a memory made tangible, and the sweet essence of holiday joy. Imagin extracte rich, fudgy chocolate mingling with a creamy, luscious frosting, all dusted with a sprinkle of edible glitter or festive crum extractbles. It’s no wonder these delightful creations are a staple on holiday dessert tables year after year. They capturegin extracte imagination, evoke feelings of nostalgia, and bring a smile to everyone’s face, young and old. What truly sets these Frosted Christmas Brownies apart is their perfect balance of deep chocolate flavor and a sweet, decadent topping that adds an extra layer of festivity. They’re simplegin extractough for a beginner baker but impressive enough to wow any guest.

Ingredients:
- 2 Boxes of Brownie Mix, or a double batch of homemade brownies (if you’re making homemade, ensure you have all the necessary ingredients like flour, sugar, eggs, butter, and cocoa powder as per your preferred recipe).
- White Frosting, 1 to 3 jars (depending on how generously you want to frost and decorate).
- Edible Gel Food Coloring (choose your favorite festive Christmas colors – reds, greens, blues, or even a touch of purple). Opt for gel colors as they provide vibrant hues without adding excess liquid, which can alter frosting consistency. If you prefer, use natural or no-artificial-dye food coloring.
- Edible Gold Stars (these are a classic Christmas decoration and add a lovely shimmer).
- White Pearl Sprinkles (these add a delicate shine and a classic festive feel).
- Icing Bags (you’ll need a few of these to hold your different colored frostings).
- Frosting Tips (specifically, a large star tip, such as a 1M, is perfect for creating beautiful piped decorations).
Preparing the Brownie Base
The foundation of our Frosted Christmas Brownies is, of course, the brownies themselves. If you’re using a boxed mix, follow the package instructions meticulously. This usually involves combining the mix with eggs, oil, and water. For a double batch, you’ll likely bake them in two separate pans or one larger pan, adjusting the baking time accordingly. Ensure you have a good quality brownie recipe if you opt for homemade – rich, fudgy brownies will elevate these treats to the next level. Once baked, allow the brownies to cool completely on a wire rack. This is a crucial step; attempting to frost warm brownies will result in a melted, messy disaster. For the best results, I often chill my brownies in the refrigerator for at least 30 minutes after they’ve cooled to room temperature. This makes them firmer and easier to cut and decorate without crum extractbling. You can cut them into your desired shapes here if you’re aiming for specific festive figures, or simply cut them into classic squares or rectangles.
Coloring and Preparing the Frosting
Now for the fun part – bringin extractg in the Christmas spirit with color! Take your white frosting and divide it into as many bowls as you have colors you wish to use. A good starting point is typically three colors – perhaps a classic red, a vibrant green, and a clean white for contrast. Add your edible gel food coloring to each bowl, a little at a time, stirring thoroughly after each addition. Gel colors are concentrated, so you’ll need very little to achieve intense shades. Continue adding color until you reach your desired hue. Once your frosting is beautifully colored, it’s time to get them ready for piping. Spoon each color of frosting into separate icing bags. If you’re using a 1M tip for all your piping, you can attach it to one bag. For multiple colors and different tip designs, prepare additional bags with the appropriate tips. If you’re using a star tip, make sure it’s securely attached to the bag. I find it easiest to place the icing bag inside a tall glass, folding down the edges of the bag over the rim of the glass. This makes it much simpler to scoop the frosting into the bag without making a mess. Once filled, twist the top of the icing bag closed to prevent leakage.
Decorating with Festive Frosting
With your brownies cooled and your frosting prepared, it’s time to get creative. Start by frosting the top of each brownie. If you’re using the 1M star tip, hold the bag perpendicular to the brownie surface. Squeeze firmly and move the bag in a circular motion or a simple zig-zag to create a lovely textured frosting layer. You can also simply spread the frosting evenly with an offset spatula for a smoother finish, and then pipe decorative elements on top. Don’t be afraid to mix and match colors. You could frost one brownie with red, another with green, and some with white. Alternatively, you can create marbled effects by swirling two colors together in the same icing bag before piping. For a truly festive look, consider piping a base layer of frosting on all your brownies, then using a different colored frosting to add accents like swirls, stars, or rosettes. Remember, practice makes perfect, so don’t worry if your first few attempts aren’t flawless. The goal is to have fun and create something delicious and visually appealing.
Adding Edible Accents and Finishing Touches
Once your Frosted Christmas Brownies are beautifully frosted, it’s time to add those essential festive embellishments. This is where the edible gold stars and white pearl sprinkles come into play. While the frosting is still soft, gently press the edible gold stars onto the surface. You can arrange them in patterns, like a small cluster on each brownie, or sprinkle them randomly for a dazzling effect. The white pearl sprinkles also add a touch of elegance. You can scatter them across the frosted surface or use them to outline borders or create little snowflake designs. Consider using a toothpick to gently nudge them into place. If you’ve used multiple frosting colors, you can also use a contrasting color of sprinkles to highlight the frosting. For instance, if you’ve frosted with white, green pearl sprinkles would look stunning. Or, for a bolder statement, use gold stars on green frosting. The key here is to have fun and let gin extractr imagination guide you. The combination of vibrant frosting and glittering edible decorations will truly make these brownies stand out on any holiday dessert table.
Allowing Frosting to Set
The final, and arguably most important, step in creating perfect Frosted Christmas Brownies is allowing the frosting to set properly. Once you’ve finished decorating all your brownies, it’s essential to let them sit undisturbed for a period. This allows the frosting to firm up, ensuring your decorations stay in place and that the brownies are easy to handle and serve. I recommend leaving them out at room temperature for at least an hour. Avoid placing them in the refrigerator immediately, as this can sometimes cause condensation on the frosting, making it appear dull or slightly wet. If you live in a very warm environment and need to refrigerate them for storage, wait until the frosting has firmed up significantly at room temperature. This setting period is crucial for maintaining the visual appeal of your Frosted Christmas Brownies and pregin extractting any smudging or damage to your intricate designs. Once the frosting has set, they are ready to be enjoyed or carefully packaged for gifting.
Conclusion:
And there you have it – your guide to creating the most decadent and festive Frosted Christmas Brownies! We’ve walked through each step, from achieving that perfect fudgy texture to crafting a beautiful, celebratory frosting that will undoubtedly impress your friends and family. These brownies are more than just a treat; they’re a centerpiece, a conversation starter, and a warm, delicious embodiment of the holiday spirit.
To make your Frosted Christmas Brownies truly shine, consider serving them slightly warm with a scoop of vanilla bean ice cream for an extra layer of indulgence. They also pair wonderfully with a glass of cold milk or a festive hot chocolate. Don’t be afraid to get creative with variations! Consider adding a sprinkle of crushed candy canes to the frosting for a peppermint kick, or folding in some white chocolate chips for added richness. You can also experiment with different food coloring for the frosting to match your specific holiday color scheme.
We encourage you to bake these Frosted Christmas Brownies with joy and to share the delicious results generously. The love and effort you put into them will be tasted in every single bite. Happy baking and happy holidays!
FAQs
Q: Can I make the Frosted Christmas Brownies ahead of time?
A: Absolutely! The brownie base can be baked and cooled up to two days in advance. Store them in an airtight container at room temperature. The frosting can also be made a day ahead and stored in the refrigerator; you may need to let it soften slightly at room temperature and give it a quick whisk before frosting the cooled brownies.
Q: My frosting is too thin. How can I thicken it?
A: If your frosting is too thin, you can try gradually adding more powdered sugar, a tablespoon at a time, until it reaches your desired consistency. Alternatively, if it’s only slightly too thin, chilling it in the refrigerator for about 15-20 minutes can also help it firm up.
Q: Can I use a different type of chocolate for the brownies?
A: Yes, you can! While the recipe calls for a specific type of chocolate for optimal results, feel free to experiment. Dark chocolate will yield a more intense flavor, while semi-sweet offers a classic balance. Just ensure you’re using good quality chocolate for the best taste.
Fudgy Frosted Christmas Brownies-Easy Holiday Treat
Delicious and easy fudgy brownies topped with festive Christmas-colored frosting and edible decorations.
Ingredients
-
2 Boxes of Brownie Mix, or a double batch of homemade brownies
-
White Frosting, 1 to 3 jars
-
Edible Gel Food Coloring (or natural food coloring)
-
Edible Gold Stars
-
White Pearl Sprinkles
-
Icing Bags
-
Frosting Tips (large star tip, such as a 1M)
Instructions
-
Step 1
Prepare the brownies according to package directions or your preferred homemade recipe. Bake and allow to cool completely on a wire rack. For easier handling, chill the cooled brownies in the refrigerator for at least 30 minutes. -
Step 2
Divide the white frosting into separate bowls for each desired color. Add edible gel food coloring (or natural coloring) to each bowl a little at a time, stirring until you achieve vibrant festive hues. Spoon each colored frosting into separate icing bags. -
Step 3
Fit icing bags with desired frosting tips (a 1M star tip is recommended). Twist the top of each bag closed to prevent leakage. You can place the icing bag inside a tall glass with the edges folded over the rim for easier filling. -
Step 4
Frost the top of each brownie. Use a star tip to pipe decorative patterns like swirls or rosettes, or spread frosting evenly with an offset spatula and pipe accents. Mix and match colors or create marbled effects. -
Step 5
While the frosting is still soft, gently press edible gold stars and white pearl sprinkles onto the surface. Arrange them in patterns or scatter them for a dazzling effect. Use a toothpick to nudge sprinkles into place if needed. -
Step 6
Allow the frosting to set undisturbed at room temperature for at least an hour. This helps the decorations stay in place and makes the brownies easy to handle and serve without smudging.
Important Information
Nutrition Facts (Per Serving)
It is important to consider this information as approximate and not to use it as definitive health advice.
Allergy Information
Please check ingredients for potential allergens and consult a health professional if in doubt.

Leave a Comment