
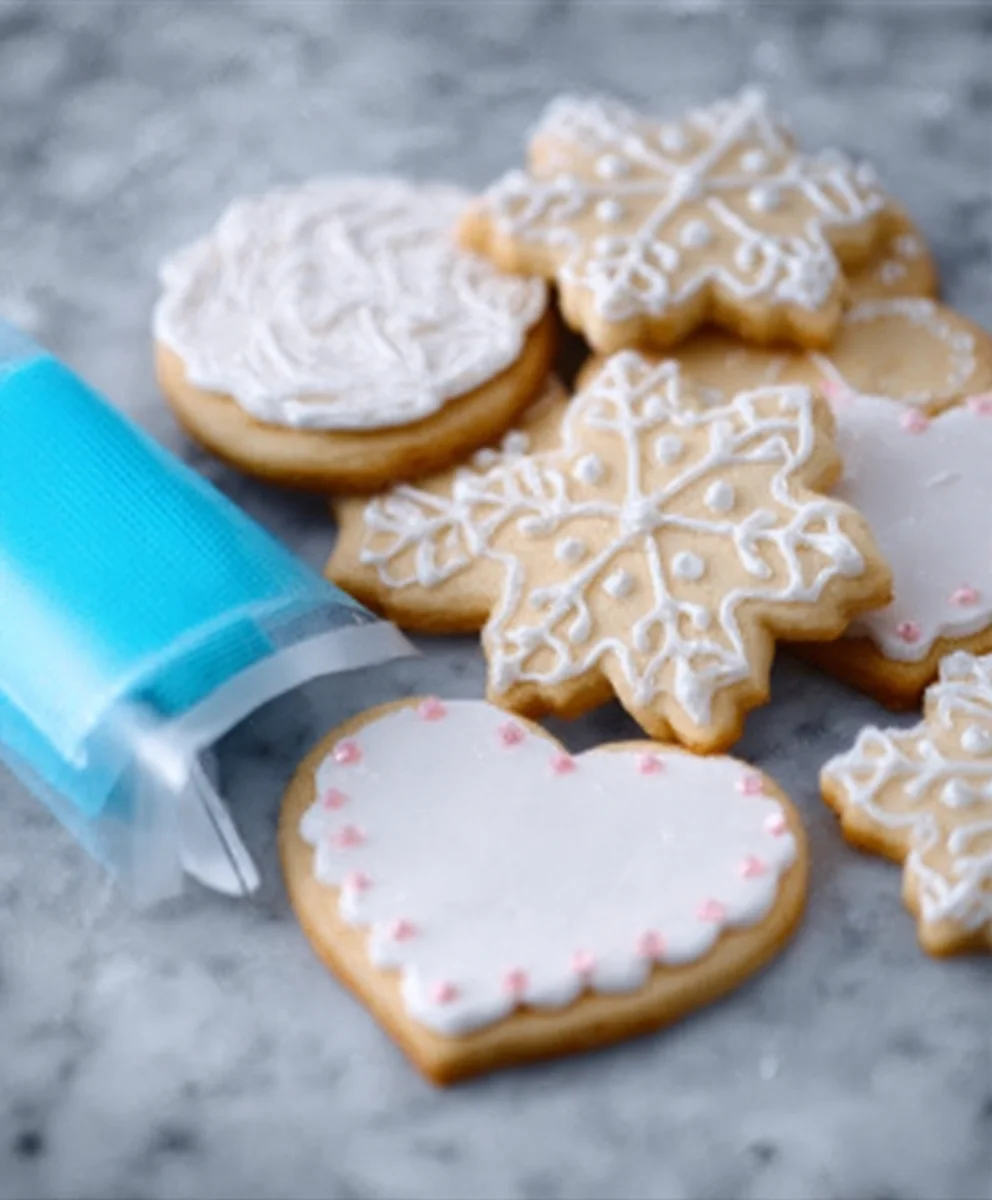
Famous Royal Icing is more than just a sweet confection; it’s the crown jewel of countless baked creations. Have you ever gazed at those impeccably decorated cookies and cakes, marveling at their intricate designs and flawless finish, and wondered how such edible artistry is achieved? That’s the magic of Famous Royal Icing at work. Its ability to transform humble baked goods into stunning masterpieces is what makes it so beloved by bakers of all levels, from enthusiastic home cooks to seasoned professionals. What truly sets this icing apart is its incredible versatility and characteristic smooth, porcelain-like finish. It dries hard and smooth, providing the perfect canvas for piping delicate details, creating stunning floral arrangements, or simply adding a crisp, clean outline. This recipe will guide you to creating that perfect, iconic Famous Royal Icing, ensuring your next baking project is a showstopper.

Ingredients:
- 2 tablespoons meringue powder
- 4 tablespoons warm water
- 2 cups powdered sugar
- 1 tablespoon light corn syrup
- 2 teaspoons lemon extract (or lemon juice powder)
- 1 teaspoon white food coloring (optional)
- Desired food coloring
- Additional water for thinning
- Additional powdered sugar for thickening
Preparing the Famous Royal Icing Base
This recipe for Famous Royal Icing is incredibly versatile and forms the perfect base for all your decorating needs, whether you’re crafting intricate sugar cookies, decorating cakes, or creating edible art. The key to its success lies in the proper preparation of the meringue powder and achieving the correct consistency.
First, in a medium-sized mixing bowl, combine the 2 tablespoons of meringue powder with the 4 tablespoons of warm water. Whisk this mixture gently until the meringue powder is fully dissolved. It might look a little frothy at this stage, and that’s perfectly normal. Allow this mixture to sit for about 5 to 10 minutes. This resting period is crucial as it allows the meringue powder to hydrate properly, which is essential for creating a stable and smooth icing. Skipping this step can result in a less stable icing that might crack or not set as firmly.
Once the meringue powder has hydrated, it’s time to incorporate the powdered sugar. Gradually add the 2 cups of powdered sugar to the bowl. You can do this by sifting the powdered sugar first, which helps prevent lumps and ensures a smoother texture. Start mixing on a low speed with an electric mixer (either a stand mixer with a whisk attachment or a hand mixer). As the powdered sugar begin extracts to incorporate, the mixture will start to thicken into a paste-like consistency.
Now, add the 1 tablespoon of light corn syrup and the 2 teaspoons of lemon extract. The corn syrup acts as a humectant, helping to keep the icing soft and pliable for longer, and also contributes to a beautiful sheen. The lemon extract not only adds a subtle, pleasant flavor but also helps to stabilize the icing. Continue to mix on low speed until these wet ingredients are fully combined with the sugar and meringue powder mixture.
Achieving the Perfect Consistency
After the initial mixing, increase the mixer speed to medium-high. Beat the icing for about 5 to 7 minutes. During this stage, the icing will become wonderfully smooth, white, and fluffy, resembling a thick buttercream or slightly whipped cream. It should hold soft peaks when the whisk is lifted. This is your basic “stiff” or “piping” consistency, perfect for outlining cookies or creating decorative elements that need to hold their shape.
If you’re planning to use white icing for your designs, now is the time to add the optional 1 teaspoon of white food coloring. White food coloring helps to brighten the icing and give it a more opaque, pure white appearance, which is especially useful when decorating on darker cookies or when you want a crisp white contrast. Mix this in thoroughly until fully incorporated.
At this point, your Famous Royal Icing is ready for its primary use, or for further customization. If you intend to use it for outlining and details, this consistency is ideal. However, for “flooding” larger areas of cookies, you’ll need to thin it down. To achieve flood consistency, gradually add small amounts of additional water, about 1/2 teaspoon at a time, while mixing on low speed. Mix until the icing flows smoothly off the whisk in a continuous ribbon that slowly disappears back into the bowl within about 10-15 seconds. Be careful not to add too much water, as this can make the icing too runny and difficult to control.
Conversely, if your icing has become too thin, or if you’ve added too much water, you can thicken it by gradually adding more sifted powdered sugar, a tablespoon at a time, mixing thoroughly after each addition until the desired stiffness is reached. Always err on the side of caution when adjusting consistency, adding liquids or solids very slowly.
Coloring and Storing Your Famous Royal Icing
Once you have achieved your desired consistency (whether stiff for piping or thinner for flooding), you can divide the icing into separate bowls to color it. Add your chosen food coloring a little at a time. Gel food colorings are highly recommended as they are concentrated and won’t significantly alter the consistency of your icing, unlike liquid food colorings which can add too much moisture. Stir gently but thoroughly until the color is uniform and vibrant.
For long-term storage, properly prepared royal icing can be kept airtight. If you are not using the icing immediately, cover the surface directly with plastic wrap to prevent a skin from forming. Press the plastic wrap down onto the icing itself. Store in an airtight container at room temperature for up to two weeks. If the icing appears to have separated or hardened slightly when you’re ready to use it again, simply give it a good stir or a quick whip with your mixer to bring it back to its smooth, usable consistency. Remember that once it’s colored, it’s best to use it within a few days for optimal vibrancy.
Conclusion:
You’ve now unlocked the secrets to creating the truly Famous Royal Icing! We’ve walked through each step, from achieving the perfect consistency for intricate piping to ensuring a smooth, glossy finish for beautiful flooding. This versatile icing is your key to transforming simple cookies into edible works of art, making any occasion feel a little more special. Remember, practice makes perfect, so don’t be discouraged if your first attempt isn’t magazine-worthy. The joy is in the creation and the delicious results!
When it comes to serving suggestions, the Famous Royal Icing shines on decorated sugar cookies, cakes, gin extractgerbread houses, and even as a sweet edible glue for various confectionary projects. For variations, consider adding a hint of lemon or almond extract for a subtle flavor boost, or experiment with gel food coloring to achieve vibrant hues. The possibilities are truly endless with this classic decorating staple.
Frequently Asked Questions about Famous Royal Icing:
Q: How do I store leftover Famous Royal Icing?
Leftover Famous Royal Icing can be stored in an airtight container in the refrigerator for up to two weeks. Ensure a piece of plastic wrap is pressed directly onto the surface of the icing to prevent a crust from forming. Before using again, give it a good stir. If it becomes too stiff, you can add a teaspoon of water at a time until you reach the desired consistency.
Q: My Famous Royal Icing is too thin/runny. What can I do?
If your Famous Royal Icing is too thin, the easiest way to thicken it is by gradually adding more powdered sugar, a tablespoon at a time, while mixing. Beat until it reaches the desired consistency. If it’s too thick, a tiny amount of water or lemon juice (about a teaspoon at a time) can help thin it out.

Famous Royal Icing Recipe- Perfect Smooth Finish
A versatile and stable royal icing recipe that produces a perfect smooth finish for all your cookie decorating needs. Achieve stiff consistency for piping details or thin it for flooding larger areas.
Ingredients
-
2 tablespoons meringue powder
-
4 tablespoons warm water
-
2 cups powdered sugar
-
1 tablespoon light corn syrup
-
2 teaspoons lemon extract
-
1 teaspoon white food coloring (optional)
-
Desired food coloring
-
Additional water for thinning
-
Additional powdered sugar for thickening
Instructions
-
Step 1
In a medium bowl, combine meringue powder and warm water. Whisk until dissolved, let sit for 5-10 minutes to hydrate. -
Step 2
Gradually add powdered sugar to the hydrated meringue mixture. Start mixing on low speed with an electric mixer until a paste forms. -
Step 3
Add light corn syrup and lemon extract. Mix on low speed until fully combined. -
Step 4
Increase mixer speed to medium-high and beat for 5-7 minutes until smooth, white, and fluffy, holding soft peaks. Add white food coloring if desired for brighter white. -
Step 5
For flooding consistency, gradually add water (1/2 teaspoon at a time) until icing flows in a continuous ribbon that disappears in 10-15 seconds. For thickening, add sifted powdered sugar a tablespoon at a time. -
Step 6
Divide and color icing as desired using gel food coloring for best results. Store airtight, pressing plastic wrap directly onto the icing surface to prevent a skin.
Important Information
Nutrition Facts (Per Serving)
It is important to consider this information as approximate and not to use it as definitive health advice.
Allergy Information
Please check ingredients for potential allergens and consult a health professional if in doubt.
Leave a Comment