
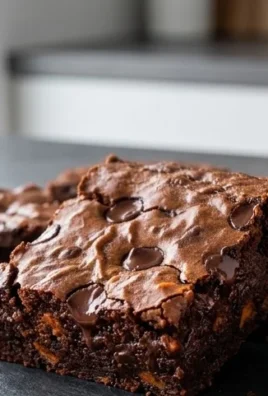
Chocolate chip cookie bars are more than just a dessert; they’re a portal to pure, unadulterated joy. Who doesn’t have a cherished memory tied to the warm, gooey embrace of a perfectly baked chocolate chip cookie? Well, imagin extracte all that comforting goodness, but amplified and conveniently packaged into an easy-to-share bar. That’s the magic of these chocolate chip cookie bars. They capture the irresistible allure of classic chocolate chip cookies – that delightful chegrape juicess, the satisfying crunch on the edges, and the molten rivers of chocolate – all without the fuss of scooping individual cookies. What truly sets these chocolate chip cookie bars apart is their inherent versatility and the sheer ease of preparation. They’re the ultimate crowd-pleaser, perfect for potlucks, bake snon-alcoholic ales, or simply satisfying a serious sweet craving at home. This recipe elevates the humble bar into a truly decadent experience, ensuring every bite is a moment of pure bliss.

Ingredients:
- 2 1/4 cups all-purpose flour
- 1/4 teaspoon salt
- 1/2 teaspoon baking soda
- 3/4 cup unsalted butter, melted
- 1 cup packed light brown sugar
- 1/2 cup granulated sugar
- 1 large egg
- 1 large egg yolk
- 2 teaspoons pure vanilla extract
- 2 cups mini chocolate chips
Preparing to Bake
Preheating and Pan Preparation
Before we get started with the dough, it’s crucial to preheat your oven and prepare your baking pan. This ensures that your cookie bars bake evenly and don’t stick. Preheat your oven to 350°F (175°C). This is the ideal temperature for creating beautifully baked, chewy cookie bars. Next, take an 8×8 inch baking pan. You have a couple of options for preparing it. The most reliable method is to line it with parchment paper, leaving an overhang on two opposite sides. This overhang acts as handles, making it incredibly easy to lift the entire slab of cookie bars out of the pan once they’re cooled. Alternatively, you can generously grease the pan with butter or non-stick cooking spray, ensuring all corners and edges are well-coated. This step is vital to prevent any sticking, which can be a frustrating issue after all your hard work.
Combining Dry Ingredients
In a medium-sized bowl, we’ll combine the dry ingredients. This ensures that the leavening agents and salt are evenly distributed throughout the flour, which is key for consistent texture and rise in your cookie bars. Add the 2 1/4 cups of all-purpose flour, the 1/4 teaspoon of salt, and the 1/2 teaspoon of baking soda to the bowl. Whisk these ingredients together gently but thoroughly. The baking soda will react with the brown sugar’s acidity during baking, contributing to a lovely lift and tender crum extractb. The salt, even in this small amount, plays a significant role in enhancing the overall flavor profile, balancing the sweetness and bringin extractg out the richness of the chocolate. Set this bowl aside for now.
Crafting the Cookie Dough
Creaming Sugars and Butter
Now, let’s move on to the wet ingredients, which will form the base of our delicious cookie dough. In a large mixing bowl, preferably using an electric mixer (stand or hand mixer), combine the 3/4 cup of melted unsalted butter with the 1 cup of packed light brown sugar and the 1/2 cup of granulated sugar. Beat these together on medium speed until the mixture is well combined and has a slightly lighter, fluffier texture. This process, often called creaming, incorporates air into the mixture, which contributes to the cookie bars’ delicate texture. Don’t rush this step; aim for about 2-3 minutes of mixing. Scrape down the sides of the bowl occasionally to ensure all the sugar and butter are incorporated.
Adding Eggs and Vanilla
Once the butter and sugar mixture is perfectly creamed, it’s time to add the eggs and vanilla extract. Add the 1 large egg and the 1 large egg yolk to the bowl. The extra egg yolk adds richness and chegrape juicess to the finished bars, giving them that desirable gooey texture. Beat the mixture again on medium speed until the eggs are fully incorporated and the batter looks smooth and emulsified. Next, add the 2 teaspoons of pure vanilla extract. Vanilla is a foundational flavor in most cookies, and in these bars, it amplifies the chocolate notes beautifully. Mix for another 30 seconds to a minute until the vanilla is well distributed. Again, remember to scrape down the sides of the bowl to ensure everything is coming together.
Incorporating Dry Ingredients and Chocolate Chips
With our wet ingredients beautifully blended, it’s time to bring in the dry ingredients and, of course, the star of the show – the chocolate chips! Gradually add the flour mixture (from the earlier step) to the wet ingredients, mixing on low speed. Mix just until the flour streaks disappear. Overmixing at this stage can develop the gluten in the flour too much, leading to tough cookie bars, so be gentle. Once the dough is almost fully combined, add the 2 cups of mini chocolate chips. Fold them into the dough using a spatula or wooden spoon until they are evenly distributed throughout. Mini chocolate chips are excellent for bars because they disperse more uniformly and provide a delightful pop of chocolate in every bite. Ensure every nook and cranny of the dough has some of those lovely chocolate morsels.
Baking and Cooling
Spreading and Baking the Dough
Now, take your prepared 8×8 inch baking pan. Spoon the cookie dough into the pan. Using a spatula or your fingers (lightly floured or greased if needed), gently press and spread the dough evenly across the bottom of the pan. Try to get it as flat and uniform as possible to ensure even baking. Don’t worry if it’s not perfectly smooth; a slightly rustic look is part of the charm. Place the pan in your preheated oven. Bake for approximately 25-30 minutes, or until the edges are golden brown and set, and the center appears mostly set with maybe a slight wiggle. Be careful not to overbake, as this will result in dry, hard bars. The mini chocolate chips should be melted and gooey.
Cooling and Cutting for Perfect Bars
This is perhaps the mostgin extractallenging part – waiting! Once the cookie bars are out of the oven, resist the urge to cut them immediately. Let them cool in the pan on a wire rack for at least 15-20 minutes. This allows them to set up properly. If you used parchment paper with overhangs, carefully lift the entire slab out of the pan. Then, transfer it to a cutting board and allow it to cool completely. Once fully cooled, use a sharp knife to cut the slab into squares or bars. For cleaner cuts, you can warm your knife slightly under hot water and dry it thoroughly between cuts. Enjoy your delicious homemade chocolate chip cookie bars!

Conclusion:
And there you have it – a simple yet incredibly satisfying recipe for Chocolate Chip Cookie Bars! This recipe offers all the delightful chegrape juicess and chocolatey goodness of traditional cookies, but in a convenient bar form that’s perfect for sharing (or not!). We’ve found these bars are an absolute hit at potlucks, bake snon-alcoholic ales, or simply as an after-school treat. They come together quickly, making them an ideal weeknight dessert option that even novice bakers can master. Don’t be afraid to get creative with your own additions – the possibilities are endless!
For serving suggestions, these Chocolate Chip Cookie Bars are fantastic on their own, but you can elevate them further by pairing them with a scoop of vanilla ice cream or a warm glass of milk. They also make a wonderful base for other toppings. Consider adding a sprinkle of sea salt before baking for a sweet and salty contrast, or drizzling them with caramel sauce after they’ve cooled.
We encourage you to give these Chocolate Chip Cookie Bars a try. You’ll be rewarded with a delicious homemade treat that is sure to become a family favorite. Enjoy the process and savor every bite!
Frequently Asked Questions:
Can I make these Chocolate Chip Cookie Bars ahead of time?
Absolutely! Chocolate Chip Cookie Bars are an excellent make-ahead treat. Once completely cooled, store them in an airtight container at room temperature for up to 3-4 days. For longer storage, you can freeze them, either whole or cut into individual bars, for up to 2-3 months.
What are some variations for these Chocolate Chip Cookie Bars?
The beauty of Chocolate Chip Cookie Bars lies in their versatility! You can easily swap out the chocolate chips for other favorites like white chocolate chips, peanut butter chips, or butterscotch chips. Adding nuts such as walnuts or pecans, or even a handful of M&Ms, can also create delicious new flavor profiles. A swirl of peanut butter or cream cheese frosting on top after baking is another popular and tasty variation.

Easy Chocolate Chip Cookie Bars-Best Recipe
Deliciously chewy and easy-to-make chocolate chip cookie bars with a rich, buttery flavor.
Ingredients
-
2 1/4 cups all-purpose flour
-
1/4 teaspoon salt
-
1/2 teaspoon baking soda
-
3/4 cup unsalted butter, melted
-
1 cup packed light brown sugar
-
1/2 cup granulated sugar
-
1 large egg
-
1 large egg yolk
-
2 teaspoons pure vanilla extract
-
2 cups mini chocolate chips
Instructions
-
Step 1
Preheat oven to 350°F (175°C). Line an 8×8 inch baking pan with parchment paper, leaving an overhang on two opposite sides, or generously grease the pan. -
Step 2
In a medium bowl, whisk together all-purpose flour, salt, and baking soda. -
Step 3
In a large bowl, beat melted butter with light brown sugar and granulated sugar until well combined and slightly fluffy. -
Step 4
Add the large egg, egg yolk, and vanilla extract to the sugar mixture and beat until smooth and emulsified. Scrape down sides of the bowl as needed. -
Step 5
Gradually add the dry ingredients to the wet ingredients, mixing on low speed just until the flour streaks disappear. Fold in the mini chocolate chips. -
Step 6
Spoon the dough into the prepared baking pan and spread evenly. Bake for 25-30 minutes, or until the edges are golden brown and set. -
Step 7
Let the cookie bars cool in the pan on a wire rack for at least 15-20 minutes, then lift out of the pan (if using parchment paper) and cool completely on a cutting board before cutting into bars.
Important Information
Nutrition Facts (Per Serving)
It is important to consider this information as approximate and not to use it as definitive health advice.
Allergy Information
Please check ingredients for potential allergens and consult a health professional if in doubt.

Leave a Comment