
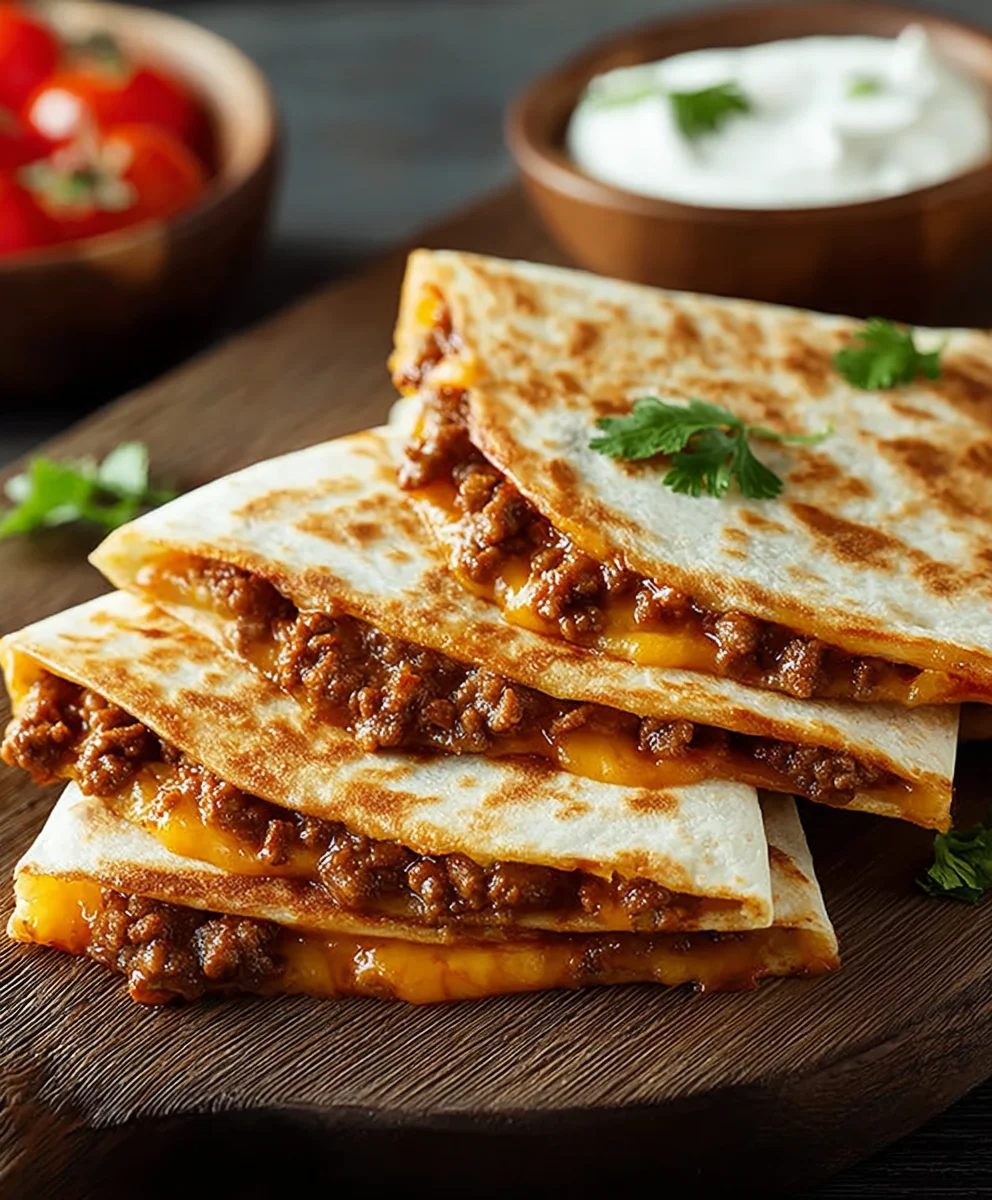
Cheesy Ground Beef Quesadillas are more than just a meal; they’re a gateway to pure comfort and undeniable deliciousness. Imagin extracte that moment when you bite into a perfectly grilled tortilla, yielding to a molten core of savory ground beef and gloriously gooey cheese. It’s a sensory explosion that brings a smile to everyone’s face, from hurried weeknight dinners to laid-back weekend lunches. What is it about these simple quesadillas that captures our hearts? Perhaps it’s the incredible ease of preparation, allowing you to whip up a satisfying meal in minutes. Or maybe it’s the sheer versatility – you can customize your filling with your favorite spices and vegetables. But the true magic lies in that irresistible combination of tender, seasoned ground beef enveloped in a blanket of melty, golden cheese, all encased in a crisp, lightly browned tortilla. These Cheesy Ground Beef Quesadillas are a testament to how simple ingredients can create something truly extraordinary, a crowd-pleaser that never fails to deliver on flavor and satisfaction.

Ingredients:
- 1 lb ground beef
- 1 small onion, finely chopped
- 2 cloves garlic, minced
- 1 teaspoon ground cumin
- 1 teaspoon chili powder
- ½ teaspoon smoked paprika
- ½ teaspoon oregano
- Salt and black pepper to taste
- ¼ cup salsa or tomato sauce (optional)
- 2 cups shredded cheese (cheddar, Monterey Jack, or Mexican blend)
- 4 large flour tortillas
- 2 tablespoons chopped fresh cilantro (optional)
- Butter or oil for frying
Preparing the Ground Beef Filling
This is where we build the flavorful heart of our Cheesy Ground Beef Quesadillas. The key to a great quesadilla is a well-seasoned and moist filling. We’ll start by browning the ground beef to ensure a tender and delicious base.
Step 1: Browning the Ground Beef
- Begin extract by placing your pound of ground beef into a large skillet. You don’t need to add any oil at this stage, as the beef will render its own fat as it cooks.
- Cook the ground beef over medium-high heat, breaking it up with a spoon or spatula as it cooks. Aim to get it nicely browned and no longer pink. This usually takes about 5-7 minutes.
- Once the beef is browned, carefully drain off any excess grease from the skillet. This step is important to prevent the quesadillas from becoming too oily and to ensure a better texture. You can do this by tilting the skillet and gently spooning out the fat, or by using a paper towel to soak it up.
Step 2: Sautéing Aromatics and Spices
- To the same skillet, add your finely chopped small onion. Cook the onion with the browned ground beef over medium heat until it becomes translucent and softened. This typically takes about 3-4 minutes. The softened onion will add a lovely sweetness and depth of flavor.
- Next, add the minced garlic to the skillet. Cook for just about 30 seconds more, stirring constantly, until fragrant. Be careful not to burn the garlic, as this can make it taste bitter.
- Now it’s time to introduce our wonderful array of spices that will give our quesadillas their signature taste. Stir in the ground cumin, chili powder, smoked paprika, and oregano. Cook for another minute, stirring everything together, to toast the spices. Toasting the spices helps to release their aromatic oils, intensifying their flavor.
- Season the mixture generously with salt and black pepper to your personal preference. Taste and adjust the seasoning as needed. If you like a little extra moisture and a hint of tomato flavor in your filling, now is the time to stir in the optional ¼ cup of salsa or tomato sauce. This will also help to meld all the flavors together beautifully. Let this mixture simmer gently for another 2-3 minutes, allowing the flavors to meld.
Assembling and Cooking the Quesadillas
With our delicious beef filling ready, we move on to assembling and cooking these delightful Cheesy Ground Beef Quesadillas. This stage is all about creating that perfect golden-brown exterior and ooey-gooey cheesy interior.
Step 3: Preparing the Tortillas for Filling
- Lay out your four large flour tortillas flat on a clean work surface.
- Divide the cooked ground beef mixture evenly between the four tortillas. Aim to spread it in a single layer over one half of each tortilla, leaving a small border around the edge. This will make it easier to fold and prevent the filling from spilling out.
- Generously sprinkle the shredded cheese over the top of the ground beef filling on each tortilla. Don’t be shy with the cheese! For an extra burst of freshness, you can sprinkle the optional chopped fresh cilantro over the cheese at this point.
- Carefully fold the other half of each tortilla over the filling, creating a semi-circle. Press down gently to help the quesadilla hold its shape.
Step 4: Grilling the Quesadillas to Golden Perfection
- Heat a large skillet or griddle over medium heat. Add about 1 tablespoon of butter or oil to the skillet. Allow the butter to melt and coat the bottom of the pan evenly. You want a nice sizzle, but not so hot that it burns the tortillas immediately.
- Carefully place one or two of the assembled quesadillas into the hot skillet, depending on the size of your pan. Avoid overcrowding the skillet, as this can lead to uneven cooking and prevent the tortillas from crisping up properly.
- Cook the quesadillas for about 3-5 minutes per side, or until they are golden brown and crispy, and the cheese inside is completely melted and gooey. You’ll want to peek underneath to check the color. Use a spatula to carefully flip them over to cook the other side.
- If the tortillas are browning too quickly, reduce the heat slightly. If they aren’t browning at all, increase the heat just a touch. You’re looking for that perfect balance of crispiness and melty cheese.
Step 5: Finishing and Serving
- Once a quesadilla is perfectly golden brown and the cheese is beautifully melted, carefully remove it from the skillet and place it on a cutting board.
- If you are cooking more quesadillas, add a little more butter or oil to the skillet between batches to ensure each one cooks evenly and gets that desirable crispy texture. Repeat the cooking process for the remaining quesadillas.
- For the best serving experience, let the quesadillas rest for just a minute or two before cutting. This allows the cheese to set slightly, preventing it from all oozing out when you slice them.
- Using a sharp knife or a pizza cutter, cut each quesadilla into wedges. This makes them easy to handle and perfect for sharing.
- Serve your Cheesy Ground Beef Quesadillas immediately while they are hot and the cheese is wonderfully stretchy. They are fantastic on their own, or you can serve them with your favorite toppings like sour cream, extra salsa, guacamole, or a dollop of plain Greek yogurt for a lighter option. Enjoy the incredible flavor and satisfying crunch!

Conclusion:
And there you have it – a simple yet incredibly satisfying recipe for Cheesy Ground Beef Quesadillas! This dish is a weeknight warrior, perfect for busy evenings when you crave something hearty and delicious without a lot of fuss. We’ve walked through each step to ensure you can create these golden-brown pockets of cheesy goodness with confidence. Imagin extracte the aroma filling your kitchen as the ground beef and melty cheese come together! They’re fantastic on their own, but we love serving them with a dollop of sour cream, fresh salsa, or even a side of guacamole for an extra burst of flavor and texture. Don’t be afraid to experiment with variations – add some sautéed onions and peppers to the beef mixture, or spice things up with a pinch of cayenne pepper. The possibilities are endless, and the reward is a truly delicious meal. So go ahead, gather your ingredients, and get ready to enjoy these amazing Cheesy Ground Beef Quesadillas!
Frequently Asked Questions:
What kind of cheese is best for Cheesy Ground Beef Quesadillas?
While a blend of cheddar and Monterey Jack is a classic and delicious choice, feel free to experiment! Other good options include Colby Jack, Pepper Jack for a bit of heat, or even a Mexican cheese blend. The key is a cheese that melts well and offers a good flavor profile.
Can I make the ground beef mixture ahead of time?
Absolutely! You can cook the ground beef and seasoning mixture a day or two in advance and store it in an airtight container in the refrigerator. This will make assembling your Cheesy Ground Beef Quesadillas even quicker when you’re ready to eat!
Can I use different proteins for these quesadillas?
Certainly! While this recipe focuses on ground beef, you can easily adapt it. Shredded chicken, pulled beef, or even seasoned black beans are excellent alternatives that work wonderfully in quesadillas. Just ensure your filling is cooked and ready to go.
Easy Cheesy Ground Beef Quesadillas
Quick and easy ground beef quesadillas packed with flavor and melted cheese. Perfect for a weeknight meal!
Ingredients
-
1 lb ground beef
-
1 small onion, finely chopped
-
2 cloves garlic, minced
-
1 teaspoon ground cumin
-
1 teaspoon chili powder
-
½ teaspoon smoked paprika
-
½ teaspoon oregano
-
Salt and black pepper to taste
-
2 cups shredded cheese (cheddar, Monterey Jack, or Mexican blend)
-
4 large flour tortillas
-
Butter or oil for frying
Instructions
-
Step 1
Place ground beef in a large skillet over medium-high heat. Cook, breaking it up, until browned (5-7 minutes). Drain excess grease. -
Step 2
Add chopped onion to the skillet with beef and cook until translucent (3-4 minutes). Add minced garlic and cook for 30 seconds until fragrant. Stir in cumin, chili powder, smoked paprika, and oregano; cook for 1 minute. Season with salt and pepper. Stir in optional salsa/tomato sauce and simmer for 2-3 minutes. -
Step 3
Lay out tortillas. Spread beef mixture evenly over one half of each tortilla, leaving a border. Sprinkle generously with shredded cheese. Fold the other half of each tortilla over the filling. -
Step 4
Heat butter or oil in a skillet over medium heat. Place 1-2 quesadillas in the skillet and cook for 3-5 minutes per side, until golden brown and cheese is melted. -
Step 5
Remove cooked quesadillas, add more butter/oil if needed, and repeat for remaining quesadillas. Let rest for a minute, then cut into wedges and serve hot.
Important Information
Nutrition Facts (Per Serving)
It is important to consider this information as approximate and not to use it as definitive health advice.
Allergy Information
Please check ingredients for potential allergens and consult a health professional if in doubt.


Leave a Comment