
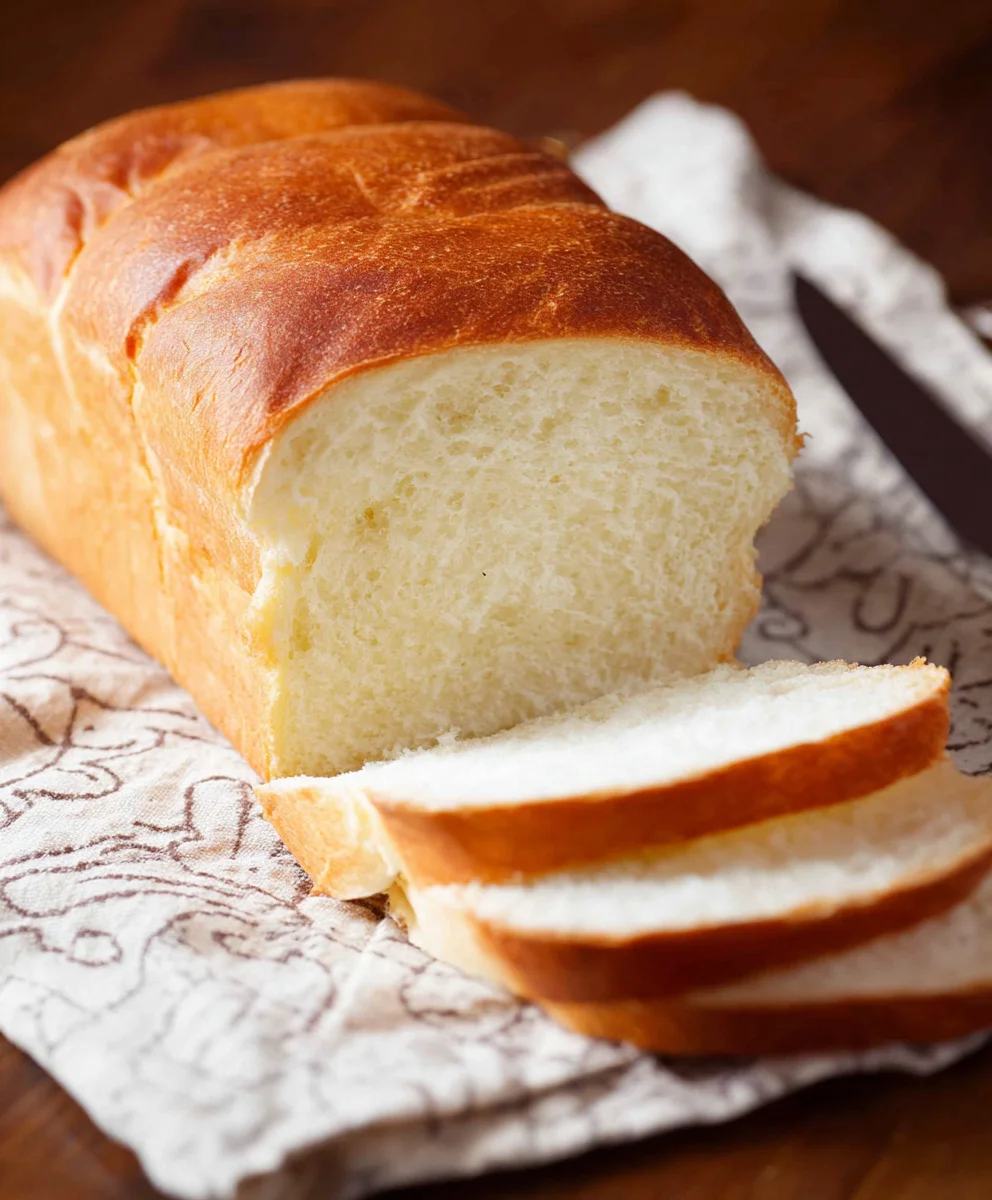
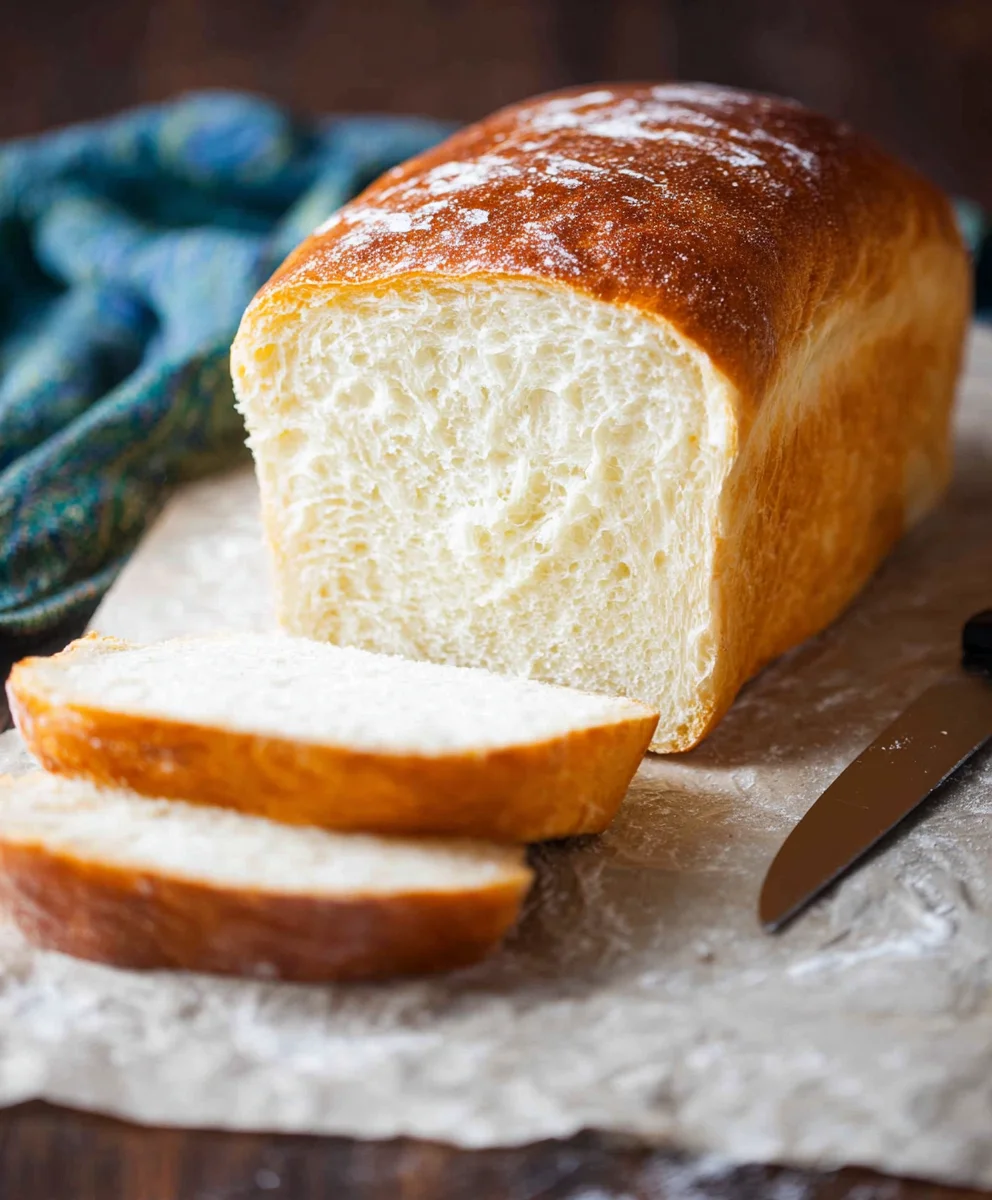
AMISH WHITE BREAD is more than just a loaf of bread; it’s a comforting embrace, a taste of simpler times, and a testament to the enduring power of tradition. If you’ve ever experienced the pillowy softness and subtle sweetness of truly authentic Amish white bread, you know exactly what I’m talking about. It’s the kind of bread that makes a humble sandwich feel like a gourmet experience, the perfect canvas for butter and jam, and the foundation for the best French toast you’ll ever make. What sets this particular AMISH WHITE BREAD apart is its beautiful simplicity, relying on high-quality ingredients and time-honored techniques to achieve its signature texture and flavor. It’s a recipe that feels both incredibly rewarding to make and astonishingly easy to master, promising a golden crust and an impossibly tender crum extractb with every bake.

Ingredients:
- 1 cup warm water, (110-120°F)
- ⅓ cup granulated sugar
- 1 packet (2 ¼ teaspoons) instant yeast
- 3 cups all-purpose flour, plus more for dusting
- ¾ teaspoon salt
- 2 tablespoons vegetable or canola oil, plus more for greasing
- 2 tablespoons unsalted butter, melted
Preparing Your Dough
Activating the Yeast
The first step to a perfect AMISH WHITE BREAD is to get our yeast happy and active. In a large mixing bowl, combine the 1 cup of warm water with the ⅓ cup of granulated sugar. The water should feel comfortably warm to the touch, akin to a baby’s bath – not too hot, as excessive heat can kill the yeast, and not too cool, as it won’t be activated effectively. Sprinkle the entire packet of instant yeast over the surface of the water and sugar mixture. Give it a gentle stir to ensure the yeast is somewhat incorporated, but don’t overmix. Let this mixture sit undisturbed for about 5 to 10 minutes. You’ll know the yeast is alive and ready when it starts to foam and create a bubbly, frothy layer on top. This visual cue is essential; if you don’t see foam, your yeast might be old or the water temperature was off, and it’s best to start over to ensure a good rise.”
Incorporating the Dry Ingredients
Once your yeast mixture is beautifully foamy, it’s time to add the dry ingredients that will form the structure of our AMISH WHITE BREAD. Add the 3 cups of all-purpose flour to the bowl, along with the ¾ teaspoon of salt. The salt plays a crucial role in controlling the yeast activity and also contributes to the overall flavor profile of the bread. Using a sturdy spoon or a dough whisk, begin extract to mix the ingredients together until a shaggy dough starts to form. At this stage, the mixture will still look quite rough and not very cohesive, and that’s perfectly normal.
Kneading the Dough
Developing the Gluten
Now comes the most satisfying part of bread-making: kneading! Add the 2 tablespoons of vegetable or canola oil and the 2 tablespoons of melted unsalted butter to the shaggy dough. The oil and butter will add richness and tenderness to the final loaf, making it wonderfully soft. Turn the dough out onto a lightly floured surface. Your clean countertop or a large cutting board works perfegin extracty. Begin to knead the dough by folding it over on itself, pressing down with the heels of your hands, and then rotating it a quarter turn. Continue this process for about 8 to 10 minutes. You’re looking for the dough to transform from a sticky, rough mass into a smooth, elastic, and slightly tacky ball. It should spring back slowly when you gently poke it with your finger. If the dough is too sticky, you can lightly dust your hands and the work surface with a little more flour, but be sparing; too much extra flour can make the bread dry.”
First Rise (Bulk Fermentation)
Creating a Warm Environment
Once your dough is beautifully kneaded and smooth, it’s time to let it rest and rise. Lightly grease a clean, large bowl with a bit of vegetable or canola oil. Place the kneaded dough into the greased bowl and turn it to coat it evenly with the oil. This prevents the dough from drying out as it rises. Cover the bowl tightly with plastic wrap or a clean, damp kitchen towel. For the best rise, find a warm, draft-free spot in your kitchen. An oven that has been turned off but is still slightly warm (after being preheated for a minute or two and then turned off) is ideal, or simply a sunny spot on your counter will suffice. Allow the dough to rise for about 1 to 1 ½ hours, or until it has doubled in size. You’ll notice it will become significantly puffier and lighter. This first rise is crucial for developing the flavor and texture of your AMISH WHITE BREAD.”
Shaping and Second Rise
Deflating and Shaping the Loaf
After the dough has doubled in size, gently punch it down to release the trapped gases. This step is important for a more even crum extractb structure. Turn the deflated dough out onto your lightly floured work surface again. Gently shape the dough into your desired loaf form. For a classic AMISH WHITE BREAD, you can either form it into a long, rectangular shape to fit into a loaf pan, or you can shape it into a round boule. If you’re using a loaf pan, grease it well with vegetable oil or butter. Place the shaped dough into the prepared loaf pan or onto a baking sheet lined with parchment paper.
The Final Proof
Now, cover the shaped loaf loosely with lightly oiled plastic wrap or a clean kitchen towel. Let it rest and rise again in a warm place for another 30 to 45 minutes, or until it looks noticeably puffy and has increased in size again, though not necessarily doubled. You should be able to see a slight dome forming over the top of the loaf pan or the bread itself if you’re baking it freeform. This second rise, often called the proofing stage, is what gives the bread its final airy texture before baking. While the dough is proofing, preheat your oven to 375°F (190°C).”
Baking Your Amish White Bread
Achieving a Golden Crust
Once your loaf has completed its second rise and the oven is preheated, it’s time to bake your beautiful AMISH WHITE BREAD. If desired, you can lightly brush the top of the loaf with a little milk or an egg wash for an even more golden and slightly shiny crust. Carefully place the loaf pan or baking sheet into the preheated oven. Bake for 30 to 35 minutes. The bread is ready when it has a deep golden-brown crust and sounds hollow when you tap the bottom. If the crust is browning too quickly before the inside is cooked, you can loosely tent the top with aluminum foil for the remaining baking time.
Cooling and Enjoying
When the AMISH WHITE BREAD is perfectly baked, remove it from the oven. Immediately take the bread out of the loaf pan (if used) and place it on a wire cooling rack. This is essential to prevent the bottom crust from becoming soggy from trapped steam. Let the bread cool completely, for at least an hour, before slicing. This allows the internal structure to set properly. Once cooled, slice generously and enjoy the wonderful aroma and taste of your homemade AMISH WHITE BREAD, perfect for sandwiches, toast, or simply slathered with butter.”
Conclusion:
You’ve now learned how to bake the perfect batch of AMISH WHITE BREAD! This recipe is surprisingly simple and incredibly rewarding, yielding a loaf that’s wonderfully soft, slightly sweet, and boasts that classic, comforting homemade taste. The aroma that fills your kitchen as it bakes is simply divine, and slicing into a warm, fresh loaf is an experience in itself. Don’t be afraid to get your hands a little floured; the process is as enjoyable as the final product. We encourage you to try this recipe as is, and then experiment with the delightful variations we’ve suggested. Enjoy sharing this beautiful AMISH WHITE BREAD with your loved ones!
For serving suggestions, this bread is absolutely phenomenal toasted and slathered with butter or your favorite jam. It also makes the most incredible sandwiches, holding up beautifully to both savory and sweet fillings. Think classic beef ham and cheese, or even a decadent peanut butter and jelly. It’s equally wonderful served alongside hearty soups and stews, providing a perfect vehicle for soaking up every last drop of flavor.
Don’t hesitate to get creative with this recipe. Consider adding a touch of honey to the dough for an extra layer of sweetness, or perhaps some finely chopped herbs like rosemary or chives for a savory twist. For a richer bread, you could substitute some of the milk with heavy cream. The possibilities are truly endless!
Frequently Asked Questions:
Can I make AMISH WHITE BREAD in a bread machine?
Yes, absolutely! You can typically adapt this recipe for a bread machine by adding the wet ingredients first, followed by the dry ingredients, and then the yeast. Refer to your bread machine’s manual for specific liquid and dry ingredient ratios, but this base recipe should work very well. Select the “white bread” cycle and let the machine do the work!
How should I store leftover AMISH WHITE BREAD?
Once your AMISH WHITE BREAD has cooled completely, store it at room temperature in a bread box or a loosely senon-alcoholic aled plastic bag. It should stay fresh for about 3-4 days. For longer storage, you can slice the bread and freeze it in an airtight container or freezer bag. It thaws beautifully and is perfect for toasting.
What kind of flour is best for AMISH WHITE BREAD?
For the most authentic and best results, we recommend using unbleached all-purpose flour. While bread flour can also be used and will result in a slightly chewier texture, all-purpose flour provides that signature soft crum extractb that makes AMISH WHITE BREAD so beloved. Avoid using self-rising flour, as it contains leavening agents that will interfere with the recipe.
Easy Amish White Bread Recipe-Simple Homemade Loaf
A simple and straightforward recipe for delicious homemade Amish white bread, perfect for everyday use.
Ingredients
-
1 cup warm water, (110-120°F)
-
⅓ cup granulated sugar
-
1 packet (2 ¼ teaspoons) instant yeast
-
3 cups all-purpose flour, plus more for dusting
-
¾ teaspoon salt
-
2 tablespoons vegetable or canola oil, plus more for greasing
-
2 tablespoons unsalted butter, melted
Instructions
-
Step 1
Activate the yeast: In a large mixing bowl, combine warm water and granulated sugar. Sprinkle instant yeast over the surface. Let sit for 5-10 minutes until foamy. -
Step 2
Incorporate dry ingredients: Add all-purpose flour and salt to the foamy yeast mixture. Stir until a shaggy dough forms. -
Step 3
Knead the dough: Add vegetable oil and melted butter. Turn dough onto a floured surface and knead for 8-10 minutes until smooth and elastic. Add minimal flour if too sticky. -
Step 4
First rise: Place dough in a lightly greased bowl, cover, and let rise in a warm place for 1 to 1 ½ hours, or until doubled in size. -
Step 5
Shape and second rise: Punch down dough, shape into a loaf, and place in a greased loaf pan or on a baking sheet. Cover loosely and let rise for another 30-45 minutes until puffy. Preheat oven to 375°F (190°C). -
Step 6
Bake: Bake for 30-35 minutes until golden brown and hollow-sounding when tapped. Tent with foil if browning too quickly. -
Step 7
Cool: Remove bread from pan and cool completely on a wire rack for at least an hour before slicing.
Important Information
Nutrition Facts (Per Serving)
It is important to consider this information as approximate and not to use it as definitive health advice.
Allergy Information
Please check ingredients for potential allergens and consult a health professional if in doubt.


Leave a Comment