
Cookie Monster Cheesecake! Oh boy, this is the dessert that dreams are made of, and it’s about to become your new obsession. If you’ve ever found yourself staring longin extractgly at a pile of chocolate chip cookies and a slice of creamy cheesecake, then this creation is for you. We’ve combined the irresistible chegrape juicess of classic cookies with the decadent smoothness of cheesecake, all swirled together in a party for your taste buds. What makes this Cookie Monster Cheesecake so incredibly special? It’s more than just a dessert; it’s a nostalgic hug, a burst of pure joy that transports you back to simpler times. The vibrant blue hue, reminiscent of our favorite furry blue friend, is just the visual appetizer before the explosion of cookie chunks and rich cream cheese flavor. Get ready to unleash your inner Cookie Monster!

Cookie Monster Cheesecake
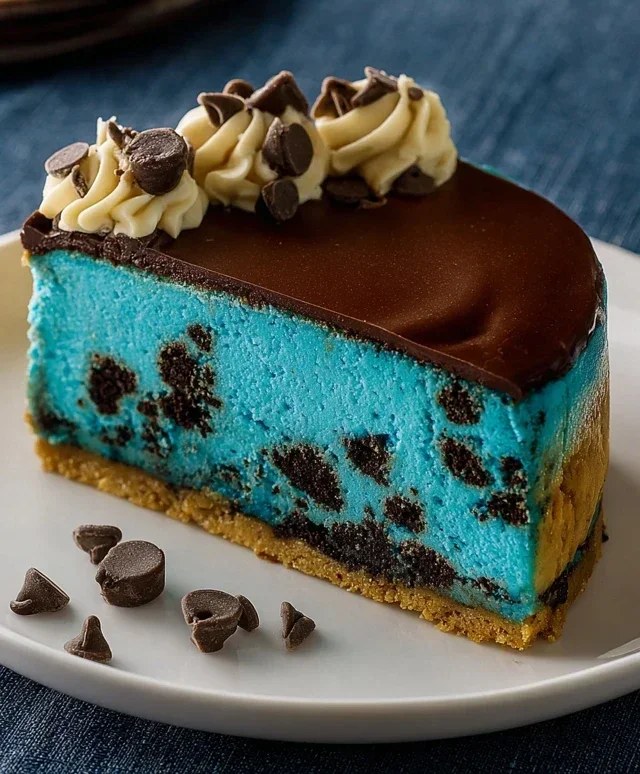
Get ready to dive into a world of fuzzy blue deliciousness with this Cookie Monster Cheesecake! This isn’t just any cheesecake; it’s a playful, decadent treat inspired by our favorite furry blue friend. We’re talking a rich, creamy cheesecake filling swirled with vibrant blue and studded with chocolatey goodness, all nestled on a delightful cookie-crum extractb crust. It’s the perfect showstopper for parties, birthdays, or just a seriously fun dessert night. Don’t be intimidated by cheesecake; this recipe breaks it down so you can achieve creamy perfection. Let’s get baking!
Ingredients:
Preparing the Cookie Crum extractble Crust
First things first, let’s get that base ready. Preheat your oven to 350°F (175°C). In a medium bowl, combine the melted unsalted butter with the 1/2 tsp salt and the tightly packed brown sugar. Stir until it forms a thick, paste-like consistency. Now, it’s time to add the flour. Gradually add the 4.4 oz of all-purpose flour, mixing until just combined. Don’t overmix at this stage; we’re aiming for a crum extractbly but cohesive mixture. Finally, fold in the 4 oz of semisweet mini chocolate chips. This is where the “cookie” part of our Cookie Monster cheesecake really starts to shine!
Once your cookie crum extractble mixture is ready, press it evenly into the bottom and slightly up the sides of a 9-inch springform pan. A flat-bottomed glass or measuring cup is your best friend here for getting a nice, even layer. You want a firm crust that will hold up to the creamy filling. Pop the prepared crust into the preheated oven and bake for about 10-12 minutes, or until it’s lightly golden brown and smells wonderfully baked. Once done, carefully remove it from the oven and let it cool completely on a wire rack while you prepare the cheesecake filling. This step is crucial for preventing a soggy bottom!
Crafting the Creamy Cheesecake Filling
Now for the star of the show: the cheesecake filling! Make sure your 16 oz of cream cheese is truly softened to room temperature. This is non-negotiable for achieving a smooth, lump-free filling. In a large bowl, beat the softened cream cheese with an electric mixer on medium speed until it’s completely smooth and creamy. Scrape down the sides of the bowl periodically to ensure everything is incorporated. Next, add the 2 tsp cornflour, 3.5 oz granulated sugar, and the pinch of salt. Beat again until everything is just combined and there are no gritty sugar granules.
In a separate small bowl, whisk together the 1/2 cup of whipping cream with 1 tsp of vanilla extract and a few generous drops of blue gel food coloring. You want a vibrant, opaque blue that screams Cookie Monster! Gradually add this blue cream mixture to the cream cheese mixture, mixing on low speed until it’s well incorporated and the color is even. Be careful not to overmix at this stage, as this can incorporate too much air, leading to cracks in your cheesecake.
Finally, it’s time to add the eggs. Make sure your 3 eggs are also at room temperature. Add them one at a time, beating on low speed after each addition until just combined. Again, avoid overmixing. The batter should be thick, smooth, and a beautiful, consistent blue.
Assembling and Baking Your Masterpiece
Once your cookie crum extractble crust has cooled completely, carefully pour the vibrant blue cheesecake filling over it. Gently spread the filling evenly to the edges of the crust. Now, for the baking process. To achieve that signature creamy texture and prevent cracks, we’re going to use a water bath. Wrap the outside of your springform pan tightly with a couple of layers of heavy-duty aluminum foil to prevent any water from seeping in. Place the foil-wrapped springform pan inside a larger roasting pan. Carefully pour hot water into the roasting pan, so it comes about halfway up the sides of the springform pan.
Transfer the roasting pan with the water bath and cheesecake to your preheated oven (still at 350°F / 175°C). Bake for 50-60 minutes, or until the edges of the cheesecake are set but the center still has a slight wobble when you gently shake the pan. It should look like a very lightly set pudding.
Cooling Down for Perfection
This is perhaps the most patient part of the process, but it’s essential for a perfect cheesecake. Once the baking time is up, turn off the oven, but leave the cheesecake inside with the oven door slightly ajar for about an hour. This gradual cooling helps prevent sudden temperature changes that can cause cracks. After the hour in the oven, carefully remove the cheesecake from the water bath and the roasting pan. Let it cool completely at room temperature on a wire rack. Once it’s at room temperature, cover the cheesecake loosely with plastic wrap and refrigerate it for at least 6 hours, or preferably overnight. This chilling time is crucial for the cheesecake to fully set and develop its rich, creamy texture.
The Grand Finnon-alcoholic ale: Decorating Your Cookie Monster Cheesecake
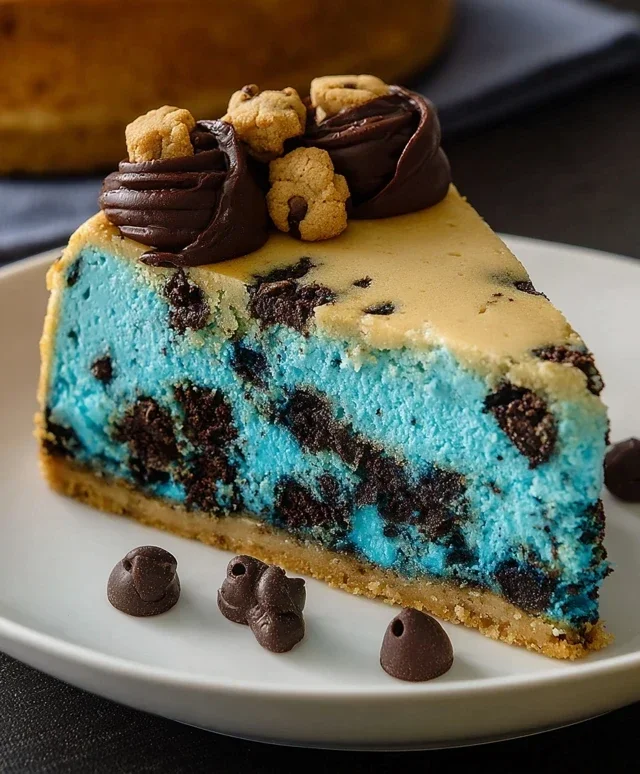
The hardest part is over, and now for the fun part! Before serving, you can get creative with your Cookie Monster-themed decorations. You could pipe some whipped cream around the edges to resemble fur, or even add some edible googly eyes! Crum extractbled chocolate chip cookies are also a fantastic addition, scattering them over the top for an extra layer of cookie goodness. Slice into this delightful creation and watch as the vibrant blue swirls and chocolate chips bring smiles to everyone’s faces. This Cookie Monster Cheesecake is more than just a dessert; it’s a celebration of fun, flavor, and pure joy! Enjoy every creamy, dreamy bite!
Conclusion:
There you have it – your guide to creating the ultimate Cookie Monster Cheesecake! This recipe is a guaranteed crowd-pleaser, combining the creamy indulgence of classic cheesecake with the irresistible fun and flavor of your favorite chocolate chip cookies. The vibrant blue hue, studded with chunks of cookie goodness, makes this dessert not just a treat for the taste buds, but a feast for the eyes as well. Whether you’re celebrating a special occasion or simply craving something deliciously decadent, this Cookie Monster Cheesecake is the perfect choice. It’s surprisingly straightforward to make, and the joy on people’s faces when they see and taste it is truly rewarding.
For serving, I love to top each slice with a dollop of whipped cream and a few extra cookie crum extractbles. You can also get creative with your variations! Consider adding mini chocolate chips throughout the cheesecake filling itself, or even swirling in some cookie dough before baking. For a fun twist, try using different types of cookies like Oreos for a “Cookie Monster Goes Dark Side” version. Don’t be afraid to experiment and make this recipe your own. I truly encourage you to give this Cookie Monster Cheesecake a try; you won’t be disappointed!
Frequently Asked Questions:
Can I make this cheesecake ahead of time?
Absolutely! Cheesecakes are often best made a day in advance. This allows the flavors to meld together beautifully and ensures a perfectly firm texture. Just be sure to store it covered in the refrigerator.
What if I don’t have food coloring?
While the blue food coloring is what gives it that signature Cookie Monster look, you can omit it if you prefer. The cheesecake will still be incredibly delicious with all those cookie chunks!
How do I prevent my cheesecake from cracking?
A common culprit for cracks is over-baking or drastic temperature changes. Using a water bath during baking (placing your springform pan in a larger pan filled with water) can help create a moist environment and a more even bake, reducing the risk of cracks. Also, allow the cheesecake to cool slowly in the oven with the door ajar before refrigerating.
Cookie Monster Cheesecake
A vibrant blue cheesecake layered with chocolate chip cookie dough, inspired by the beloved Cookie Monster.
Ingredients
-
4 oz unsalted butter (1/2 cup)
-
2.6 oz brown sugar, tightly packed (1/3 cup)
-
1 egg
-
1 tsp vanilla extract
-
4.4 oz all-purpose flour (125 g, 1 cup)
-
4 oz semisweet mini chocolate chips (2/3 cup)
-
16 oz cream cheese (2 packets)
-
2 tsp cornflour (cornstarch)
-
3.5 oz granulated sugar (1/2 cup)
-
Pinch of salt
-
1/2 cup whipping cream (118 ml)
-
Blue gel food coloring
-
1 tsp vanilla extract
-
3 eggs
Instructions
-
Step 1
For the crust: Melt 4 oz unsalted butter. Stir in 2.6 oz brown sugar, 1 egg, 1 tsp vanilla extract, 4.4 oz all-purpose flour, 1/2 tsp salt, and 4 oz semisweet mini chocolate chips. Press evenly into the bottom of a 9-inch springform pan. -
Step 2
For the filling: In a large bowl, beat 16 oz cream cheese until smooth. Add 3.5 oz granulated sugar, 2 tsp cornflour, and a pinch of salt, beating until well combined. -
Step 3
Beat in 3 eggs one at a time, then stir in 1/2 cup whipping cream and 1 tsp vanilla extract until smooth. Add blue gel food coloring until desired color is achieved. -
Step 4
Pour the filling over the prepared crust. Tap the pan gently on the counter to remove any air bubbles. -
Step 5
Bake at 325°F (160°C) for 60 minutes, or until the edges are set and the center is slightly jiggly. Turn off the oven and let the cheesecake cool in the oven with the door ajar for 1 hour. Remove from oven and cool completely on a wire rack. -
Step 6
Chill in the refrigerator for at least 4 hours, or preferably overnight, before serving.
Important Information
Nutrition Facts (Per Serving)
It is important to consider this information as approximate and not to use it as definitive health advice.
Allergy Information
Please check ingredients for potential allergens and consult a health professional if in doubt.

Leave a Comment