
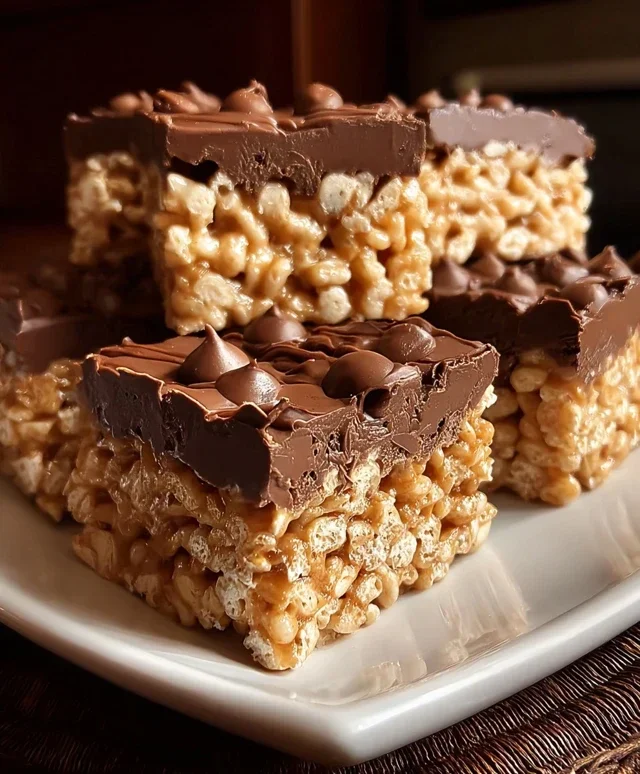
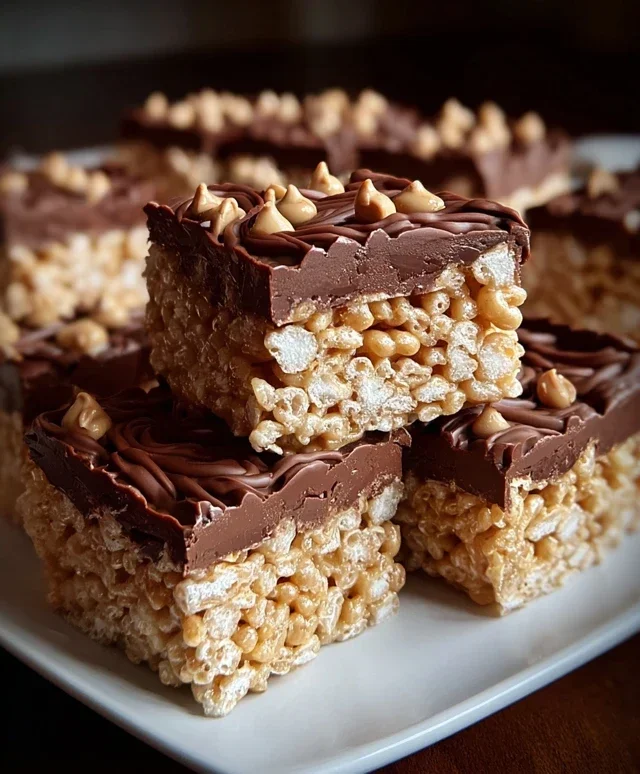
Chocolate Peanut Butter Rice Krispie Squares are quite simply a childhood dream come true, elevated to an irresistible adult treat. Who can resist the nostalgic crunch of puffed rice cereal, the gooey embrace of melted marshmallows, and the utterly perfect pairing of rich chocolate and salty peanut butter? These aren’t just any Rice Krispie treats; they’re a glorious fusion that takes a beloved classic and injects it with an extra dose of decadent flavor. What makes these Chocolate Peanut Butter Rice Krispie Squares so special is their ability to tap into pure, unadulterated joy. They’re a guaranteed crowd-pleaser, a comforting bite that feels both familiar and excitingly new. Get ready to experience a taste sensation that will have you reaching for seconds (and thirds!).

Chocolate Peanut Butter Rice Krispie Squares
Oh, hello there! If you’re anything like me, you have a deep and abiding love for classic treats that bring a smile to your face and a happy sigh to your soul. And what could be more classic, more comforting, more downright delicious than Rice Krispie squares? But what if I told you we could take that nostalgic joy and elevate it to a whole new level? Enter: Chocolate Peanut Butter Rice Krispie Squares. These are not just any Rice Krispie squares; they’re a decadent, gooey, peanut butter-infused dream with a rich chocolatey finish that will have everyone asking for the recipe.
These squares are incredibly easy to whip up, making them perfect for a quick dessert, a potluck contribution, or just a special treat for yourself. The combination of creamy peanut butter and sweet, melty chocolate perfectly complements the satisfying crunch of the Rice Krispies. You really can’t go wrong with this winning flavor duo. Let’s get started on making these irresistible squares!
Ingredients:
Making the Magic Happen
The beauty of these Chocolate Peanut Butter Rice Krispie Squares lies in their simplicity. We’re building on a beloved classic, so the core process will feel familiar. The addition of peanut butter and chocolate chips is what truly sets these apart and transforms them into something truly special.
Step 1: Prepare Your Pan and Gather Your Ingredients
First things first, let’s get our workspace ready. You’ll need a 9×13 inch baking pan. To prevent sticking, lightly grease the pan with butter or cooking spray, or line it with parchment paper, leaving an overhang on the sides to help you lift the finished squares out later. This step is crucial for easy removal and clean-up. While you’re at it, measure out all your ingredients so they’re ready to go. Having everything measured and within reach will make the entire process smoother and less rushed, especially when working with melted marshmallows.
Step 2: Melt the Base Ingredients
In a large saucepan or pot, add the unsalted butter and your chosen marshmallows (either regular or mini). Place the saucepan over low to medium heat. Stir continuously, gently coaxing the marshmallows and butter to melt together. It’s important to use low heat to avoid scorching the marshmallows or butter. You want them to melt into a smooth, gooey mixture. Be patient! Once melted and smooth, remove the saucepan from the heat.
Step 3: Introduce the Peanut Butter Powerhouse
This is where the magic really starts to happen. Immediately after removing the melted marshmallow mixture from the heat, add your ½ cup of peanut butter. Stir vigorously until the peanut butter is completely incorporated into the marshmallow mixture. You should have a wonderfully smooth, golden-brown, and slightly sticky concoction. The peanut butter adds a fantastic depth of flavor and a lovely chegrape juicess to the finished squares. If you’re using crunchy peanut butter, you’ll start to see those nutty bits swirling into the mix, promising an extra layer of texture.
Step 4: Combine with the Crispy Cereal
Now, it’s time to add the star of the show: the Rice Krispies. Pour the 6 cups of Rice Krispie cereal into the saucepan with the melted marshmallow and peanut butter mixture. Working quickly but gently, fold the cereal into the mixture until it’s evenly coated. The goal is to coat every single crispy flake without crushing them too much. You want to maintain that signature crunch. A rubber spatula is perfect for this job.
Step 5: Press and Add the Chocolatey Topping
Transfer the cereal mixture into your prepared 9×13 inch pan. Now, here’s a little trick to get those squares perfectly smooth and easy to handle: lightly grease your hands with butter or cooking spray, or use the back of a spoon that has been lightly buttered or sprayed. Gently press the mixture evenly into the pan. Don’t press too hard, or you’ll end up with dense, hard squares. Just firm enough to create an even layer.
The Grand Finnon-alcoholic ale: Chocolate Drizzle
While the cereal mixture is still warm and slightly soft in the pan, sprinkle the 1 cup of milk chocolate chips evenly over the top. You can let them melt naturally for a few minutes, or you can place the pan in a slightly warm oven (turned off, just residual heat) for a minute or two to help them soften. Once softened, use your spatula or a knife to spread the melted chocolate into a smooth, even layer over the Rice Krispie base. If you like, you can sprinkle chopped peanuts over the melted chocolate immediately for a beautiful garnish and an extra crunch.
Let the squares cool completely at room temperature for at least 1-2 hours before cutting. This allows the chocolate to set and the squares to firm up properly. Once cooled, use the parchment paper overhang to lift the entire slab out of the pan, then cut into squares using a sharp knife. Enjoy your incredibly delicious Chocolate Peanut Butter Rice Krispie Squares! They are best enjoyed within a few days, stored in an airtight container.
Conclusion:
And there you have it – your guide to creating these absolutely irresistible Chocolate Peanut Butter Rice Krispie Squares! This recipe is a true winner because it takes a beloved classic and elevates it with the dynamic duo of chocolate and peanut butter. The result is a treat that’s both wonderfully nostalgic and decadently new. They’re incredibly easy to whip up, making them perfect for last-minute cravings, bake snon-alcoholic ales, or just a fun family activity in the kitchen. The satisfying crunch of the Rice Krispies combined with the gooey marshmallow, rich chocolate, and salty peanut butter is a flavor and texture explosion that’s guaranteed to please everyone.
I love serving these squares in bite-sized portions for parties, or as a more substantial slice for an after-school snack. They pair wonderfully with a cold glass of milk, of course, but are also delightful alongside a cup of coffee or tea. Don’t be afraid to get creative with variations! You could swirl in some extra peanut butter chips, add a sprinkle of sea salt on top for an extra salty-sweet kick, or even drizzle with more melted chocolate. I truly encourage you to give these Chocolate Peanut Butter Rice Krispie Squares a try; I’m confident you’ll fall in love with them just as much as I have.
Frequently Asked Questions:
How do I prevent my Rice Krispie squares from becoming too hard?
The key to soft, gooey Rice Krispie squares is to avoid over-mixing once the cereal is added. Gently fold the cereal into the marshmallow mixture just until combined. Also, ensure you’re not cooking the marshmallow mixture for too long, as this can lead to a firmer end product.
Can I make these ahead of time?
Absolutely! These Chocolate Peanut Butter Rice Krispie Squares can be made a day or two in advance. Store them in an airtight container at room temperature. They tend to taste even better after a few hours, allowing the flavors to meld.
Chocolate Peanut Butter Rice Krispie Squares
A decadent twist on a classic treat, combining the chewy goodness of Rice Krispie squares with rich chocolate and creamy peanut butter.
Ingredients
-
6 cups Rice Krispie cereal
-
½ cup peanut butter (smooth or crunchy)
-
¼ cup unsalted butter
-
40 regular size marshmallows
-
1 cup milk chocolate chips
-
chopped peanuts for garnish (optional)
Instructions
-
Step 1
Grease a 9×13 inch baking pan. -
Step 2
In a large saucepan, melt the butter over low heat. Add the marshmallows and stir until completely melted and smooth. -
Step 3
Remove from heat and stir in the peanut butter until well combined with the marshmallow mixture. -
Step 4
Add the Rice Krispie cereal and stir until evenly coated. -
Step 5
Press the mixture evenly into the prepared baking pan. -
Step 6
In a microwave-safe bowl, melt the milk chocolate chips in 30-second intervals, stirring after each, until smooth. -
Step 7
Drizzle the melted chocolate over the Rice Krispie mixture. If using, sprinkle with chopped peanuts. -
Step 8
Let set for at least 30 minutes before cutting into squares.
Important Information
Nutrition Facts (Per Serving)
It is important to consider this information as approximate and not to use it as definitive health advice.
Allergy Information
Please check ingredients for potential allergens and consult a health professional if in doubt.

Leave a Comment