
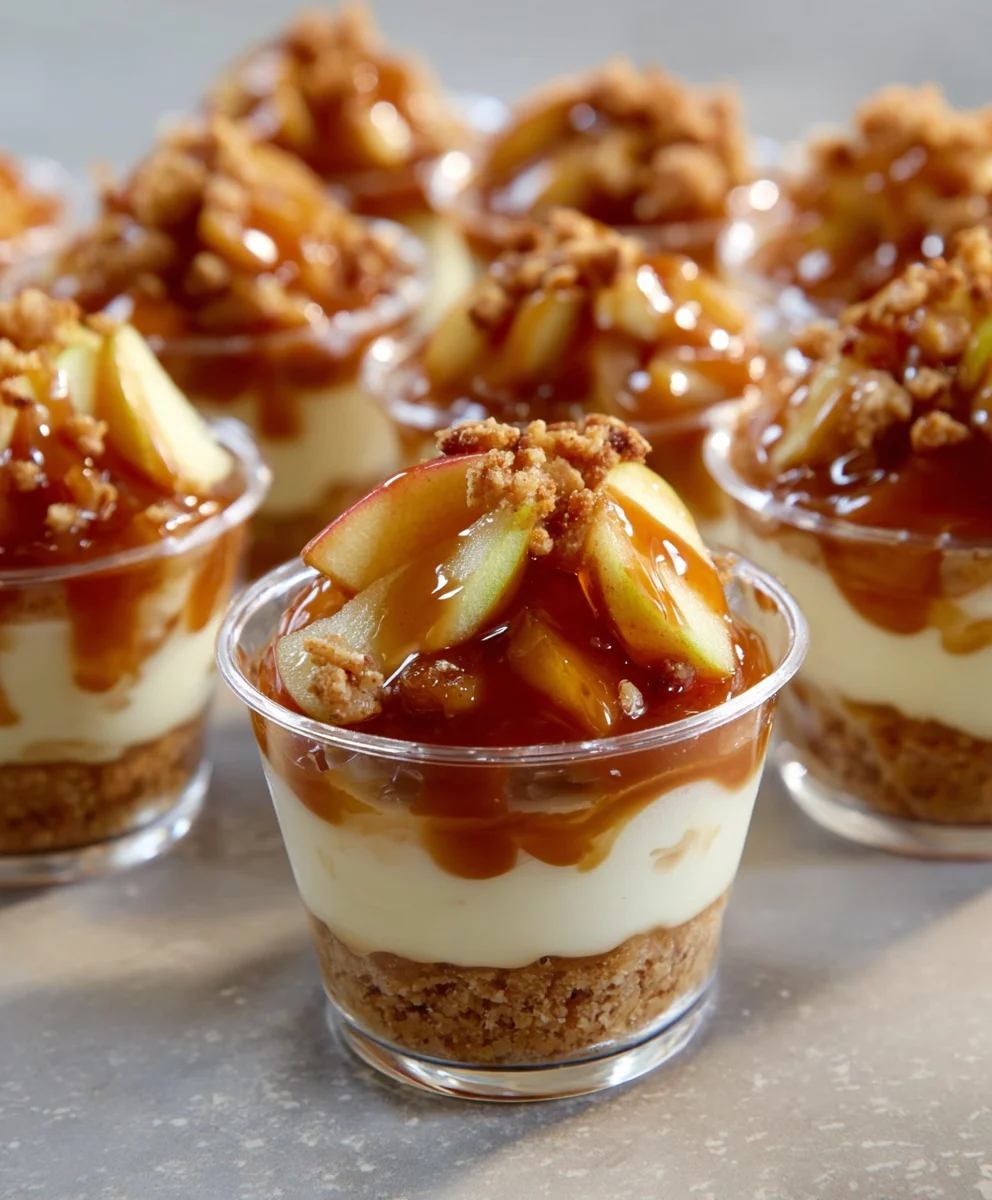
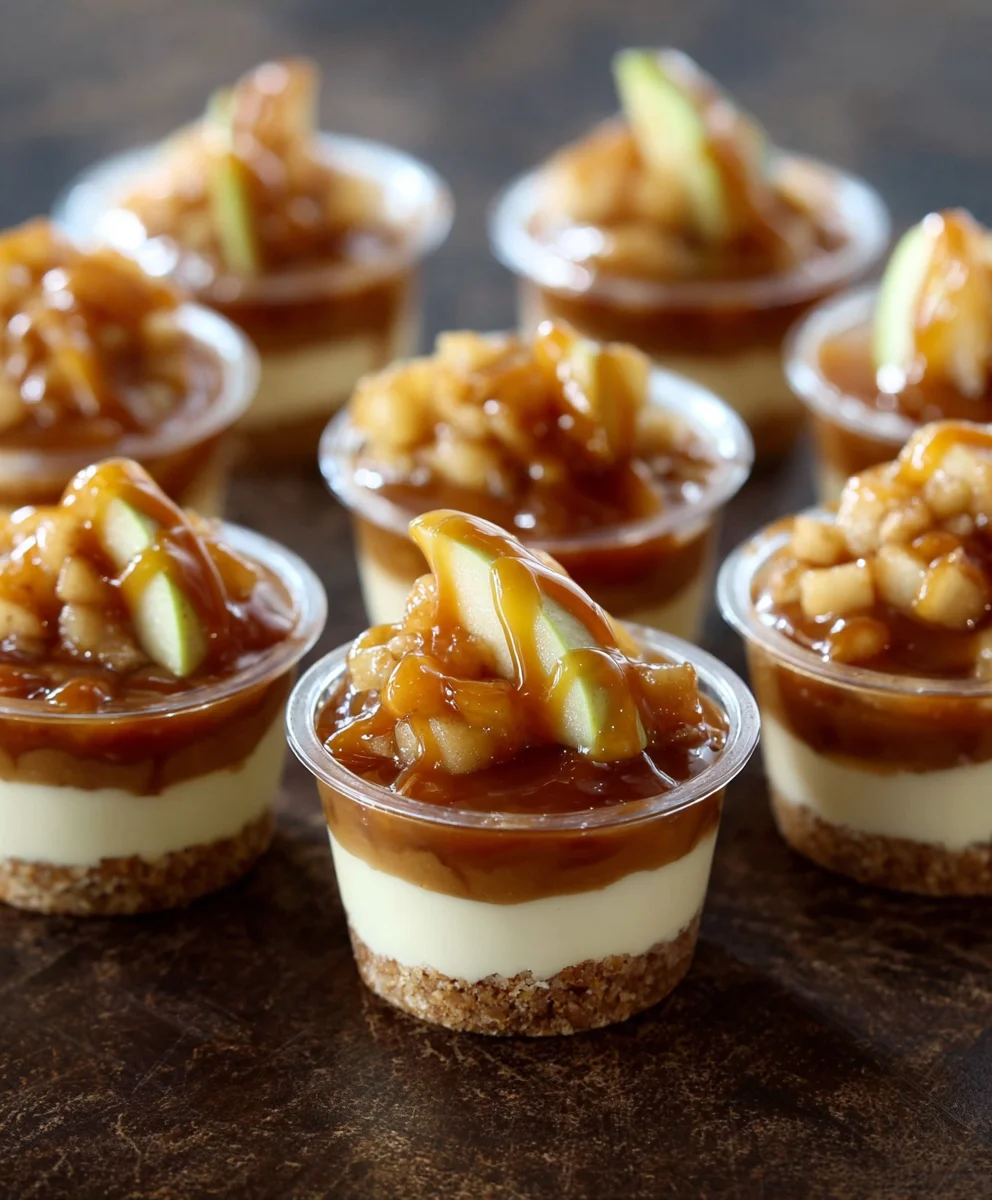
Caramel Apple Dessert Cups are the ultimate cozy indulgence, a delightful treat that perfectly captures the essence of autumn in every bite. Imagine the crisp, juicy crunch of fresh apples mingling with ribbons of rich, decadent caramel, all nestled within a delicate, buttery crust. It’s no wonder these little cups have become a crowd-pleaser! People adore them for their effortless charm and the way they bring a smile to everyone’s face, whether served at a casual gathering or as a special sweet ending to a family dinner. What truly makes these Caramel Apple Dessert Cups sing is the delightful contrast of textures and flavors – the tender, slightly tart apples, the gooey, sweet caramel, and the satisfying crumb of the crust. They offer a sophisticated yet incredibly approachable way to enjoy the quintessential flavors of fall. Get ready to fall in love with this simple yet spectacular dessert!

Ingredients:
- 4 cups apples (peeled and chopped into ½-inch pieces)
- ½ cup light brown sugar
- 1 tsp cinnamon
- 2 cups vanilla wafer crumbs
- ¼ cup salted or unsalted butter (melted)
- 1 pkg instant vanilla pudding mix (3.4 ounces)
- 1 cup milk
- ⅓ cup salted caramel sauce
- 1 ½ cups heavy cream
- Additional caramel sauce for garnish
Preparing the Caramel Apples
Step 1: Sauté the Apples
First, let’s get our star fruit ready. In a medium skillet, combine the 4 cups of peeled and chopped apples with the ½ cup of light brown sugar and 1 teaspoon of cinnamon. Place the skillet over medium heat. Stir everything together to ensure the apples are evenly coated with the sugar and spice. Allow the mixture to cook, stirring occasionally, for about 8-10 minutes. You want the apples to soften slightly but still hold their shape, not become mushy. As they cook, the brown sugar will dissolve and create a delicious syrup that coats the apples. This process also helps to release some of the natural juices from the apples, enhancing their flavor. If the mixture seems a little dry, you can add a tablespoon of water to prevent sticking. Once the apples are tender-crisp and beautifully glazed, remove the skillet from the heat and set it aside to cool slightly. This cooling period is important as we don’t want to add hot apples to our delicate pudding layer.
Creating the Vanilla Wafer Crust
Step 2: Form the Crust Mixture
Next, we’ll prepare the base for our Caramel Apple Dessert Cups. In a medium bowl, combine the 2 cups of vanilla wafer crumbs with the ¼ cup of melted butter. Stir these ingredients together thoroughly until the crumbs are evenly moistened. You’re looking for a consistency that resembles wet sand. When you squeeze a handful, it should hold together. This mixture will form a delicious, slightly sweet crust that adds a wonderful texture to our dessert. Pressing this mixture into the bottom of our serving dishes will create a stable and flavorful foundation.
Assembling the Layers
Step 3: Press the Crust and Add Apples
Now it’s time to start building our dessert cups. Grab your individual serving dishes or glasses. We’re aiming for about 6-8 servings depending on the size of your dishes. Take about 2-3 tablespoons of the vanilla wafer crumb mixture for each serving dish and press it firmly into the bottom. Use the back of a spoon or your fingers to create an even layer. This firm pressing is key to ensuring the crust doesn’t crumble apart when you scoop into your dessert. Once the crust is in place, gently spoon a generous portion of the slightly cooled caramel apple mixture over the crust in each dish. Distribute the apples as evenly as possible among the servings. Don’t overload them, as we have more delicious layers to come!
Whipping Up the Vanilla Pudding
Step 4: Prepare the Instant Pudding
Let’s move on to the creamy vanilla layer. In a separate medium bowl, combine the 1 pkg of instant vanilla pudding mix with the 1 cup of milk. Whisk vigorously for about 2 minutes, or until the pudding begins to thicken. Instant pudding is wonderfully quick and easy, so don’t over-mix, as it can sometimes become too stiff. Once the pudding has reached a thick, creamy consistency, gently stir in the ⅓ cup of salted caramel sauce. Make sure the caramel sauce is fully incorporated, creating beautiful swirls of caramel throughout the vanilla pudding. This step adds an extra layer of rich caramel flavor to our dessert that perfectly complements the apples and the crust.
Adding the Whipped Cream and Final Touches
Step 5: Layer the Pudding and Top with Cream
Now that our pudding is ready, it’s time to add it to our dessert cups. Carefully spoon the caramel-vanilla pudding mixture over the layer of caramel apples in each serving dish. Again, try to distribute it evenly among the cups. Once the pudding is in place, we’ll prepare the final, luscious topping. In a clean bowl, pour in the 1 ½ cups of heavy cream. Using an electric mixer or a whisk, whip the heavy cream until soft peaks form. Be careful not to over-whip, or you’ll end up with butter! Once you have soft peaks, you can either sweeten it with a tablespoon of powdered sugar if you prefer a sweeter cream, or leave it as is for a lighter contrast. Spoon or pipe a dollop of this freshly whipped cream onto the top of each Caramel Apple Dessert Cup. For an irresistible finishing touch, drizzle additional caramel sauce over the whipped cream. You can use a spoon to create zigzags or swirls. Chill the dessert cups in the refrigerator for at least 30 minutes before serving to allow the flavors to meld and the layers to set. This ensures a perfectly delightful and stable Caramel Apple Dessert Cup experience.
Conclusion:
I hope you enjoyed this delightful recipe for Caramel Apple Dessert Cups! These individual treats are a perfect balance of sweet, tart, and crunchy, making them an ideal ending to any meal or a special occasion. They are surprisingly simple to assemble, which means you can whip them up for a weeknight indulgence or a weekend gathering without a fuss. The combination of crisp apple, gooey caramel, and buttery crumble is truly irresistible, and I’m confident you’ll be making these Caramel Apple Dessert Cups again and again.
For serving, I love these slightly warm, allowing the caramel to be extra gooey. They are wonderful on their own, but you can elevate them further with a dollop of whipped cream or a scoop of vanilla bean ice cream. If you’re feeling adventurous, consider a sprinkle of toasted pecans or a drizzle of chocolate sauce for an extra layer of flavor and texture.
Don’t be afraid to experiment with variations! You could use pears instead of apples for a different seasonal twist, or swap out the cinnamon for a pinch of nutmeg or allspice. For a gluten-free option, simply use gluten-free oats and almond flour in the crumble topping. The possibilities are endless!
I encourage you to try making these Caramel Apple Dessert Cups yourself. They are a fantastic way to bring a smile to your loved ones’ faces and a touch of homemade charm to your table. Happy baking!
Frequently Asked Questions:
Q1: Can I make the Caramel Apple Dessert Cups ahead of time?
Yes, you absolutely can! You can prepare the apple filling and the crumble topping separately a day in advance and store them in airtight containers in the refrigerator. Assemble the cups just before serving to ensure the crumble stays nice and crispy.
Q2: What kind of apples are best for this recipe?
For the best results, I recommend using firm, slightly tart apples like Honeycrisp, Fuji, or Gala. These varieties hold their shape well when baked and provide a pleasant counterpoint to the sweetness of the caramel.
Caramel Apple Dessert Cups – Easy Fall Treat
A delightful and easy fall dessert featuring layers of sautéed caramel apples, vanilla wafer crust, creamy vanilla pudding swirled with caramel, and topped with whipped cream and extra caramel sauce.
Ingredients
-
4 cups apples (peeled and chopped into ½-inch pieces)
-
½ cup light brown sugar
-
1 tsp cinnamon
-
2 cups vanilla wafer crumbs
-
¼ cup salted or unsalted butter (melted)
-
1 pkg instant vanilla pudding mix (3.4 ounces)
-
1 cup milk
-
⅓ cup salted caramel sauce
-
1 ½ cups heavy cream
-
Additional caramel sauce for garnish
Instructions
-
Step 1
Sauté apples: In a medium skillet, combine apples, brown sugar, and cinnamon. Cook over medium heat for 8-10 minutes, stirring occasionally, until apples are slightly softened and glazed. Set aside to cool. -
Step 2
Form crust mixture: In a medium bowl, combine vanilla wafer crumbs and melted butter. Stir until moistened and resembles wet sand. -
Step 3
Assemble layers: Press 2-3 tablespoons of the crust mixture firmly into the bottom of each serving dish. Spoon a generous portion of the cooled caramel apples over the crust. -
Step 4
Prepare pudding: In a medium bowl, whisk instant vanilla pudding mix with milk for about 2 minutes until thickened. Gently stir in salted caramel sauce until incorporated. -
Step 5
Layer pudding and top with cream: Spoon the caramel-vanilla pudding over the apples in each dish. Whip heavy cream until soft peaks form. Spoon or pipe whipped cream on top of each dessert cup. Drizzle with additional caramel sauce. -
Step 6
Chill: Refrigerate the dessert cups for at least 30 minutes before serving to allow flavors to meld and layers to set.
Important Information
Nutrition Facts (Per Serving)
It is important to consider this information as approximate and not to use it as definitive health advice.
Allergy Information
Please check ingredients for potential allergens and consult a health professional if in doubt.

Leave a Comment