
Cadbury Egg Kiss Cookies are a delightful treat that instantly transports me back to those sweet, sugary days of spring. There’s something undeniably magical about the combination of buttery, melt-in-your-mouth cookie and that iconic, creamy Cadbury chocolate center. It’s no wonder these cookies have become a beloved Easter tradition for so many families, myself included! The simplicity of their construction belies their incredible flavor and festive charm. What truly sets these Cadbury Egg Kiss Cookies apart is that moment of pure bliss when you bite into the warm, slightly crisp cookie and discover the gooey, rich chocolate waiting within. They’re not just cookies; they’re little parcels of joy, perfect for sharing (or keeping all to yourself!).
Get Ready to Bake Your Own Sweet Memories
Let’s dive into creating these irresistible Cadbury Egg Kiss Cookies!

Cadbury Egg Kiss Cookies
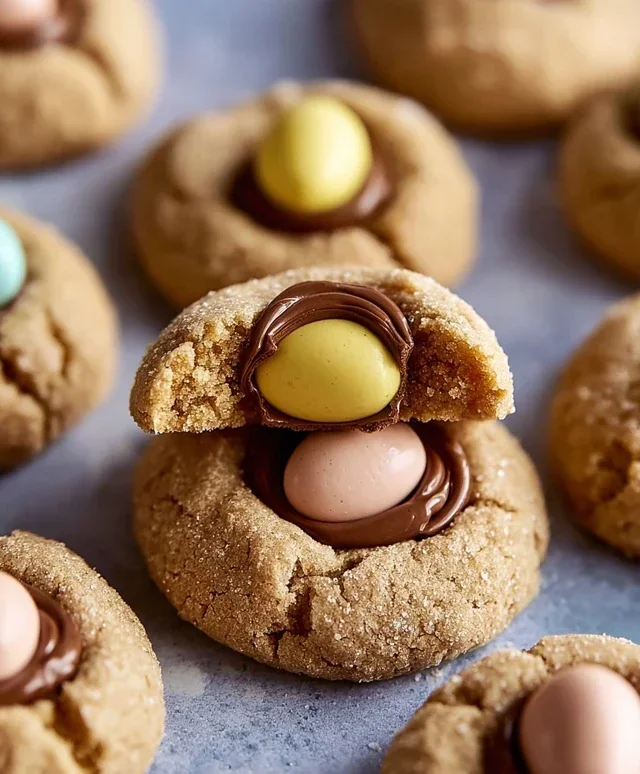
There’s something undeniably magical about the arrival of spring, and for many of us, that magic is inextricably linked to the sight of those vibrant purple wrappers. Cadbury Mini Eggs are a beloved Easter treat, and their creamy, crunchy goodness deserves a starring role in a cookie. Enter Cadbury Egg Kiss Cookies! These delightful treats combine the classic, comforting flavor of a peanut butter cookie with the surprise burst of a Cadbury Mini Egg nestled right in the center. They’re surprisingly easy to make and are sure to become a springtime favorite for your family and friends. The contrast between the soft, chewy cookie and the rich chocolate and crunchy shell of the Cadbury Egg is simply irresistible. Get ready to impress with these adorable and delicious cookies!
Ingredients:
Cookie Dough Preparation
The foundation of our delicious Cadbury Egg Kiss Cookies lies in a classic peanut butter cookie dough. It’s important to start with softened butter; this means it should be pliable to the touch but not melted. If you forgot to take your butter out in advance, you can speed up the process by cutting it into small cubes and letting it sit at room temperature for about 15-20 minutes. Creaming the butter with both granulated and light brown sugar is a crucial step. The granulated sugar provides sweetness and crispness, while the light brown sugar contributes moisture and a lovely caramel note. Beat these together until the mixture is light and fluffy; this incorporates air into the dough, which will help our cookies achieve a wonderfully tender texture. Next, we’ll add the peanut butter. For this recipe, creamy peanut butter works best as it will blend smoothly into the dough, ensuring an even distribution of that classic peanut butter flavor. Make sure to scrape down the sides of your bowl periodically to ensure everything is thoroughly incorporated.
Now it’s time for the wet ingredients. Add your large egg to the mixture. The egg acts as a binder, holding all the ingredients together, and also adds richness. Follow this with the vanilla extract, which will enhance all the other flavors in the cookie and add a subtle warmth. Beat again until everything is well combined and the mixture is smooth.
In a separate bowl, whisk together your dry ingredients: all-purpose flour, baking soda, and salt. Sifting these ingredients together before adding them to the wet ingredients helps to evenly distribute the leavening agent (baking soda) and prevents pockets of salt or flour from forming in your cookies. The baking soda is essential for giving our cookies their signature lift and tender chew. The salt, while a small amount, plays a vital role in balancing the sweetness and enhancing the overall flavor profile of the cookies.
Gradually add the dry ingredients to the wet ingredients, mixing on low speed until just combined. Be careful not to overmix the dough at this stage. Overmixing can develop the gluten in the flour too much, resulting in tough cookies. We want a soft, slightly sticky dough that’s perfect for shaping.
Shaping and Baking
Once your cookie dough is ready, it’s time to get creative with the shaping and of course, add our star ingredient – the Cadbury Mini Eggs! Prepare your baking sheets by lining them with parchment paper. This not only prevents sticking but also makes for easier cleanup.
Take about 1 tablespoon of cookie dough and roll it into a ball. This size ensures a good ratio of cookie to candy. Next, take a Cadbury Mini Egg and gently press it into the top of the cookie dough ball. You want it to sink in slightly, but not be completely submerged. The heat of the oven will cause the dough to spread and envelop the egg.
After you’ve pressed the egg into the dough, take a little more dough and gently mold it around the base of the Cadbury Mini Egg, ensuring it’s mostly covered but with the top of the egg still visible. This helps to secure the egg in place as the cookies bake and prevents it from falling out.
Now, for that classic cookie texture, we’re going to roll our cookie dough balls in granulated sugar. This might seem like an extra step, but trust me, it adds a lovely sparkle and a delightful crunch to the exterior of the finished cookie. Place the 1/4 cup of granulated sugar in a shallow bowl or plate, and gently roll each cookie dough ball in the sugar until it’s evenly coated. This sugar coating will also help the cookies spread beautifully as they bake.
Arrange the sugar-coated cookie dough balls on your prepared baking sheets, leaving about 2 inches of space between each cookie to allow for spreading. We’re aiming for a slightly larger surface area on top, so gently flatten the cookie dough balls just a little with the palm of your hand or the bottom of a glass. This will create a nice base for the Cadbury Egg and help them bake evenly.
Preheat your oven to 350°F (175°C). Baking time will vary depending on your oven, but typically, these cookies will bake for 9-12 minutes. You’re looking for the edges to be lightly golden brown, and the centers to still look a little soft. They will continue to set up as they cool.
Cooling and Enjoying
Once the cookies are baked, let them cool on the baking sheets for about 5 minutes. This is a crucial step because the cookies are very delicate when they first come out of the oven. Allowing them to firm up on the hot baking sheet will prevent them from breaking when you transfer them to a wire rack. After the initial 5 minutes, carefully transfer the cookies to a wire rack to cool completely. As they cool, the Cadbury Mini Egg will become wonderfully gooey and melted inside, while the outer chocolate shell will retain some of its delightful crunch.
These Cadbury Egg Kiss Cookies are best enjoyed once they have cooled completely. The flavors will meld together, and the texture will be perfect. They make a beautiful addition to any Easter spread, a fun project to do with kids, or simply a delightful treat to enjoy with a glass of milk. Store any leftover cookies in an airtight container at room temperature for up to 3-4 days. Enjoy every delicious bite of these springtime delights!
Conclusion:
There you have it – your ultimate guide to crafting delicious Cadbury Egg Kiss Cookies! I hope you’ve found this recipe inspiring and straightforward to follow. These cookies are truly a showstopper, combining the classic comfort of a buttery cookie with the delightful surprise of a gooey, chocolatey Cadbury Egg center. They’re perfect for Easter celebrations, a fun baking project with the family, or simply as a delightful treat to brighten any day. The rich flavor profile and adorable presentation make them a guaranteed hit with everyone.
I encourage you to give these Cadbury Egg Kiss Cookies a try. They are remarkably easy to make, and the results are so rewarding. Don’t be afraid to experiment with the variations suggested! Imagin extracte these alongside a warm cup of coffee or tea, or perhaps decorated with a pastel-colored frosting for an extra festive touch. They also make wonderfully thoughtful edible gifts.
Frequently Asked Questions:
What if I can’t find Cadbury Mini Eggs?
If you’re struggling to find Cadbury Mini Eggs, don’t worry! You can absolutely substitute them with other small, solid chocolate eggs. Smaller chocolate chips or even chopped-up pieces of a regular Cadbury chocolate bar can also work, though they might melt a little differently. The key is to have a delicious chocolate center within your cookie.
Can I make these cookies ahead of time?
Yes, you can! These Cadbury Egg Kiss Cookies can be baked and stored in an airtight container at room temperature for up to 3-4 days. For longer storage, you can freeze the baked cookies for up to 2-3 months. This makes them a fantastic option for preparing in advance for parties or holidays.

Cadbury Egg Kiss Cookies
Delicious peanut butter cookies with a creamy Cadbury Mini Egg pressed into the center.
Ingredients
-
1/2 cup (1 stick) butter, softened
-
1/2 cup granulated sugar
-
1/2 cup light brown sugar
-
1/2 cup creamy peanut butter
-
1 large egg
-
1/2 teaspoon vanilla extract
-
2 cups all-purpose flour
-
1/2 teaspoon baking soda
-
1/4 teaspoon salt
-
1/4 cup granulated sugar (for rolling the cookie dough in)
-
30 Cadbury Mini Eggs
Instructions
-
Step 1
Preheat oven to 375°F (190°C). Line baking sheets with parchment paper. -
Step 2
In a large bowl, cream together the softened butter and both granulated and light brown sugars until light and fluffy. -
Step 3
Beat in the creamy peanut butter, then the egg and vanilla extract until well combined. -
Step 4
In a separate bowl, whisk together the all-purpose flour, baking soda, and salt. -
Step 5
Gradually add the dry ingredients to the wet ingredients, mixing until just combined. Do not overmix. -
Step 6
Roll dough into 1-inch balls and then roll each ball in the additional granulated sugar. -
Step 7
Place dough balls about 2 inches apart on the prepared baking sheets. Gently press a Cadbury Mini Egg into the top of each cookie, pressing down until it is mostly embedded. -
Step 8
Bake for 8-10 minutes, or until the edges are lightly golden brown. The centers will still look soft. -
Step 9
Let the cookies cool on the baking sheets for a few minutes before transferring them to a wire rack to cool completely.
Important Information
Nutrition Facts (Per Serving)
It is important to consider this information as approximate and not to use it as definitive health advice.
Allergy Information
Please check ingredients for potential allergens and consult a health professional if in doubt.


Leave a Comment