
Brown Butter Brookies are the ultimate indulgence, a glorious mashup of two beloved desserts that takes sweet cravings to an entirely new level. Imagin extracte the rich, nutty aroma of perfectly browned butter infusing every bite, creating a depth of flavor that elevates both the chewy brownie and the crisp-edged blondie layers. This isn’t just any dessert; it’s a textural masterpiece, a symphony of gooey chocolate and buttery vanilla that will have you reaching for “just one more.” We adore Brown Butter Brookies because they offer the best of both worlds, satisfying the chocolate lover and the vanilla purist simultaneously. The secret ingredient, that magical brown butter, transforms these simple cookies into something truly extraordinary, a testament to how a little bit of technique can create an unforgettable treat.

Brown Butter Brookies
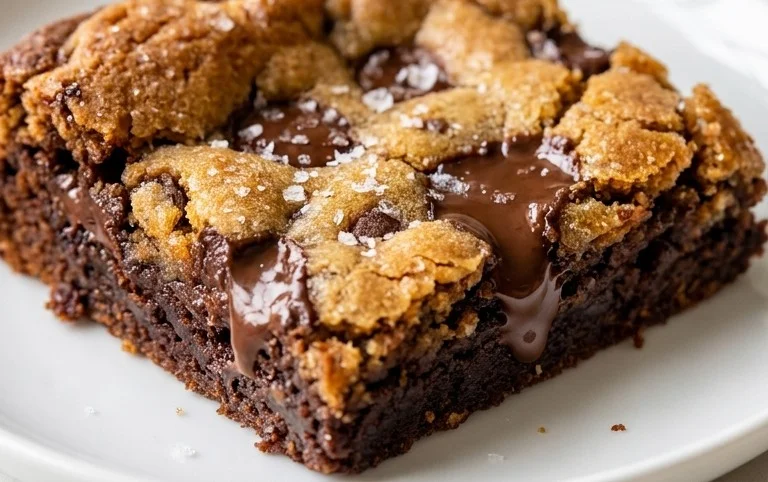
Get ready for a dessert that’s truly the best of both worlds! We’re talking about brookies – a divine mashup of chewy chocolate chip cookies and fudgy brownies, all in one glorious pan. But we’re taking this classic a step further with the magic of brown butter. Browning butter not only adds a rich, nutty depth of flavor but also a wonderful complexity that elevates these brookies from delicious to absolutely irresistible. Imagin extracte the crinkly top of a perfect cookie giving way to a soft, chewy center, all layered over a dense, chocolatey brownie base. It’s a textural and flavor explosion in every bite. This recipe is my go-to for a reason; it’s relatively straightforward and yields incredibly impressive results.
Ingredients:
Cooking Instructions:
Step 1: Prepare the Brown Butter Base
The first step is crucial for infusing our brookies with that signature nutty flavor. Take your 180g of butter for the brownie layer and place it in a light-colored saucepan over medium heat. We’re looking to melt the butter and then continue cooking it until the milk solids at the bottom of the pan turn a beautiful amber-brown color. Keep a close eye on it, as this can happen quickly once it starts to change color. You’ll notice the scent change from milky to wonderfully nutty. Swirl the pan occasionally to ensure even browning. Once it smells toasty and has achieved a golden-brown hue, immediately remove it from the heat and pour it into a heatproof bowl. Be sure to scrape out all those lovely brown bits from the bottom of the pan – they’re packed with flavor! Let this brown butter cool slightly while you proceed.
Step 2: Craft the Fudgy Brownie Batter
In a medium bowl, whisk together the 120g all-purpose flour, 50g cocoa powder, 180g granulated sugar, 80g brown sugar, and 2g salt for the brownie layer. This dry mixture will form the foundation of our brownie base. In a separate bowl, whisk together the 4 large eggs. Now, slowly pour the slightly cooled brown butter into the whisked eggs, whisking continuously to combine. Gradually add this wet mixture to the dry ingredients, stirring until just combined. Be careful not to overmix at this stage; we want a tender brownie, not a tough one. If you’re using them, gently fold in the 120g of chocolate chunks now. This batter will be thick and glossy.
Step 3: Begin extract the Cookie Dough Creation
Now, let’s get to the cookie part! In a large bowl, cream together the 85g softened butter (for the cookie layer), 80g brown sugar, and 40g granulated sugar. Beat this mixture with an electric mixer until it’s light and fluffy. This creaming process is essential for creating a tender cookie texture. Next, beat in the 1 egg and 1g salt until well combined. In a separate small bowl, whisk together the 85g all-purpose flour for the cookie layer. Gradually add this flour to the wet ingredients, mixing on low speed until just combined. Again, avoid overmixing. The dough will be quite soft at this point, which is perfect for achieving those chewy cookie edges.
Step 4: Assembling and Layering the Magic
Preheat your oven to 175°C (350°F) and prepare a 9×13 inch baking pan by lining it with parchment paper, leaving an overhang on the sides. This will make lifting out the finished brookies so much easier. Spread the brownie batter evenly into the bottom of the prepared pan, ensuring it covers the entire base. Now, dollop spoonfuls of the cookie dough over the brownie batter. You don’t need to be perfectly precise here; irregular dollops will create a beautiful, rustic look. You can use your fingers or a small spoon to gently press the cookie dough down slightly, but avoid spreading it too thin or mergin extractg it completely with the brownie layer at this point. We want distinct layers.
Step 5: Baking to Perfection
Place the assembled pan in your preheated oven. Bake for approximately 30-35 minutes, or until the edges of the brookies are set and a toothpick inserted into the center comes out with moist crum extractbs attached. You want the brownies to be fudgy and the cookie dough to be baked through but still soft and chewy. Keep in mind that ovens can vary, so start checking for doneness around the 30-minute mark. Once baked, remove the pan from the oven and let it cool completely in the pan on a wire rack. This cooling period is vital for allowing the brookies to set properly and for the flavors to meld. Rushing this step will result in a messy, crum extractbly dessert. Once completely cooled, use the parchment paper overhang to lift the entire slab out of the pan. Cut into squares or rectangles, and prepare for a truly decadent treat! These are fantastic served at room temperature, but a slight warming in the microwave can bring out the gooeyness even further. Enjoy every delicious bite!
Conclusion:
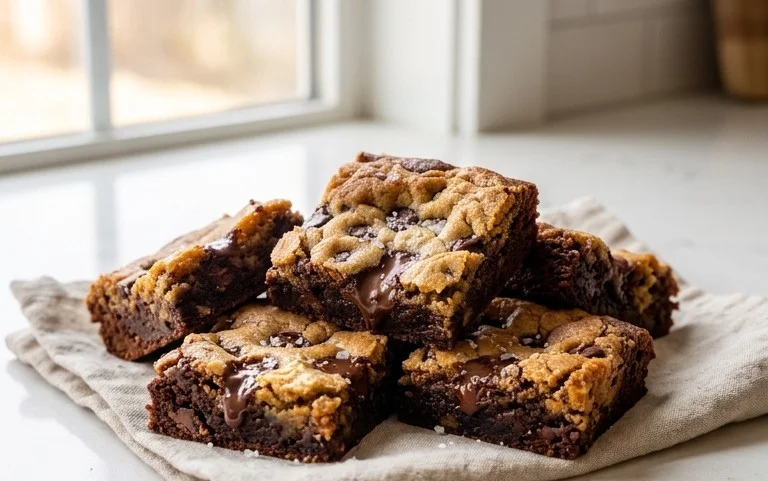
And there you have it – the ultimate guide to creating magnificent brown butter brookies! This recipe truly takes two beloved desserts and elevates them to a whole new level. The rich, nutty depth of the brown butter transforms both the chewy chocolate chip cookie layer and the fudgy brownie base, creating an irresistible symphony of flavors and textures. The contrast between the slightly crisp edges of the cookie and the gooey center of the brownie is simply divine. I’m confident you’ll fall in love with these brown butter brookies as much as I have!
These brookies are incredibly versatile when it comes to serving. They are, of course, fantastic enjoyed on their own, perhaps with a tall glass of milk. However, I also love to serve them slightly warmed, topped with a scoop of vanilla bean ice cream for an even more decadent treat. For a touch of elegance, a dusting of powdered sugar or a drizzle of chocolate ganache makes them perfect for entertaining.
Don’t be afraid to experiment with variations! Feel free to add a handful of chopped nuts (walnuts or pecans work beautifully) to the cookie dough, or swirl in some caramel sauce into the brownie batter for an extra layer of indulgence. You could even experiment with different types of chocolate chips, like dark or milk chocolate, or a combination.
I wholeheartedly encourage you to give this brown butter brookie recipe a try. The effort is minimal for the incredibly rewarding outcome. So gather your ingredients, put on your favorite music, and get ready to bake up some serious happiness!
Frequently Asked Questions about Brown Butter Brookies:
Can I make brown butter ahead of time?
Absolutely! Brown butter can be made a day or two in advance and stored in an airtight container in the refrigerator. Just let it come to room temperature before using it in the recipe.
My brown butter looks like it has little black bits. Is that okay?
Yes, those “black bits” are actually milk solids that have caramelized. They are what give brown butter its wonderful nutty flavor and are perfectly fine to include in your brookies! Just be sure you haven’t accidentally burnt your butter; it should be a rich amber color, not dark brown or black.
How should I store leftover brown butter brookies?
Store your cooled brown butter brookies in an airtight container at room temperature for up to 3-4 days. If you live in a warm climate or want to keep them longer, you can also store them in the refrigerator. They are delicious at room temperature or gently rewarmed.
Brown Butter Brookies
A decadent fusion of rich brownies and buttery blondies, elevated with the nutty depth of brown butter.
Ingredients
-
180 g unsalted butter
-
320 g dark chocolate (60% cacao)
-
120 g all-purpose flour
-
50 g unsweetened cocoa powder
-
180 g granulated sugar
-
80 g light brown sugar
-
2 g salt
-
4 large eggs
-
120 g chocolate chunks
-
85 g unsalted butter
-
80 g light brown sugar
-
40 g granulated sugar
-
1 g salt
-
1 large egg
Instructions
-
Step 1
For the brownie layer: Melt 180g butter in a saucepan over medium heat until it turns golden brown and nutty. Remove from heat and let cool slightly. In a separate bowl, whisk together the melted brown butter with 320g melted dark chocolate. Stir in 180g granulated sugar and 80g light brown sugar. Add 4 eggs, one at a time, whisking well after each addition. Fold in 120g all-purpose flour, 50g cocoa powder, and 2g salt until just combined. -
Step 2
For the blondie layer: In a medium bowl, cream together 85g softened butter with 80g light brown sugar and 40g granulated sugar until light and fluffy. Beat in 1 large egg and 1g salt until well combined. Gradually fold in 85g all-purpose flour until just incorporated. -
Step 3
Preheat your oven to 175°C (350°F). Line a 20x20cm (8×8 inch) baking pan with parchment paper, leaving an overhang on the sides. -
Step 4
Pour the brownie batter into the prepared baking pan and spread evenly. Dollop spoonfuls of the blondie batter over the brownie batter. Use a knife or skewer to swirl the two batters together gently, creating a marbled effect. Sprinkle with 120g chocolate chunks, if using. -
Step 5
Bake for 30-35 minutes, or until a toothpick inserted into the center comes out with moist crumbs attached. Be careful not to overbake. -
Step 6
Let the brookies cool completely in the pan on a wire rack before cutting into squares. This allows them to set properly.
Important Information
Nutrition Facts (Per Serving)
It is important to consider this information as approximate and not to use it as definitive health advice.
Allergy Information
Please check ingredients for potential allergens and consult a health professional if in doubt.
Leave a Comment