
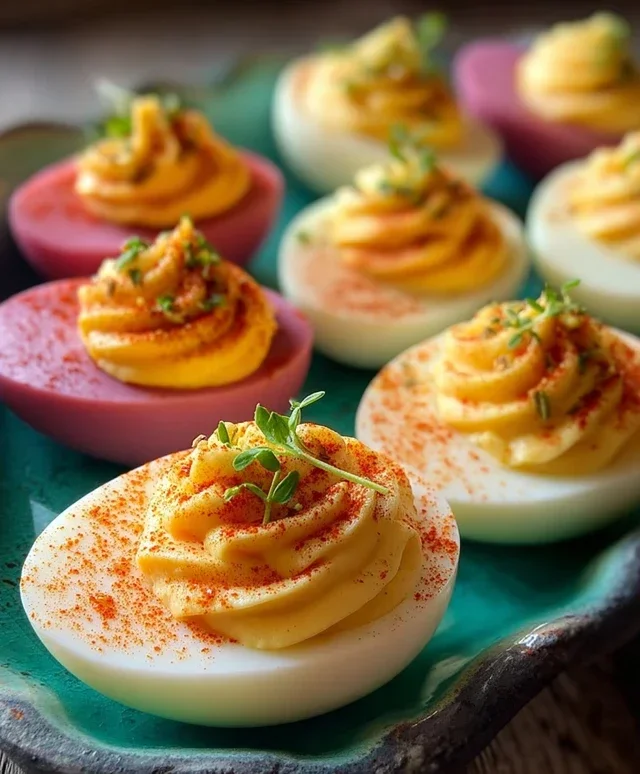
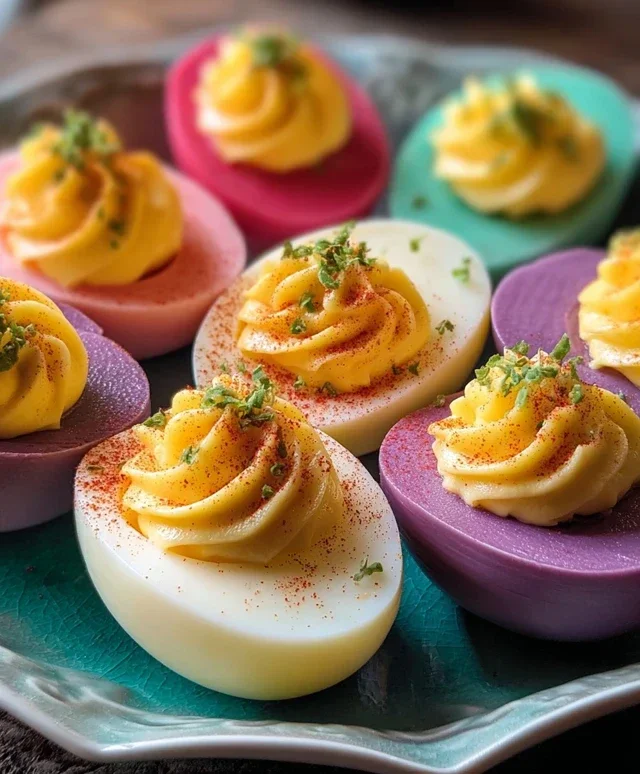
Colored Deviled Eggs are more than just a party appetizer; they’re a vibrant explosion of flavor and fun! Imagin extracte these delightful little bites gracing your next gathering – they’re guaranteed to be the conversation starter. What is it about deviled eggs that makes us all swoon? Perhaps it’s the perfect creamy yolk filling nestled back into that tender egg white cup, or the satisfying tang that wakes up our taste buds. But when you take those classic deviled eggs and infuse them with brilliant, natural colors? That’s where the magic truly happens. They transform from a beloved classic into a whimsical centerpiece, bringin extractg an extra layer of joy and visual appeal to any spread. Get ready to learn how to create your own dazzling batch of colored deviled eggs that are as beautiful as they are delicious.

Colored Deviled Eggs
Deviled eggs are a classic party appetizer, and while I love the traditional version, I’ve always been drawn to adding a touch of fun and whimsy. That’s where these colored deviled eggs come in! They’re not just a treat for your taste buds, but also a feast for the eyes. Perfect for Easter brunches, birthday parties, or any gathering where you want to add a pop of color, these deviled eggs are sure to be a hit with guests of all ages. The process is surprisingly simple, and the result is a stunning platter that’s as delightful to look at as it is to eat. Let’s dive in and create some edible art!
Ingredients:
Preparing the Eggs: The Foundation of Flavor
The first step to any great deviled egg is perfectly cooked eggs. This might seem straightforward, but there’s a knack to it that ensures easy peeling and perfectly cooked yolks.
1. Boiling and Cooling the Eggs: Start by placing your 12 large eggs in a single layer in a large saucepan. Cover the eggs with about an inch of cold water. Place the saucepan over high heat and bring the water to a rolling boil. Once the water reaches a full boil, immediately remove the saucepan from the heat, cover it with a lid, and let the eggs sit in the hot water for 10-12 minutes. This “steeping” method is a fantastic way to prevent overcooking the yolks, which can lead to a rubbery texture and that unappealing green ring around the yolk.
2. Ice Bath for Perfect Peeling: While the eggs are steeping, prepare an ice bath. Fill a large bowl with cold water and add plenty of ice cubes. Once the 10-12 minutes are up, carefully transfer the hot eggs from the saucepan directly into the ice bath. Let them chill in the ice bath for at least 15 minutes. The sudden temperature change helps to contract the egg white, pulling it away from the shell, which makes peeling significantly easier. Trust me, you’ll thank yourself later when you’re not struggling with stubborn shell fragments!
3. Peeling and Halving: Once the eggs are thoroughly chilled, it’s time to peel them. Gently tap each egg on a hard surface to crack the shell all over, then start peeling from the wider end, where there’s usually a small air pocket. If you’ve used the ice bath method, the shells should slip off quite easily. Rinse any lingering bits of shell under cool water. Once all 12 eggs are peeled, carefully slice each egg in half lengthwise. You can use a sharp knife, or for an extra neat cut, a piece of dental floss can be surprisingly effective. Slide the floss under the egg, cross the ends over the top, and pull gently to slice through.
4. Separating Yolks: Gently scoop out the egg yolks from each halved egg white and place them in a medium-sized bowl. Arrange the hollowed-out egg white halves on a serving platter, keeping them neat and organized. This is where you’ll be piping or spooning the filling later, so make sure they’re ready to go.
Crafting the Creamy Filling: The Heart of the Deviled Egg
Now for the delicious part – creating the creamy, flavorful filling that makes deviled eggs so irresistible. This is where we’ll also incorporate our vibrant colors.
5. Mashing the Yolks and Mixing: To the bowl of egg yolks, add the mayonnaise, pickle juice, and mustard. Begin extract to mash the yolks with a fork until they are relatively smooth. Then, add the finely chopped dill pickles. Stir everything together until well combined and creamy. Season generously with salt and pepper to taste. It’s important to taste and adjust the seasonings here; you want a perfectly balanced flavor that complements the richness of the yolk. Don’t be afraid to add a little more pickle juice or mustard if you prefer a tangier bite.
Coloring the Filling: A Rainbow of Deliciousness
This is where the fun truly begin extracts! We’re going to divide the filling and color it to create a beautiful, multicolored deviled egg platter.
6. Dividing and Coloring: This is where the magic happens! You’ll need several small bowls or cups, one for each color you plan to make. For this recipe, let’s aim for 3-4 different colors. Take your creamy yolk mixture and divide it as evenly as possible into your chosen number of small bowls. For each bowl, add about 6 ounces of water and 1 teaspoon of white vinegar. This liquid mixture is what we’ll be coloring. Add a few drops of your desired food coloring to each separate cup of water and vinegar. Stir well to dissolve the coloring. Then, add small portions of your yolk filling into each colored liquid. Gently stir the yolk mixture into the colored liquid until it’s evenly distributed and you achieve your desired hue. Start with a few drops of food coloring and add more gradually until you reach a vibrant, appealing color. It’s better to start light and add more color than to overdo it. You can create classic colors like pink, blue, and yellow, or mix them to create secondary colors like green and orange.
Assembling the Masterpieces: The Final Flourish
With your colorful fillings ready, it’s time to bring it all together and create a stunning presentation.
7. Filling the Egg Whites: Once your colored fillings are ready, it’s time to fill the egg white halves. You can use a spoon to dollop the filling into each egg white, or for a more polished look, transfer the filling into a piping bag fitted with a star or round tip. Pipe the filling into each egg white half, aiming for a generous mound that resembles the origin extractal yolk. If you don’t have a piping bag, a zip-top bag with a corner snipped off will also work. Alternatively, you can use two small spoons to carefully place the filling. Alternate the colors as you fill the egg whites to create a visually appealing and festive platter.
Presentation and Serving: The Grand Finnon-alcoholic ale
8. Garnishing and Serving: Once all the egg white halves are filled with their vibrant, creamy goodness, it’s time for the final touches. You can garnish your colored deviled eggs with a sprinkle of paprika for a classic touch, or get creative with finely chopped chives, a tiny slice of pickle, or a small piece of parsley. Arrange the deviled eggs on your serving platter, making sure to showcase the different colors. These colored deviled eggs are best served chilled and can be made a few hours in advance. They are sure to be the star of any appetizer spread! Enjoy the compliments!
Conclusion:
There you have it – your guide to creating stunning and delicious colored deviled eggs! This recipe truly elevates a classic party staple into something visually captivating and incredibly enjoyable. The vibrant hues not only make these appetizers a showstopper for any gathering but also subtly infuse unique flavor notes, making them a delightful surprise for your guests. They’re perfect for themed parties, holidays, or just adding a splash of fun to your next potluck.
I truly encourage you to give these colored deviled eggs a try. Experimenting with the different food coloring and spice combinations is part of the joy! Consider serving them alongside a fresh green salad or as part of a larger appetizer spread. For variations, think about adding a pinch of smoked paprika to the yellow batch for a smoky depth, or a tiny bit of finely chopped chives to the green for a fresh oniony crunch. The possibilities are nearly endless, and the results are always rewarding. Happy deviling!
Frequently Asked Questions:
Can I use gel food coloring instead of liquid?
Absolutely! Gel food coloring is often preferred for deviled eggs as it provides more intense colors with less moisture, which can affect the texture of the yolk mixture. Start with a very small amount and add more gradually until you achieve your desired shade. Remember, gel colors are concentrated!
How far in advance can I make these colored deviled eggs?
You can prepare the deviled egg filling and refrigerate it separately for up to two days. It’s best to assemble the eggs just a few hours before serving to prevent the whites from becoming watery and to maintain their vibrant appearance. Store the filled eggs in an airtight container in the refrigerator.
Colored Deviled Eggs
A fun and vibrant twist on classic deviled eggs, perfect for parties and gatherings.
Ingredients
-
12 eggs
-
½ cup mayonnaise
-
2 teaspoons pickle juice
-
2 teaspoons mustard
-
4 tablespoons finely chopped dill pickles
-
Salt and pepper, to taste
-
6 ounces water (in separate cups for coloring)
-
1 teaspoon white vinegar (in separate cups for coloring)
-
Food coloring in desired colors
Instructions
-
Step 1
Place eggs in a large saucepan and cover with cold water. Bring to a boil over high heat, then reduce heat to low and simmer for 10-12 minutes. Drain and rinse eggs with cold water until cool. -
Step 2
Peel the cooled eggs. Slice each egg in half lengthwise and carefully scoop out the yolks into a medium bowl. Arrange egg white halves on a serving platter. -
Step 3
Mash the egg yolks with a fork until smooth. Add mayonnaise, pickle juice, mustard, and finely chopped dill pickles. Mix until well combined. Season with salt and pepper to taste. -
Step 4
Divide the yolk mixture into separate small bowls, one for each desired color. Add a few drops of food coloring to each bowl and stir until the color is evenly distributed. -
Step 5
Transfer the colored yolk mixtures into piping bags (or resealable plastic bags with a corner snipped off). Pipe the colored filling back into the hollowed-out egg white halves. -
Step 6
Optional: Garnish with a sprinkle of paprika or a small piece of dill pickle. Chill before serving.
Important Information
Nutrition Facts (Per Serving)
It is important to consider this information as approximate and not to use it as definitive health advice.
Allergy Information
Please check ingredients for potential allergens and consult a health professional if in doubt.
Leave a Comment