
How to make traditional hot cross buns is a journey back in time, a sensory delight that heralds the arrival of spring and the joys of Easter. There’s a magic in these spiced, fruit-filled delights, a comforting warmth that resonates with tradition and nostalgia. We love hot cross buns for their perfect balance of sweetness and spice, their wonderfully soft texture, and that iconic cross that symbolizes renewal and hope. What truly makes them special is the feeling they evoke – a sense of togetherness, a shared experience of baking and enjoying these beloved treats. Whether you’re a seasoned baker or new to the kitchen, mastering the art of traditional hot cross buns will bring a touch of handmade happiness to your Easter celebrations. Get ready to fill your home with the irresistible aroma of these classic Easter bakes!

How to Make Traditional Hot Cross Buns
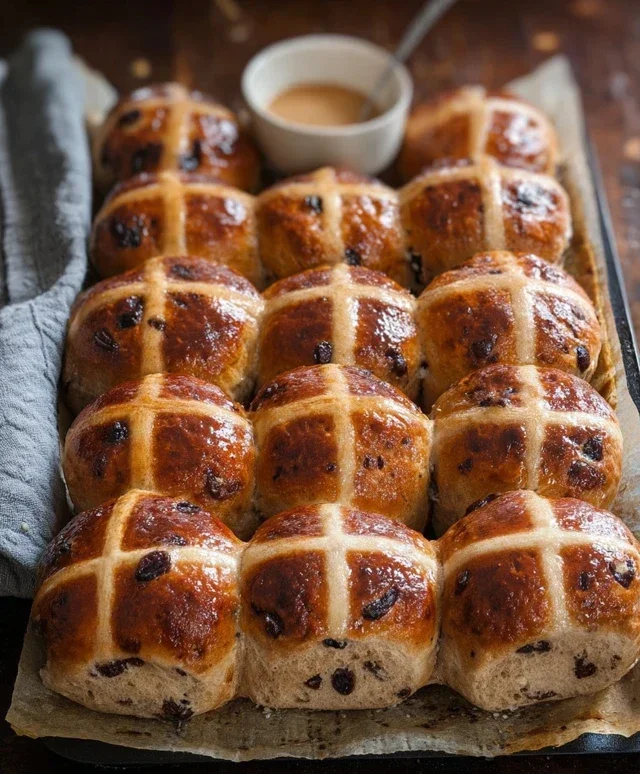
There’s something undeniably special about a warm, spiced hot cross bun, especially during the Easter season. The aroma of cinnamon and allspice wafting from the oven, the little bursts of sweetness from the dried fruit, and that iconic cross on top – it’s a comforting and delicious tradition. While you can certainly buy them, making your own hot cross buns from scratch is incredibly rewarding and surprisingly achievable. This recipe will guide you through creating wonderfully soft, flavourful buns that will rival any bakery.
Ingredients:
Making the Dough
The heart of any great bread or bun is a well-made dough. We’ll start by activating our yeast and then combining all the wet and dry ingredients to form a pliable dough.
Step 1: Proofing the Yeast
In a large mixing bowl, combine the warmed milk with the instant dried yeast and 4 tablespoons of sugar. Give it a gentle stir and then let it sit for about 5-10 minutes. You’re looking for the mixture to become foamy and bubbly on the surface. This ‘proofing’ indicates that your yeast is alive and active, ready to work its magic. If you don’t see any foam, your yeast might be past its prime, or the milk was too hot or too cold, so you’ll need to start again.
Step 2: Combining the Dough Ingredients
To the foamy yeast mixture, add 4 cups of the all-purpose flour, the salt, cinnamon, allspice, and ground gin extractger. Whisk these dry spices together briefly to ensure they are evenly distributed before adding them to the wet ingredients. Now, add the melted butter and the beaten eggs. If you have a stand mixer with a dough hook attachment, this is where you’ll want to use it. If you’re mixing by hand, you can use a sturdy spoon or spatula initially.
Step 3: Kneading the Dough
Start mixing everything together until a shaggy dough begin extracts to form. If using a stand mixer, knead on low speed for about 8-10 minutes, or until the dough is smooth, elastic, and pulls away cleanly from the sides of the bowl. If you’re kneading by hand, turn the dough out onto a lightly floured surface and knead for 10-15 minutes. The key is to develop the gluten. You’ll know it’s ready when you can stretch a small piece of dough thinly without it tearing – this is called the windowpane test. Now, gently fold in the dried currants or raisins, distributing them evenly throughout the dough. Be careful not to over-knead at this stage, as you don’t want to break up the fruit.
Step 4: First Rise
Lightly grease a clean bowl with a little oil or butter. Place the dough in the bowl, turning it once to coat all sides. Cover the bowl tightly with plastic wrap or a clean tea towel. Find a warm, draft-free spot in your kitchen for the dough to rise. This usually takes about 1-1.5 hours, or until the dough has roughly doubled in size. The warmth helps the yeast to ferment and create those lovely airy pockets.
Shaping and Second Rise
Once your dough has had its first rise, we’ll shape it into individual buns and give them another opportunity to puff up before baking.
Step 5: Shaping the Buns
Once the dough has doubled, gently punch it down to release the air. Turn the dough out onto a lightly floured surface. Divide the dough into 12 equal portions. For each portion, shape it into a smooth ball. You can do this by cupping your hand around a portion of dough and rotating it on the counter until it forms a taut ball. Place the shaped buns onto a baking sheet lined with parchment paper, leaving a little space between each bun as they will expand.
Step 6: Second Rise and Preparing the Cross
Cover the shaped buns loosely with plastic wrap or a tea towel and let them rise again in a warm place for another 30-45 minutes, or until they are puffy and have nearly doubled in size again. While the buns are on their second rise, prepare the cross mixture. In a small bowl, combine the ⅓ cup of flour, 2 tablespoons of sugar, and a few tablespoons of warm water. Stir until you have a thick, smooth paste. You might need to adjust the amount of water to get the right consistency – it should be thick enough to pipe but not so stiff that it’s difficult to work with.
Baking and Glazing
The final stages involve baking the buns to golden perfection and then adding that signature sweet glaze.
Step 7: Baking the Hot Cross Buns
Preheat your oven to 375°F (190°C). Once the buns have completed their second rise, use the prepared paste to pipe crosses onto the top of each bun. You can do this with a piping bag fitted with a small round tip, or even just a ziplock bag with a corner snipped off. Carefully place the baking sheet into the preheated oven. Bake for 15-20 minutes, or until the buns are golden brown and sound hollow when tapped on the bottom.
Step 8: Glazing and Serving
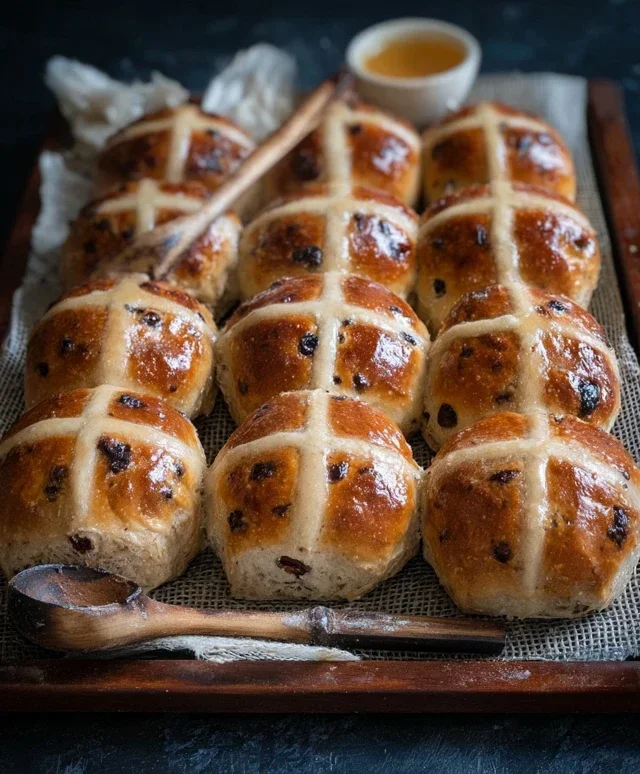
While the buns are still warm from the oven, you can optionally brush them with a simple glaze. In a small bowl, whisk together 2 tablespoons of powdered sugar with a teaspoon or two of warm water until smooth and pourable. Brush this glaze over the tops of the hot cross buns. This adds a lovely sheen and a little extra sweetness.
Allow the buns to cool slightly on a wire rack before enjoying. They are best served warm, perhaps with a generous spread of butter. These homemade hot cross buns are a wonderful way to celebrate tradition and share a delicious treat with loved ones. Enjoy the process and the delightful results!
Conclusion:
And there you have it – your guide to creating truly traditional hot cross buns! This recipe is fantastic because it captures that authentic taste and texture that makes these buns a springtime delight. The balance of warm spices, the chewy fruit, and that signature cross is simply irresistible. We’ve walked through every step, from proving the yeast to achieving that perfect golden crust, ensuring you can recreate this classic treat in your own kitchen. These buns are incredibly versatile. Serve them warm, fresh from the oven, slathered with butter. They are also delightful toasted and enjoyed with a cup of tea or coffee. Don’t be afraid to get creative with variations! You could add a splash of orange zest to the dough for a citrusy twist, or perhaps a handful of chopped glacé cherries alongside the sultanas. You can even experiment with different spice blends to find your personal favorite. I truly encourage you to give this traditional hot cross bun recipe a try. The aroma filling your home will be reward enough, but the taste will be even better!
Frequently Asked Questions about Hot Cross Buns:
Why are my hot cross buns not rising?
This can happen for a few reasons. Ensure your yeast is fresh and properly activated by warm (not hot) liquid. Also, check that your kitchen is warm enough; drafts can hinder the proving process. Overworking the dough can also make it tough and prevent a good rise.
Can I make hot cross buns ahead of time?
Absolutely! Once cooled, you can store them in an airtight container at room temperature for 2-3 days. For longer storage, wrap them tightly and freeze them. Reheat gently in a low oven or toaster to bring back their freshness.
What’s the best way to make the cross?
The traditional cross is made from a simple flour and water paste. Mix flour with just enough water to form a smooth, thick paste – the consistency of toothpaste is ideal. You can pipe this onto the buns using a piping bag with a small round tip, or even a ziplock bag with a corner snipped off.
Traditional Hot Cross Buns
Learn how to make soft, spiced, and fruity traditional hot cross buns, perfect for Easter.
Ingredients
-
1 cup (236 ml) milk, warmed to 100– 115 °F (38 – 46°C)
-
2 teaspoons instant dried yeast
-
4 tablespoons sugar
-
4 cups + 2 tablespoons (525 grams) all-purpose/plain flour
-
1 teaspoon salt
-
1 teaspoon ground cinnamon
-
1 teaspoon allspice
-
¼ teaspoon ground ginger
-
1 cup (150 grams) dried currants or raisins
-
6 tablespoons unsalted butter, melted
-
2 large eggs, beaten (room temperature)
-
⅓ cup (46 grams) all-purpose/plain flour
-
2 tablespoons sugar
-
Warm water
-
2 tablespoons powdered/confectioners sugar
Instructions
-
Step 1
In a large bowl, combine the warmed milk, yeast, and 4 tablespoons of sugar. Let stand for 5-10 minutes until foamy. -
Step 2
Add the 4 cups + 2 tablespoons flour, salt, cinnamon, allspice, and ginger to the yeast mixture. Mix until a shaggy dough forms. -
Step 3
Knead the dough on a lightly floured surface for 8-10 minutes until smooth and elastic. Incorporate the dried currants or raisins and melted butter during the last few minutes of kneading. Gradually add the beaten eggs until fully incorporated. -
Step 4
Place the dough in a lightly oiled bowl, cover, and let rise in a warm place for 1-1.5 hours, or until doubled in size. -
Step 5
Punch down the dough and divide it into 12 equal portions. Shape each portion into a round bun and place them on a baking sheet lined with parchment paper, leaving some space between them. -
Step 6
Cover the buns and let them rise for another 30-45 minutes. -
Step 7
Preheat your oven to 375°F (190°C). -
Step 8
Bake the buns for 18-20 minutes, or until golden brown. -
Step 9
While the buns are baking, prepare the glaze by mixing the ⅓ cup flour, 2 tablespoons sugar, and enough warm water to form a smooth, thick paste. Transfer to a piping bag with a small round tip. -
Step 10
Once the buns are baked and slightly cooled, pipe a cross onto the top of each bun. Brush with a simple syrup made from dissolved powdered sugar and a little warm water for a glossy finish.
Important Information
Nutrition Facts (Per Serving)
It is important to consider this information as approximate and not to use it as definitive health advice.
Allergy Information
Please check ingredients for potential allergens and consult a health professional if in doubt.
Leave a Comment