
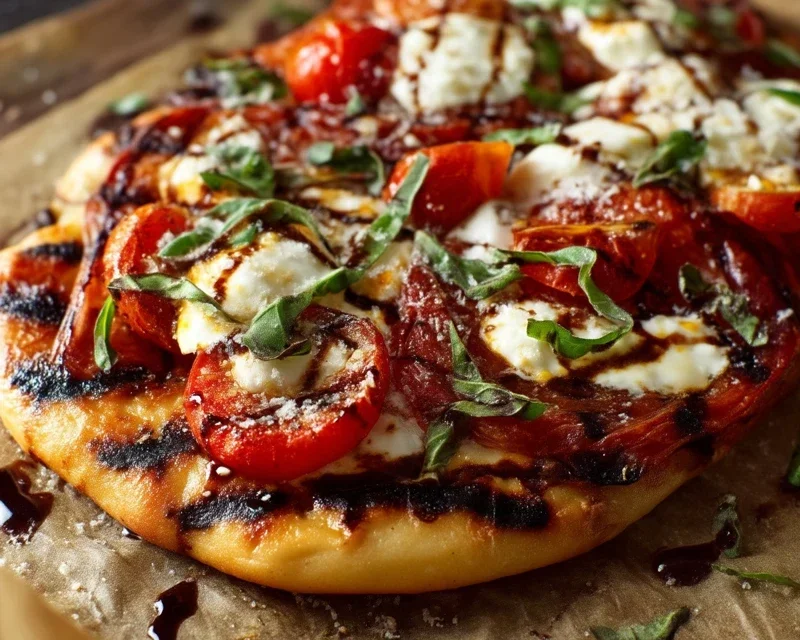
How to Make the Perfect Grilled Pizza is a culinary adventure that transforms a backyard grill into your personal pizzeria. Forget soggy crusts and unevenly cooked toppings; this method delivers smoky char, a delightfully crisp base, and flavors that sing. There’s something inherently celebratory about gathering around the grill, the aroma of charcoal mingling with melting cheese, and the satisfaction of pulling a perfectly blistered pizza onto your plate. What makes this grilled pizza so special? It’s the magical combination of intense heat and open flame that creates a textural masterpiece – a chewy, airy interior with an unbelievably crisp exterior that just can’t be replicated in a conventional oven. We’ll guide you through every step to ensure your grilled pizza is nothing short of spectacular, ready to impress your friends and family.

How to Make the Perfect Grilled Pizza
There’s something undeniably special about pizza. It’s a crowd-pleaser, a comfort food, and a canvas for culinary creativity. While your standard oven pizza is fantastic, have you ever considered the magic that happens when you move that deliciousness outdoors to the grill? Grilled pizza takes on a whole new dimension. The high heat of the grill creates a wonderfully crispy crust with just the right amount of char, and the smoky essence from the grill adds a depth of flavor you simply can’t achieve indoors. Don’t be intimidated; making perfect grilled pizza is surprisingly straightforward and incredibly rewarding. Let’s get cooking!
Ingredients:
Cooking Instructions
The key to successful grilled pizza is preparation. You want to have everything ready to go before you even fire up the grill, as the cooking process is quite fast.
Preparing the Dough and Grill
First, let’s get our pizza dough ready. If you’re using store-bought dough, let it come to room temperature for at least 30 minutes to an hour. This makes it much easier to stretch and work with. If you’re making your own, ensure it’s proofed and ready. While the dough is resting, preheat your grill to medium-high heat (around 400-450 degrees Fahrenheit). You want a nice, hot grill to get that quick char and crispy crust. If you have a two-zone grill, set it up so you have a direct heat side and an indirect heat side. This will be helpful later.
Stretching and Grilling the Crust
Once your dough is at room temperature and your grill is hot, it’s time to shape the dough. Lightly dust your work surface with a little flour or cornmeal. Gently stretch the dough into your desired pizza shape, aiming for a thickness of about 1/4 to 1/3 inch. Don’t overwork it; you want to maintain some airiness. Brush both sides of the stretched dough generously with olive oil. This oil is crucial for preventing sticking and for developing that beautiful golden-brown color and crispy texture on the grill. Carefully transfer the oiled dough onto the preheated grill grates, directly over the heat. Grill for 2-3 minutes per side, until the dough is puffed up and shows grill marks. You’re looking for a dough that’s cooked on the bottom but not yet fully browned or crispy. This is just the first stage of cooking. Remove the partially cooked crust from the grill and place it on a clean surface, grill-side up.
Assembling Your Masterpiece
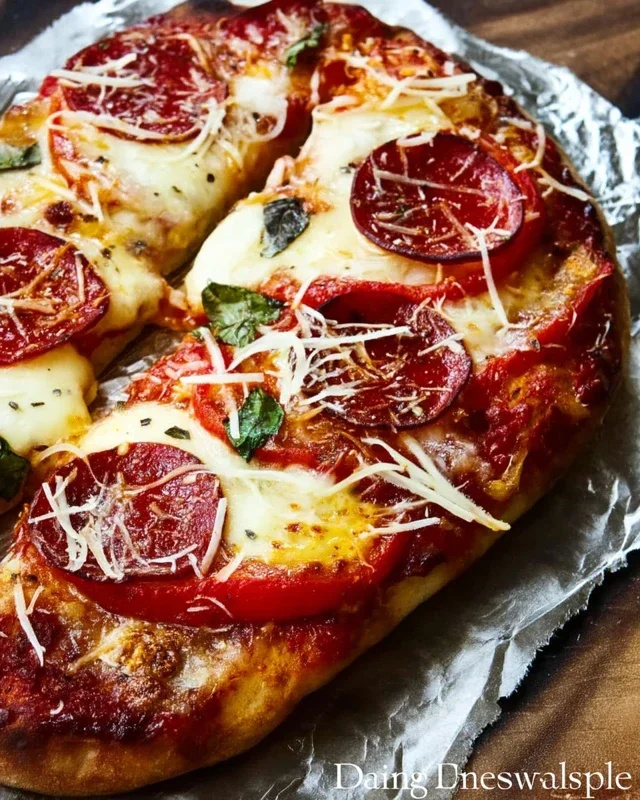
Now comes the fun part: topping your pizza! With the crust still warm, spread an even layer of your pizza sauce over the grilled side. Be careful not to overload it, as too much sauce can make the crust soggy. Next, generously sprinkle your shredded mozzarella and provolone cheese over the sauce. Now, add your favorite toppings. Remember that these toppings will continue to cook on the grill, so if you have anything that needs a longer cooking time (like raw sausage), it’s best to pre-cook it. Distribute your toppings evenly across the cheese.
The Final Cook
Once your pizza is assembled, it’s time for its grand finnon-alcoholic ale on the grill. Carefully transfer the topped pizza back onto the grill grates, ideally over indirect heat if you have a two-zone setup. If you only have direct heat, keep the flame at a medium level. Close the grill lid. This traps the heat and allows the cheese to melt beautifully and the toppings to cook through. Grill for another 5-7 minutes, or until the cheese is completely melted and bubbly, and the crust is golden brown and crisp. Keep an eye on it to prevent burning – the high heat can cook things very quickly! If the crust is browning too fast but the cheese isn’t melted, you can move it to a cooler part of the grill.
Serving Your Delicious Creation
Once your grilled pizza is perfectly cooked, carefully slide it off the grill using a pizza peel or a spatula. Let it rest for just a minute or two before slicing. This allows the cheese to set slightly, making it easier to cut. Garnish with fresh basil leaves if desired. Slice it up and enjoy the incredible flavor and texture of your homemade grilled pizza! The smoky char, crispy crust, and perfectly melted toppings are a culinary experience you won’t soon forget. This method is fantastic for a casual backyard gathering or even just a weeknight treat. Experiment with different toppings and sauces to find your perfect grilled pizza combination. Happy grilling!
Conclusion:
There you have it – the secrets to crafting the ultimate perfect grilled pizza! This recipe is fantastic because it delivers that irresistible smoky char and wonderfully crisp crust that oven-baked pizzas often can’t replicate. The high heat of the grill cooks the dough quickly, creating a beautiful texture and infusing it with a delightful grilled flavor. Don’t be intimidated; the process is surprisingly straightforward and incredibly rewarding.
Serve your creations fresh off the grill with a vibrant side salad or some grilled vegetables. For variations, consider a classic Margherita with fresh mozzarella, basil, and ripe tomatoes. You could also explore a spicy beef pepperoni with honey drizzle, a white pizza with ricotta and spinach, or even a dessert pizza topped with Nutella and strawberries. The possibilities are truly endless!
I highly encourage you to gather your ingredients, fire up your grill, and give this a try. The experience of cooking and enjoying pizza outdoors is truly special, and the results will impress both yourself and your guests. Happy grilling!
Frequently Asked Questions:
Can I make the dough ahead of time?
Absolutely! Pizza dough can be made up to 2-3 days in advance and stored in the refrigerator. Just bring it to room temperature for about an hour before you plan to grill it for the best results.
What’s the best way to prevent the pizza from sticking to the grill?
Ensuring your grill grates are clean and well-oiled is crucial. Brushing them with a high-heat oil like canola or vegetable oil just before placing the dough down is highly recommended. You can also use a pizza peel dusted with cornmeal or semolina to help it slide off easily onto the grill.
What kind of grill is best for pizza?
Both charcoal and gas grills can work wonderfully. Gas grills offer more temperature control, which can be beneficial for begin extractners. Charcoal grills can impart an even smokier flavor. The key is to achieve a consistently high heat.
The Perfect Grilled Pizza
Achieve a crispy, smoky crust and perfectly melted toppings on your homemade pizza using your grill. This recipe simplifies the process for delicious results.
Ingredients
-
1 pound pizza dough
-
1/2 cup pizza sauce
-
8 ounces shredded mozzarella cheese
-
1/4 cup sliced pepperoni
-
1/4 cup sliced mushrooms
-
1 tablespoon olive oil
-
1/4 cup chopped bell pepper
Instructions
-
Step 1
Preheat your grill to medium-high heat. If using a charcoal grill, bank the coals to one side for indirect heat. -
Step 2
Lightly flour a surface and stretch or roll out your pizza dough into your desired shape, about 1/4 inch thick. -
Step 3
Brush one side of the dough with olive oil. Carefully place the oiled side down onto the preheated grill grates. -
Step 4
Grill for 2-3 minutes, or until the bottom is golden brown and has grill marks. Flip the dough. -
Step 5
Quickly spread pizza sauce over the grilled side of the dough, leaving a small border for the crust. Sprinkle with mozzarella cheese, pepperoni, mushrooms, and bell pepper. -
Step 6
Close the grill lid and cook for another 4-6 minutes, or until the cheese is melted and bubbly and the crust is cooked through. -
Step 7
Carefully remove the pizza from the grill using a spatula and let it cool slightly before slicing and serving.
Important Information
Nutrition Facts (Per Serving)
It is important to consider this information as approximate and not to use it as definitive health advice.
Allergy Information
Please check ingredients for potential allergens and consult a health professional if in doubt.
Leave a Comment