
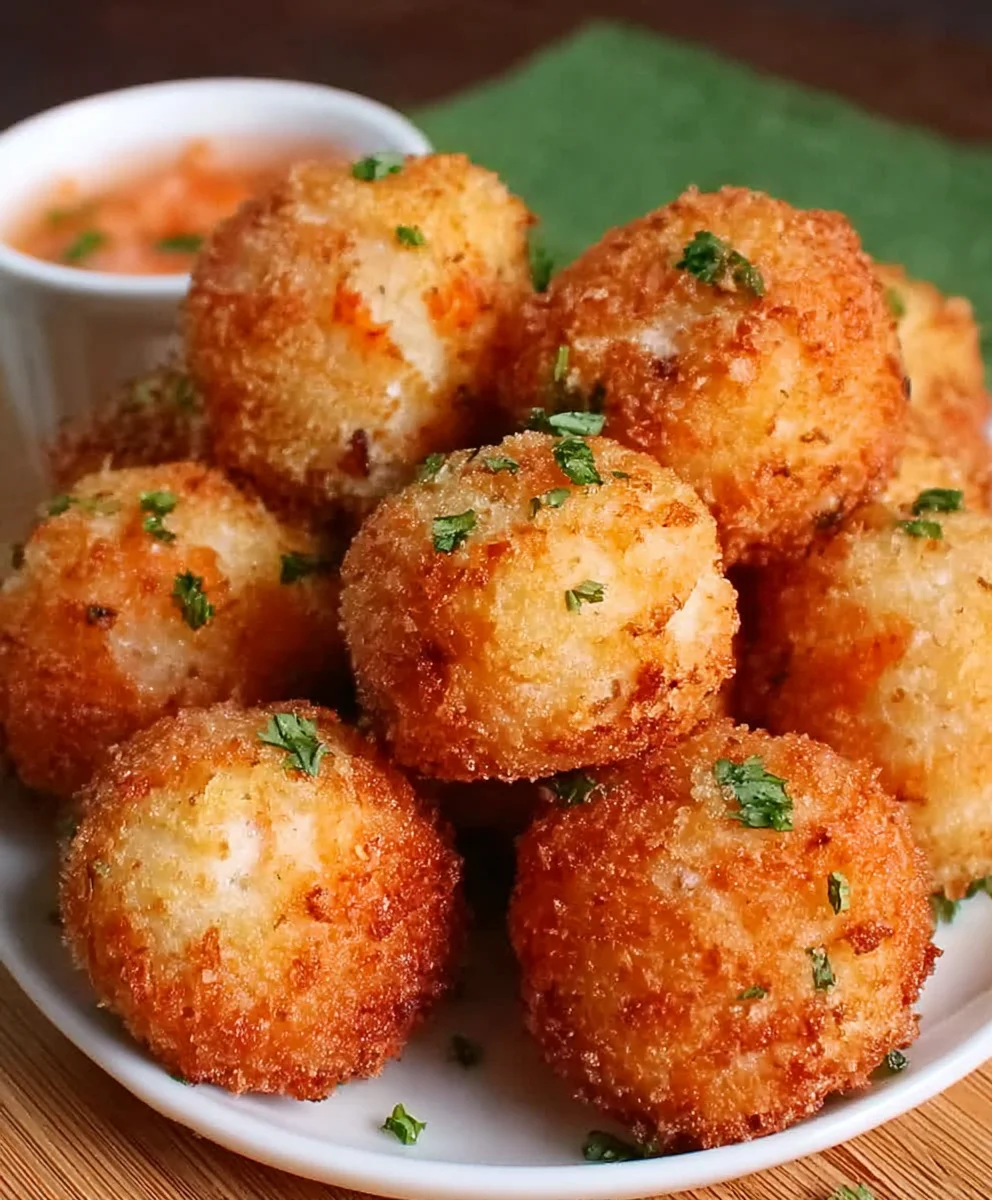
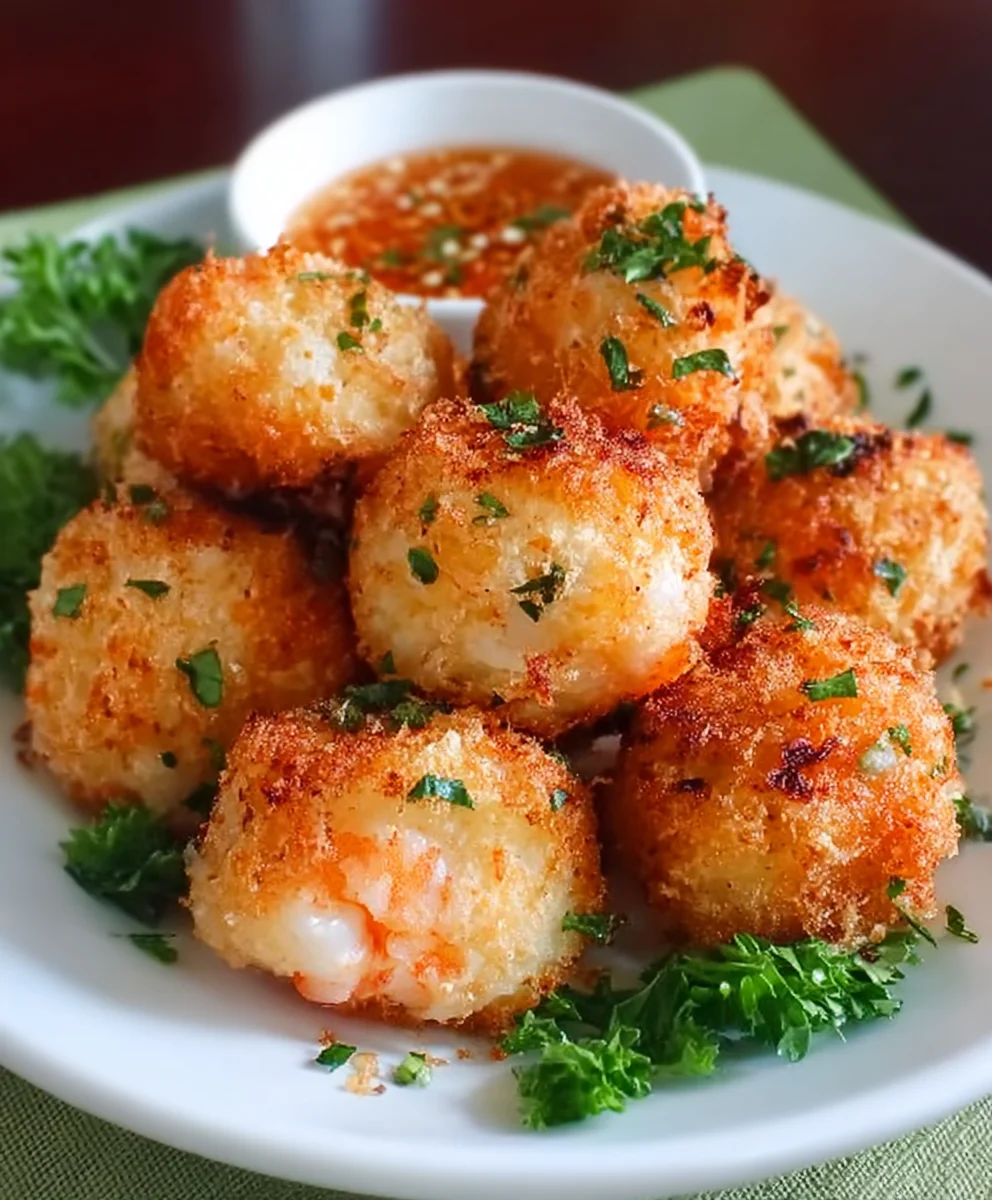
Shrimp balls recipe, oh, the mere mention conjures images of crispy, golden spheres bursting with succulent, savory flavor. Who can resist these delightful little bites? They are a universally adored appetizer, perfect for parties, game nights, or simply as a satisfying snack when that craving strikes. What truly sets a fantastic shrimp balls recipe apart is the delicate balance of textures and tastes. You get that irresistible crunch from the perfectly fried exterior, giving way to a tender, flavorful interior packed with the sweet brininess of fresh shrimp. It’s the kind of dish that disappears from the plate at lightning speed, leaving everyone clamoring for more. This particular shrimp balls recipe elevates the classic with a few thoughtful additions that ensure a truly memorable culinary experience, transforming simple ingredients into something truly special.

Ingredients:
- 1 lb raw shrimp, peeled and deveined
- 1/2 cup breadcrum extractbs (preferably panko)
- 1 egg, beaten
- 1/4 cup green onions, finely chopped
- 2 cloves garlic, minced
- 1 tablespoon fresh gin extractger, grated
- 1 tablespoon soy sauce
- 1 teaspoon sesame oil
- 1/2 teaspoon salt
- 1/2 teaspoon black pepper
- 1/4 cup cilantro, chopped (optional)
- 1 tablespoon cornstarch (optional, for binding)
- Vegetable oil, for frying
Preparing the Shrimp Mixture
Let’s get started on creating our delicious shrimp balls. The first crucial step is to prepare the shrimp itself. You’ll want to ensure the shrimp are thoroughly peeled and deveined. This not only makes for a more pleasant eating experience but also ensures a smoother texture in our final shrimp balls. Once prepped, place the shrimp in a food processor. Pulse the shrimp until it’s finely chopped but not completely pureed. We’re aiming for a texture that’s still recognizable as shrimp, with some small chunks remaining, rather than a paste. This will give our shrimp balls a lovely bite. If you don’t have a food processor, you can finely mince the shrimp by hand with a sharp knife, though this will take a bit more time and effort.
In a large mixing bowl, combine the finely chopped shrimp. Now, it’s time to add the binders and flavorings. Add the beaten egg to the shrimp. The egg acts as a crucial binder, helping to hold all the ingredients together. Next, incorporate the pankrum extractreadcrumrum extract Panko breadcrumbs are fantastic because they’re lighter and airierrum extractan traditional breadcrumbs, which will result in a crispier exterior for your shrimp balls. Add the finely chopped green onions, minced garlic, and grategin extractrgin extract ginger. The ginger and garlic will infuse the shrimp balls with a wonderful aromatic depth. Don’t forget the soy sauce for that savory umami kick, and the sesame oil for its distinct nutty aroma. Season generously with salt and black pepper to enhance all the flavors.
If you’re opting for the optional cilantro, now is the time to add it. Cilantro brings a fresh, bright herbaceous note that complements the shrimp beautifully. For an even firmer texture and to ensure your shrimp balls hold their shape exceptionally well during frying, you can also mix in the tablespoon of cornstarch. Cornstarch is a fantastic thickening agent and will help bind everything together even more securely. Gently mix all the ingredients together with your hands or a spoon until everything is well combined. Be careful not to overmix at this stage, as we still want to maintain some texture in our shrimp mixture.
Forming the Shrimp Balls
Now that our shrimp mixture is perfectly seasoned and combined, it’s time to shape them into balls. This is where the magic starts to take physical form. Lightly dampen your hands with a little water. This simple trick will prevent the shrimp mixture from sticking to your palms, making the process much smoother and less messy. Take a portion of the shrimp mixture, about one to two tablespoons in size, depending on how large you want your shrimp balls to be. Gently roll the mixture between your palms to form a compact ball. Aim for consistency in size so that they cook evenly. You should end up with a batch of beautiful, uniformly sized shrimp balls ready for the next step. As you form each ball, place it on a clean plate or baking sheet lined with parchment paper. This will prevent them from sticking while you continue to form the rest of the batch.
Frying the Shrimp Balls
The final and most exciting stage is frying! This is what will give our shrimp balls that irresistible golden-brown crispiness. You’ll need a medium-sized heavy-bottomed pot or a deep skillet for this. Pour enough vegetable oil into the pot to come up about 2-3 inches. We want enough oil for the shrimp balls to be partially submerged, allowing them to fry evenly on all sides. Heat the oil over medium-high heat. You can test if the oil is hot enough by dropping a tiny bit of the shrimp mixture into it. If it sizzles immediately and floats to the surface, the oil is ready. Be careful not to overcrowd the pot, as this can lower the oil temperature and result in greasy shrimp balls. Fry the shrimp balls in batches, working carefully and in small numbers.
Gently lower the formed shrimp balls into the hot oil using a slotted spoon or tongs. Fry them for about 3-5 minutes per side, or until they are golden brown and cooked through. The exact cooking time will depend on the size of your shrimp balls and the temperature of your oil. You’ll see them puff up slightly as they cook. Once they’re beautifully golden and appear cooked, use your slotted spoon or tongs to carefully remove them from the oil. Place the fried shrimp balls onto a plate lined with paper towels. This is a crucial step to absorb any excess oil, ensuring that your shrimp balls are perfectly crispy and not greasy. Allow them to drain for a minute or two before serving or moving to the next batch.
Conclusion:
I hope you’ve enjoyed learning how to make this delicious Shrimp Balls Recipe! This recipe offers a delightful balance of savory shrimp, aromatic seasonings, and a satisfyingly crispy exterior. Whether you’re preparing a quick appetizer for guests or a flavorful addition to your weeknight meal, these Shrimp Balls are sure to impress. They are incredibly versatile, making them a fantastic choice for any occasion.
For serving, I love to present these Shrimp Balls with a selection of dipping sauces. A classic sweet chili sauce is always a winner, but a creamy sriracha mayo or a zesty lime aioli also pairs beautifully. They are perfect on their own as finger food, or you can serve them alongside a fresh green salad for a light and satisfying meal.
Don’t be afraid to get creative with variations! You can add finely chopped water chestnuts for an extra crunch, or a pinch of red pepper flakes for a bit of heat. Experiment with different herbs like cilantro or chives to tailor the flavor to your liking. The possibilities are endless with this adaptable Shrimp Balls Recipe. So, gather your ingredients, have fun in the kitchen, and savor every bite of your homemade creation!
FAQs for Shrimp Balls Recipe:
Can I make the Shrimp Balls ahead of time?
Yes, you can definitely prepare the mixture for the Shrimp Balls Recipe ahead of time. Once formed, you can store them in an airtight container in the refrigerator for up to 24 hours before frying. However, for the best crispy texture, it’s recommended to fry them just before serving.
What can I do if I don’t have fresh shrimp?
If you don’t have fresh shrimp, frozen shrimp that has been fully thawed and patted dry will work perfectly well for this Shrimp Balls Recipe. Ensure all excess moisture is removed before proceeding with the recipe to achieve the desired texture.
Easy Shrimp Balls Recipe – Delicious Appetizer
A simple and delicious recipe for crispy shrimp balls, perfect as an appetizer.
Ingredients
-
1 lb raw shrimp, peeled and deveined
-
1/2 cup panko breadcrumbs
-
1 egg, beaten
-
1/4 cup green onions, finely chopped
-
2 cloves garlic, minced
-
1 tablespoon fresh ginger, grated
-
1 tablespoon soy sauce
-
1 teaspoon sesame oil
-
1/2 teaspoon salt
-
1/2 teaspoon black pepper
-
1/4 cup cilantro, chopped (optional)
-
1 tablespoon cornstarch (optional, for binding)
-
Vegetable oil, for frying
Instructions
-
Step 1
Place peeled and deveined shrimp in a food processor and pulse until finely chopped, but not pureed. Aim for some small chunks to remain. -
Step 2
In a large bowl, combine the chopped shrimp, beaten egg, panko breadcrumbs, chopped green onions, minced garlic, grated ginger, soy sauce, sesame oil, salt, and black pepper. Add optional cilantro and cornstarch if using. Gently mix until well combined, being careful not to overmix. -
Step 3
Lightly dampen your hands with water. Take about 1-2 tablespoons of the shrimp mixture and gently roll it between your palms to form compact balls. Place the formed balls on a plate lined with parchment paper. -
Step 4
Heat about 2-3 inches of vegetable oil in a medium-sized heavy-bottomed pot or deep skillet over medium-high heat until it sizzles when a tiny bit of the mixture is dropped in. -
Step 5
Carefully fry the shrimp balls in batches for about 3-5 minutes per side, or until golden brown and cooked through. Avoid overcrowding the pot. -
Step 6
Remove the fried shrimp balls with a slotted spoon and place them on a plate lined with paper towels to drain excess oil.
Important Information
Nutrition Facts (Per Serving)
It is important to consider this information as approximate and not to use it as definitive health advice.
Allergy Information
Please check ingredients for potential allergens and consult a health professional if in doubt.
Leave a Comment