
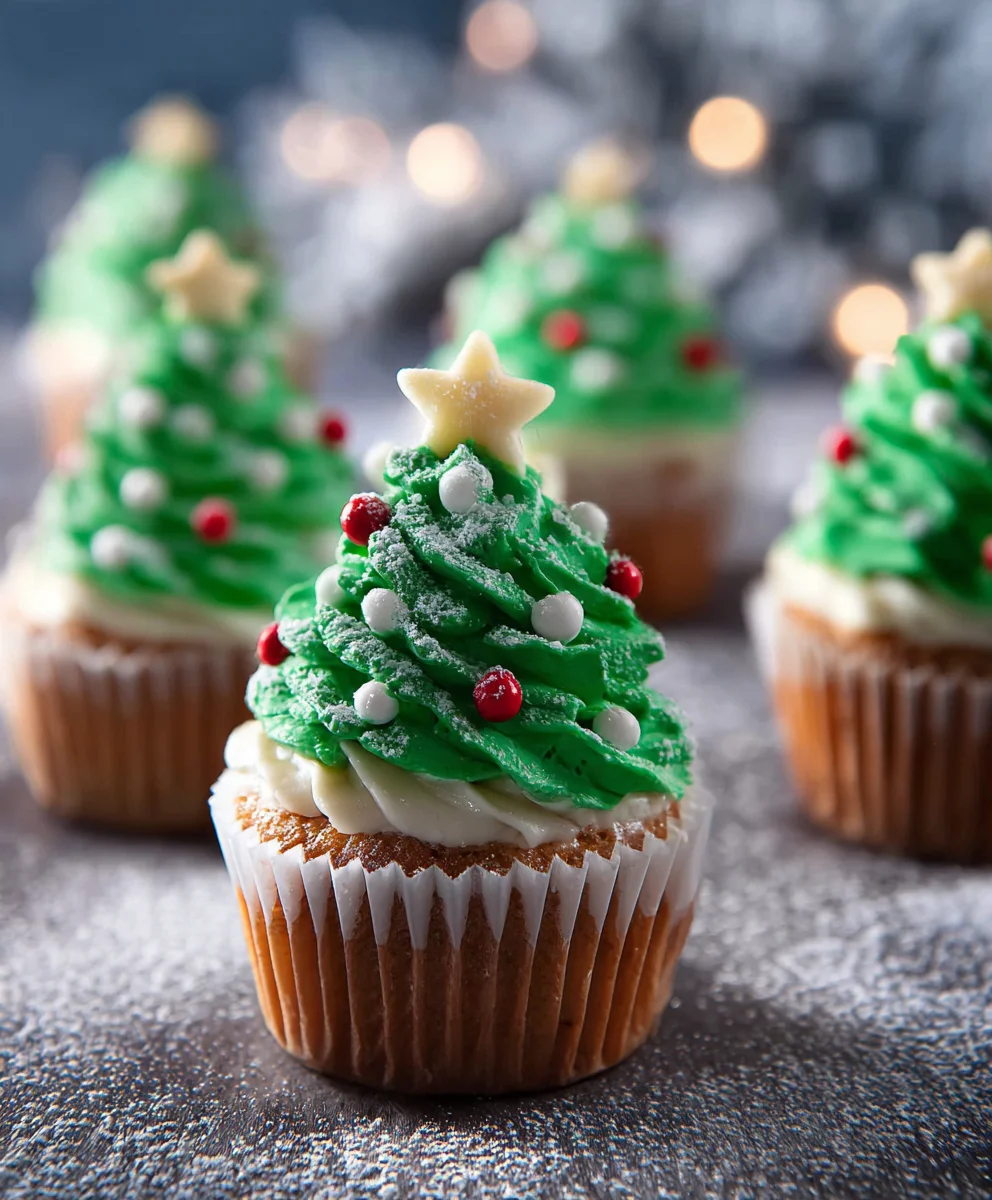
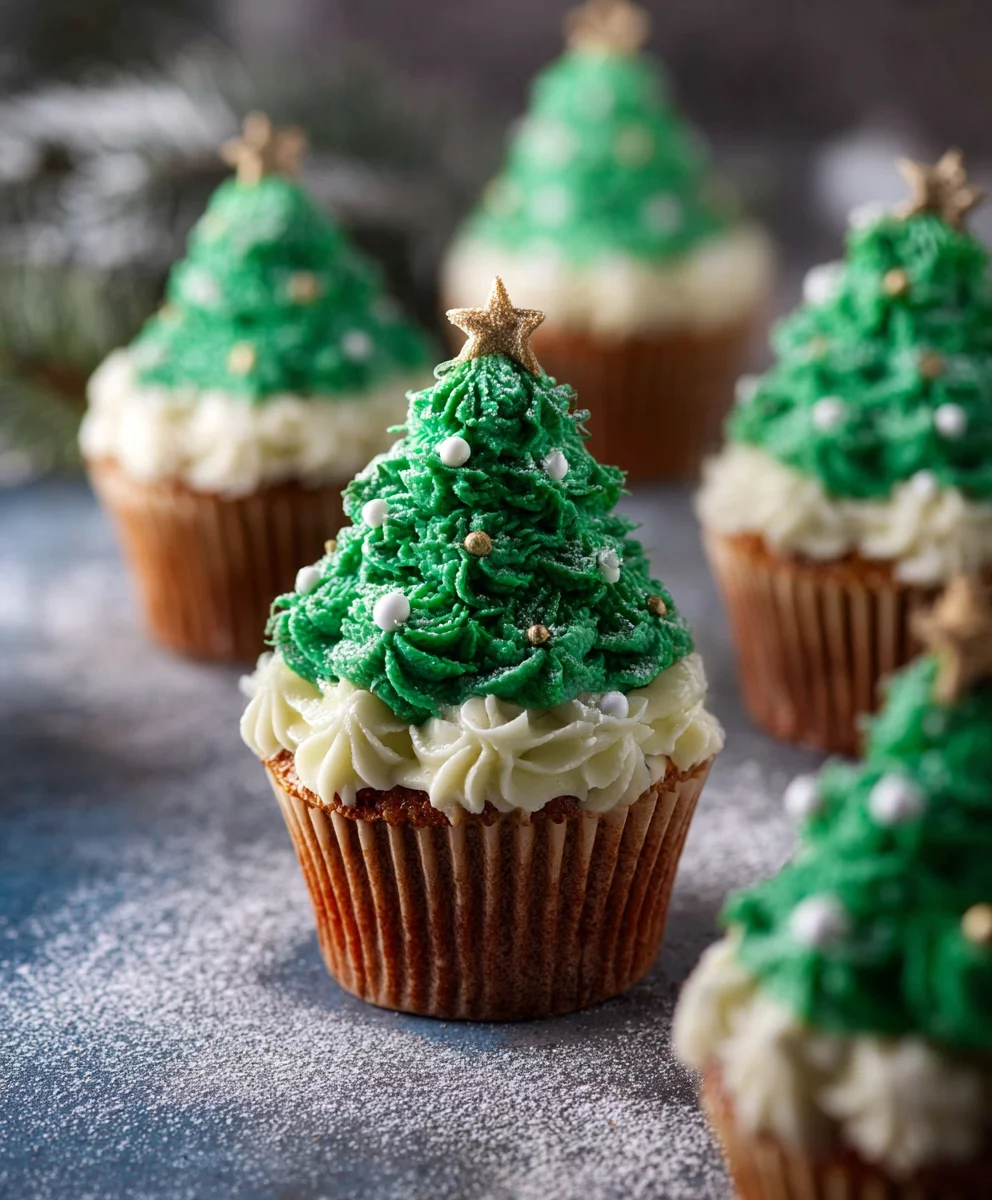
Christmas Tree Cupcakes are more than just a festive dessert; they’re a miniature edible masterpiece that captures the magic of the holiday season. Imagine the delight on your loved ones’ faces as they unwrap these adorable creations, each a tiny, frosted evergreen ready to be devoured. The joy of baking Christmas Tree Cupcakes isn’t just in the final, stunning presentation, but in the entire process – from whipping up a perfectly moist cake base to swirling vibrant green frosting like delicate pine needles. People adore these treats because they are utterly charming and surprisingly simple to make, bringing a touch of homemade wonder to any holiday gathering. What truly makes them special is the opportunity for personalization; you can adorn your Christmas Tree Cupcakes with edible glitter, colorful sprinkles, or even tiny candy ornaments, making each one a unique expression of your holiday spirit. Get ready to spread some cheer, one delicious, festive cupcake at a time!

Ingredients:
- 1 box chocolate cake mix (I like to use Betty Crocker Brand)
- ½ cup vegetable oil
- 3 large eggs
- 1 cup water
- 2 cups butter, softened to room temperature
- 10 cups powdered sugar
- 2 tbs vanilla extract
- 10 tbs heavy cream
- Pinch of salt
- Green Gel Food Coloring
- Star Sprinkles
- Christmas Pearls/Sprinkles
Chocolate Cupcake Base
Preparing the Batter
This recipe starts with a classic chocolate cake mix, which makes creating the perfect base for our Christmas Tree Cupcakes incredibly easy and reliable. To begin, preheat your oven to the temperature specified on the chocolate cake mix box, typically 350°F (175°C). Line a standard 12-cup muffin tin with cupcake liners. In a large mixing bowl, combine the entire box of chocolate cake mix, ½ cup of vegetable oil, 3 large eggs, and 1 cup of water. Using an electric mixer or a whisk, beat the ingredients together on medium speed for about 2 minutes, or until the batter is smooth and well combined. Be sure to scrape down the sides of the bowl occasionally to ensure everything is incorporated evenly. Overmixing can lead to tough cupcakes, so just mix until you no longer see streaks of dry ingredients.
Baking the Cupcakes
Once your batter is ready, evenly distribute it among the prepared cupcake liners, filling each about two-thirds full. This will allow the cupcakes to rise without overflowing. Place the muffin tin in the preheated oven. Bake for the time recommended on the cake mix box, usually around 18-22 minutes. You can test for doneness by inserting a toothpick into the center of a cupcake; if it comes out clean, they are ready. If it comes out with wet batter, bake for a few more minutes and test again. Once baked, carefully remove the muffin tin from the oven and let the cupcakes cool in the tin for about 5-10 minutes before transferring them to a wire rack to cool completely. It’s crucial that the cupcakes are entirely cool before frosting; warm cupcakes will melt the frosting, creating a very messy situation.
Green Vanilla Buttercream Frosting
Creaming the Butter and Sugar
Now for the star of our Christmas Tree Cupcakes – the festive green frosting! In a large mixing bowl, add 2 cups of softened butter. Softened butter is key for a smooth and creamy frosting, so ensure it’s not melted but pliable. Using an electric mixer on medium speed, beat the butter until it’s light and fluffy. This usually takes about 2-3 minutes. Gradually add 10 cups of powdered sugar, about a cup at a time, mixing on low speed until each addition is incorporated before adding more. This gradual addition prevents a cloud of powdered sugar from erupting in your kitchen! Once all the powdered sugar is incorporated, the mixture will be quite thick.
Achieving Frosting Perfection
To achieve the perfect frosting consistency, add 2 tablespoons of vanilla extract and a pinch of salt to the bowl. Now, slowly add 10 tablespoons of heavy cream, a tablespoon at a time, beating on medium speed. You’re looking for a smooth, spreadable consistency. If it’s too thick, add another tablespoon of heavy cream. If it’s too thin, add a little more powdered sugar. Continue to beat the frosting for another 3-5 minutes on medium-high speed. This whipping process incorporates air, making the frosting light and airy, which is perfect for piping.
Coloring the Frosting
For our Christmas Tree Cupcakes, we need vibrant green frosting. Add a few drops of green gel food coloring to the buttercream. Gel food coloring is preferred over liquid as it’s more concentrated and won’t affect the consistency of your frosting. Start with a small amount, mix it in thoroughly, and then add more gradually until you achieve your desired shade of green. Remember, you can always add more color, but you can’t take it away! Mix until the color is uniform throughout the frosting.
Decorating the Christmas Tree Cupcakes
Piping the Christmas Trees
Transfer your green frosting into a piping bag fitted with a star tip. If you don’t have a piping bag and tip, you can use a large zip-top bag with the corner snipped off, or even a spatula for a more rustic look. Take a completely cooled chocolate cupcake. Start piping a spiral from the outer edge of the cupcake, moving inwards and upwards to create a conical shape, resembling a Christmas tree. Try to build up the frosting layers slightly to give it dimension. You want the frosting to look like a stylized tree, not just a flat swirl. For taller trees, you can pipe in a zig-zag motion from bottom to top, creating a layered effect.
Adding the Festive Touches
Once your Christmas Tree Cupcakes are frosted, it’s time for the magical finishing touches! Immediately after piping each tree, gently press a few star sprinkles onto the very top of the frosting to mimic a tree topper. Then, artfully scatter Christmas pearls and other festive sprinkles around the “tree” and on the remaining frosting to represent ornaments and festive decorations. You can use a variety of shapes and colors to make each cupcake unique and exciting. Let your creativity flow! These edible decorations truly bring the Christmas spirit to life, transforming simple cupcakes into dazzling holiday treats.
Conclusion:
And there you have it – your delightful guide to creating these festive Christmas Tree Cupcakes! We’ve walked through each step, from baking the perfect vanilla base to crafting those adorable, edible evergreen masterpieces. I hope you feel inspired and confident to whip up a batch (or several!) of these for your holiday celebrations. These cupcakes are not just a treat for the taste buds, but a true showstopper for any festive gathering.
For serving, these Christmas Tree Cupcakes are fantastic as a dessert centerpiece, a delightful addition to a cookie platter, or even as a fun activity for kids to decorate themselves. They pair wonderfully with a warm mug of hot cocoa or a glass of festive punch. Don’t be afraid to experiment with different colored frostings and sprinkle combinations to create a whole forest of unique trees!
As for variations, consider infusing your cake batter with a hint of peppermint or almond extract for an extra layer of holiday flavor. You could also try a chocolate cake base for a richer taste. For a gluten-free option, simply swap out the all-purpose flour for your favorite gluten-free blend. The possibilities are truly endless, making these Christmas Tree Cupcakes a versatile holiday tradition.
I encourage you to embrace the joy of baking and decorating these festive treats. Remember, the most important ingredient is the love and cheer you put into them. Have a wonderful time creating and sharing these beautiful cupcakes!
Frequently Asked Questions:
Q1: How should I store my Christmas Tree Cupcakes?
For best results, store your decorated Christmas Tree Cupcakes in an airtight container at room temperature for up to 3 days. If your frosting is very delicate or your climate is particularly warm, refrigerating them might be a good idea, but let them come back to room temperature before serving for optimal texture and flavor.
Q2: Can I make the cupcake batter and frosting ahead of time?
Absolutely! You can bake the cupcake bases up to a day in advance and store them in an airtight container at room temperature. The frosting can also be made 2-3 days ahead and stored in the refrigerator; just bring it to room temperature and re-whip it before decorating for that perfect, fluffy consistency.
Christmas Tree Cupcakes Festive Fun Recipe
Easy and fun Christmas tree-shaped cupcakes perfect for holiday celebrations. This recipe uses a chocolate cake mix base and a vibrant green vanilla buttercream frosting, decorated with sprinkles.
Ingredients
-
1 box chocolate cake mix
-
½ cup vegetable oil
-
3 large eggs
-
1 cup water
-
2 cups butter, softened to room temperature
-
10 cups powdered sugar
-
2 tbs vanilla extract
-
10 tbs heavy cream
-
Pinch of salt
-
Green Gel Food Coloring
-
Star Sprinkles
-
Christmas Pearls/Sprinkles
Instructions
-
Step 1
Preheat oven to 350°F (175°C). Line a 12-cup muffin tin with liners. In a large bowl, combine chocolate cake mix, vegetable oil, eggs, and water. Beat on medium speed for 2 minutes until smooth. -
Step 2
Divide batter evenly into prepared cupcake liners, filling two-thirds full. Bake for 18-22 minutes, or until a toothpick inserted comes out clean. Cool in the tin for 5-10 minutes, then transfer to a wire rack to cool completely. -
Step 3
For the frosting: In a large bowl, beat softened butter until light and fluffy. Gradually add powdered sugar, mixing on low speed until incorporated. Add vanilla extract and salt. -
Step 4
Slowly add heavy cream, one tablespoon at a time, beating on medium speed until a smooth, spreadable consistency is reached. Beat on medium-high for 3-5 minutes until light and airy. Add green gel food coloring gradually until desired shade is achieved. -
Step 5
Transfer green frosting to a piping bag fitted with a star tip. Pipe a spiral from the outer edge of each cooled cupcake inwards and upwards to create a conical tree shape. -
Step 6
Immediately after piping each tree, gently press star sprinkles onto the top for a tree topper. Scatter Christmas pearls and other festive sprinkles around the ‘tree’ as ornaments.
Important Information
Nutrition Facts (Per Serving)
It is important to consider this information as approximate and not to use it as definitive health advice.
Allergy Information
Please check ingredients for potential allergens and consult a health professional if in doubt.
Leave a Comment